
Venues, rooms & calendars
Venues with rooms, pictures and documents, the room overview and the calendars. These texts sit right next to the fields inside Kursimple – here they are to read through.
Tabs of the venue page
List tab
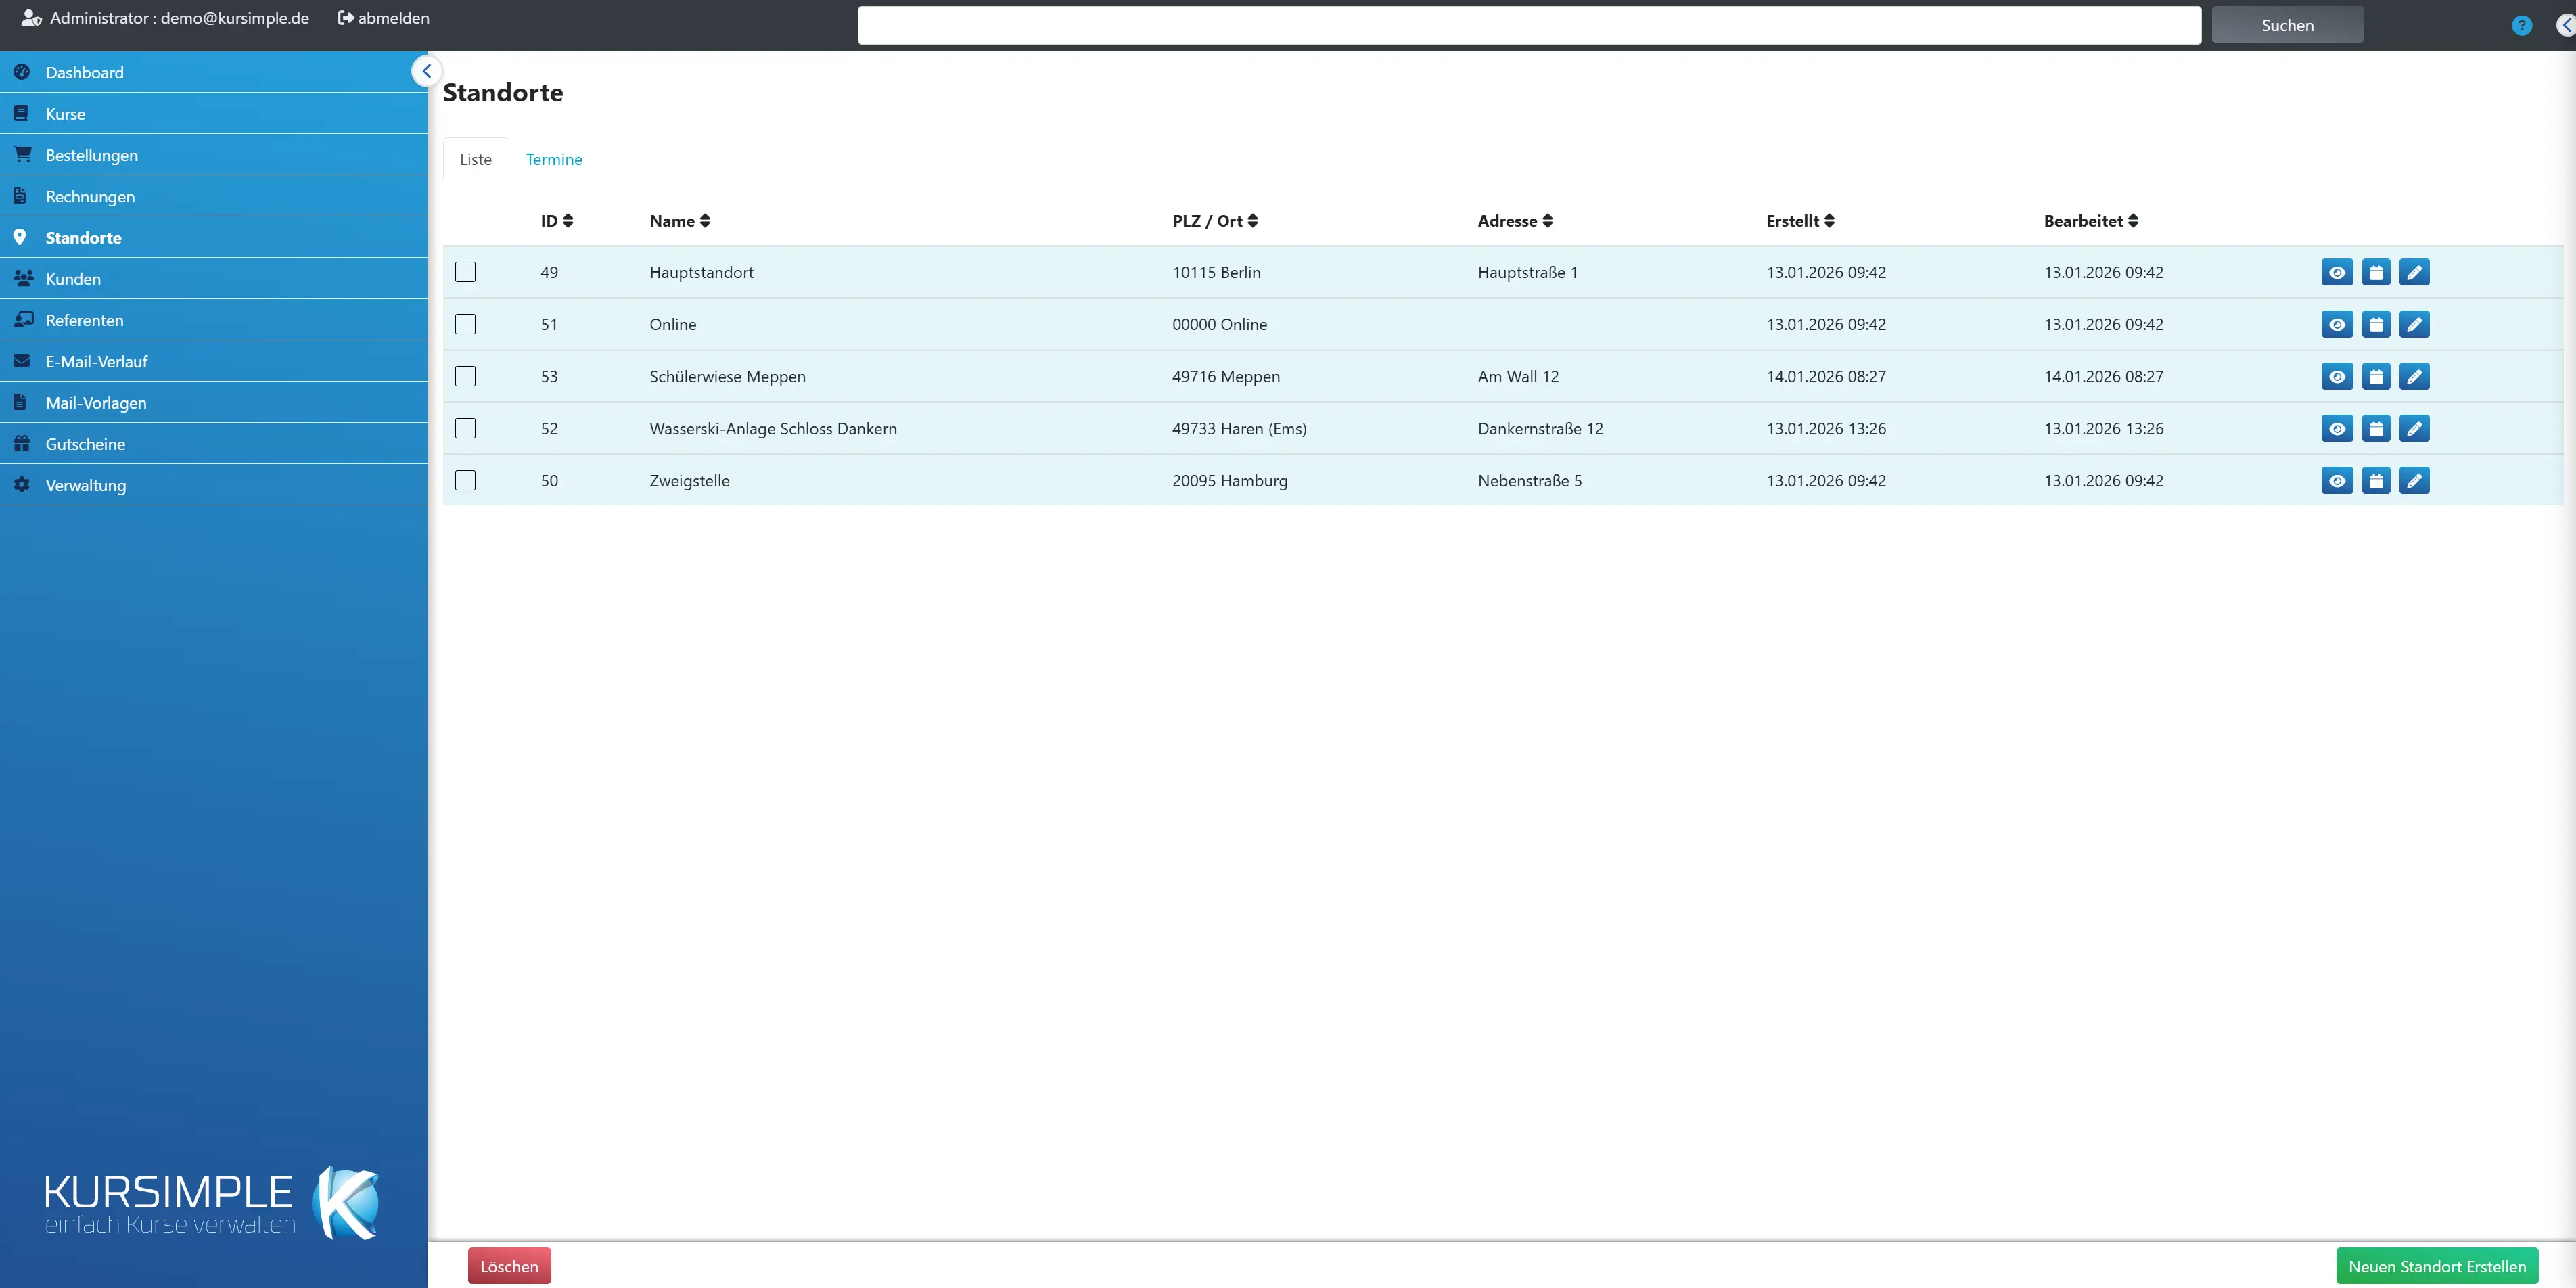
All venues as a table – here you create new locations and open existing ones for editing.
A location is a place with an address and optionally several rooms. Course sessions are assigned a location; the address then appears in the portal and in the order confirmation.
Sessions tab
A calendar of all course sessions, filterable by location – for checking when a place is occupied or free before you create a new session.
The week and day views show times and make overlaps visible.
Locations
Locations
Your venues. Every course session needs a location (or “No venue” for online courses). Here you create places with address and rooms; customers see the address in the portal and in the confirmation.
Procedure: “Create new location” → enter name and address, create rooms if needed → save → select under “Venue” in the course session.
With the checkboxes you mark locations for deletion – this only works if no session uses them any more. The eye opens the view with rooms, the calendar shows room occupancy, the pencil opens editing.
On saving, the system determines the coordinates from the address for the map display in the portal (provided a map service key is stored).
As a provider you see here only the locations assigned to your provider. You create new locations via “My locations”; they are then assigned to you automatically.
Selection
Checkbox for marking the locations you want to remove with “Delete” at the bottom.
Locations with assigned sessions cannot be deleted.
ID
Internal number of the location, assigned by the system.
Relevant for internal use only.
Name
This is what the place is called in the portal, in the course list and in the confirmation – e.g. “Studio North” or “St. Martin Parish Hall”.
Sortable via the heading. Change via the pencil.
Postcode / City
Postcode and city of the location – part of the address that customers see.
Sortable, e.g. to group locations by city.
Address
Street and house number. The system calculates the map position for the portal from it.
Typos here lead to wrong map markers – after saving, check the coordinates in the view.
Created
When the location was created.
Sortable via the heading.
Edited
When the location was last changed.
Sortable via the heading.
Actions
Eye = view with address, coordinates and rooms. Calendar = room overview with occupancy. Pencil = edit (address, rooms; further tabs for documents and pictures). Arrow with number = the course sessions at this location, grouped by course.
For room planning the calendar is the quickest entry point: you see immediately which room is occupied when.
The arrow appears only for locations with course sessions attached – directly or via one of their rooms. Each session in the expanded list leads to its editing; there you choose a different location. Once no session is attached any more, the location can be deleted.
Delete
Deletes the marked locations after confirmation. Locations that still have course sessions attached – directly or via one of their rooms – are kept; the message names them with the number of sessions (of which future). The others are deleted.
Assign the sessions to another location first, then the location can be deleted.
Deleting is meant for mistakenly created entries; you can simply leave former locations in place.
Create new location
Opens the form for a new place: name, street, house number, postcode, city and optionally rooms. After saving, the location is available for selection in course sessions.
Rooms are worthwhile if several courses run at the same time at one place – the room overview then shows overlaps.
Location
Location
The data of a location at a glance: address, map coordinates and rooms. Change via “edit”; you find documents and pictures there in their own tabs.
After creating, check here whether longitude and latitude are filled – otherwise the map marker is missing in the portal (correct the address and save again).
ID
Internal number of the location.
Relevant for internal use only.
Name
Name of the location as customers see it.
Change via “edit”.
Postcode
Postcode – part of the address in the portal.
Change via “edit”.
City
City – part of the address in the portal.
Change via “edit”.
Street
Street – part of the address in the portal and basis of the map position.
Change via “edit”.
House number
House number – part of the address.
Change via “edit”.
Longitude
Map coordinate that the system determines from the address on saving. Empty = the address could not be found or no map service key is stored.
If the value is empty: check the address (spelling, house number) and save the location again.
Latitude
Map coordinate like the longitude – together they set the marker on the map in the portal.
Determined automatically, not entered by hand.
created
When the location was created.
For orientation.
last edited
When the location was last changed.
For orientation.
Rooms
The rooms of this location with name, number, floor and building. Rooms are assigned in the course session under “Room”; the room overview then shows occupancy and overlaps.
You can create and change rooms via “edit” in the “Rooms” section.
delete
Deletes this location after confirmation – for administrators only and only if no course session uses it or one of its rooms. Otherwise it is kept and the message names the number of sessions (of which future).
Assign affected sessions to another location beforehand.
back to overview
Back to the location list. Nothing was changed here.
All details are display only.
edit
Opens the form for address and rooms. There you also find the tabs “Documents”, “Pictures” and “Room overview”.
Changes to the address take effect immediately for all sessions of this location.
Session calendar of the locations
Session calendar of the locations
All course sessions in the calendar, with location, room, speakers and participants. Choose a location at the top to see only its sessions – this is how you find free times for a new session.
For planning at a place with several rooms, the room overview of the location (calendar icon in the location list) is even more precise: it shows the occupancy per room.
Course, speakers, participants and location are linked and open in a new tab; each session also has the link “Participant list (PDF)” – see the help icon “Links in the session”.
Choose location
Shows only the sessions of the chosen location. “All” removes the filter. The selection takes effect immediately.
The filter is kept when you page between months.
Calendar view
Month, week or day via the buttons at the top right. Week and day show times – ideal for spotting overlaps.
The month gives the overview, the week the details.
Navigation
With the arrows you page back and forth, “today” jumps to the current date.
The location filter is kept.
Links in the session
Each session links into a new tab: the course title to the course, speakers to the speaker, participants to the customer's participant list, the location to the location. “Participant list (PDF)” opens the list of the session in a new tab – in the month view as “PDF” after the title.
As a speaker you see the links only for your own sessions: course title and participants lead to the participant page of your course, plus the participant list as PDF. For administration and read-only accounts the admin links apply.
In the week and day view a session grows when you hover over it with the mouse so that all details are legible.
“Print” at the top right opens the currently selected view as a PDF in a new tab – with the same period and location filter. Month, week and day fit on one A4 page, the session overview runs over several pages.
Month and week appear in landscape format, the day in portrait. If not all sessions fit in a cell, “+ n more” is shown there, and long course titles are shortened – you get the complete list with room, speakers and places if you first switch to “Session overview”.
Calendar
Calendar
All course sessions in the calendar, filterable by location. Speakers see their own sessions here. A click on a session opens the details.
For speakers this is the quickest look at their own week; for administration an overview of all places.
Choose location
Shows only sessions of the chosen location; empty means all locations. The selection takes effect immediately.
The filter is kept when paging.
Calendar view
Month, week or day via the buttons at the top right. Week and day show times.
Ideal for spotting overlaps.
Navigation
Page with the arrows, “today” jumps to the current date.
The location filter is kept.
Location documents
Location documents
Files that belong to this place – floor plans, rental agreements, directions, house rules. Upload via title + “Upload file” + “save”; optionally assign to a room.
This way colleagues and instructors find a place’s documents in one spot. Each document shows who uploaded it and when. Customers do not see these files.
search
Searches the titles of this location’s documents. Enter a term and click “search”.
An empty field and “search” shows all again.
Upload document
Enter a title, choose a file, assign a room if needed, “save”. Only then is the document saved.
After saving, the document appears in the list below.
Document title
A descriptive title so the document can be found later – e.g. “Floor plan ground floor” or “Rental agreement 2027”.
The file name alone (“scan001.pdf”) will help nobody later.
Upload file
Chooses the file from your computer. Then check the title above and click “save”.
Large files take a moment; wait for the confirmation.
Document list
All documents of the location. Use the checkboxes to mark entries for deletion; the pencil changes the title and room assignment.
Sort via the column headings Date and Description.
Date
When the document was uploaded.
Sortable.
Description
The title assigned on upload.
Sortable; change via the pencil.
Room
The room the document belongs to – e.g. a floor plan. Empty = applies to the whole location.
Change via the pencil in the row.
File
File name; clicking opens or downloads the file.
Stored separately per tenant on the server.
Employee
Who uploaded the document – the right contact person for queries.
Taken automatically from the logged-in user.
Delete
Permanently deletes the ticked documents – after confirmation.
Mark entries via the checkboxes first.
Edit document
Change the title and room assignment of a document. The file itself stays – to replace the file, delete it and upload again.
Apply with “save”.
Name
The title shown in the document list.
Short and unambiguous.
Room
Optional: the room the document belongs to.
Leave empty for the whole location.
Edit location
Edit location
Name, address and rooms of the location. Changes apply immediately to all sessions at this place. When saving, the map coordinates are recalculated from the address. Further tabs: Documents, Images, Room Overview.
If a location has moved, change the address here – future confirmations show the new one. For an additional place, create a new location instead.
Location name
Required field. This is what the place is called in the portal, in the course list and in the order confirmation – e.g. “Studio North”, not just the street.
Short and understandable for customers.
Street
Street of the address – customers see it in the portal; the map position is calculated from it.
Enter the house number in the field next to it.
House number
House number, with a suffix if needed (12a).
Important for the map position.
Postcode
Postcode of the location.
Part of the address in the portal.
City
City or municipality of the location.
Part of the address in the portal.
Rooms
The rooms of this place, each with name (required), number, floor and building. Use “add” to add a room, the X removes it. You then assign rooms in the course session under “Event room”.
Rooms are worthwhile as soon as several courses run in parallel at one place: the room overview then shows the occupancy per room.
A room that is still used in course sessions is kept when saving: a message gives the number of sessions, and your other changes are saved anyway. Assign the sessions to another room first.
save
Saves address and rooms, recalculates the map coordinates and returns to the list (“Location saved”).
Required fields are outlined in red as long as they are empty.
cancel
Discards unsaved changes and returns to the location list.
Saved data remains unchanged.
Edit tab
Name, address and rooms of the location.
Changes affect all sessions at the place.
Documents tab
Upload and manage floor plans, contracts and other files for the location.
Visible only to your team.
Images tab
Upload, caption and sort photos of the place for the booking portal.
A good photo of the course room helps customers find their way.
Room Overview tab
Calendar of the room occupancy of this location – shows which room is occupied by which course and when.
Visible only to administrative roles.
Room name
Required field. This is what the room is called in the course session and in the room overview, e.g. “Studio 1” or “Large seminar room”.
Short and unambiguous within the location. You remove a room with the red X in its row – merely clearing the name is not enough, the form then reminds you of the missing name.
Room number
The number on the room (e.g. “2.04”) – helps participants on site. Optional.
Appears in the location view.
Building
With several buildings at one place: which one the room is in. Optional.
For participants’ orientation.
Floor
Floor of the room, e.g. “GF” or “2nd floor”. Optional.
For participants’ orientation.
Location images
Location images
Photos of the place for the booking portal: upload, add title and author, sort. Only “save” applies the changes. JPEG, PNG, GIF and WebP are allowed.
A photo of the entrance or the course room takes away customers’ uncertainty on their first visit. Mind the image rights and enter the author.
Upload images
Use the field to choose one or more image files (JPEG, PNG, GIF, WebP). Each image then gets fields for title, author and description.
Use landscape format with sufficient resolution.
Image gallery
The uploaded images in the order in which they appear in the portal. Sort by dragging, remove via the X; caption the fields of each image.
The first image is used as the main image.
save
Applies uploaded, changed and removed images (“Images saved”). Without saving, new uploads are lost.
The portal then shows the new state.
back to overview
Back to the location list without saving the image changes.
Saved images are kept.
Title
Short image title – appears as a caption in the gallery and as alternative text.
Describe what can be seen (“Seminar room overlooking the garden”).
Author
Photographer or rights holder – output as the image credit; for third-party photos usually required by the licence.
For your own photos, the name of your organization.
Description
Optional text for the image, e.g. notes on directions or the entrance.
Can remain empty.
Create a venue
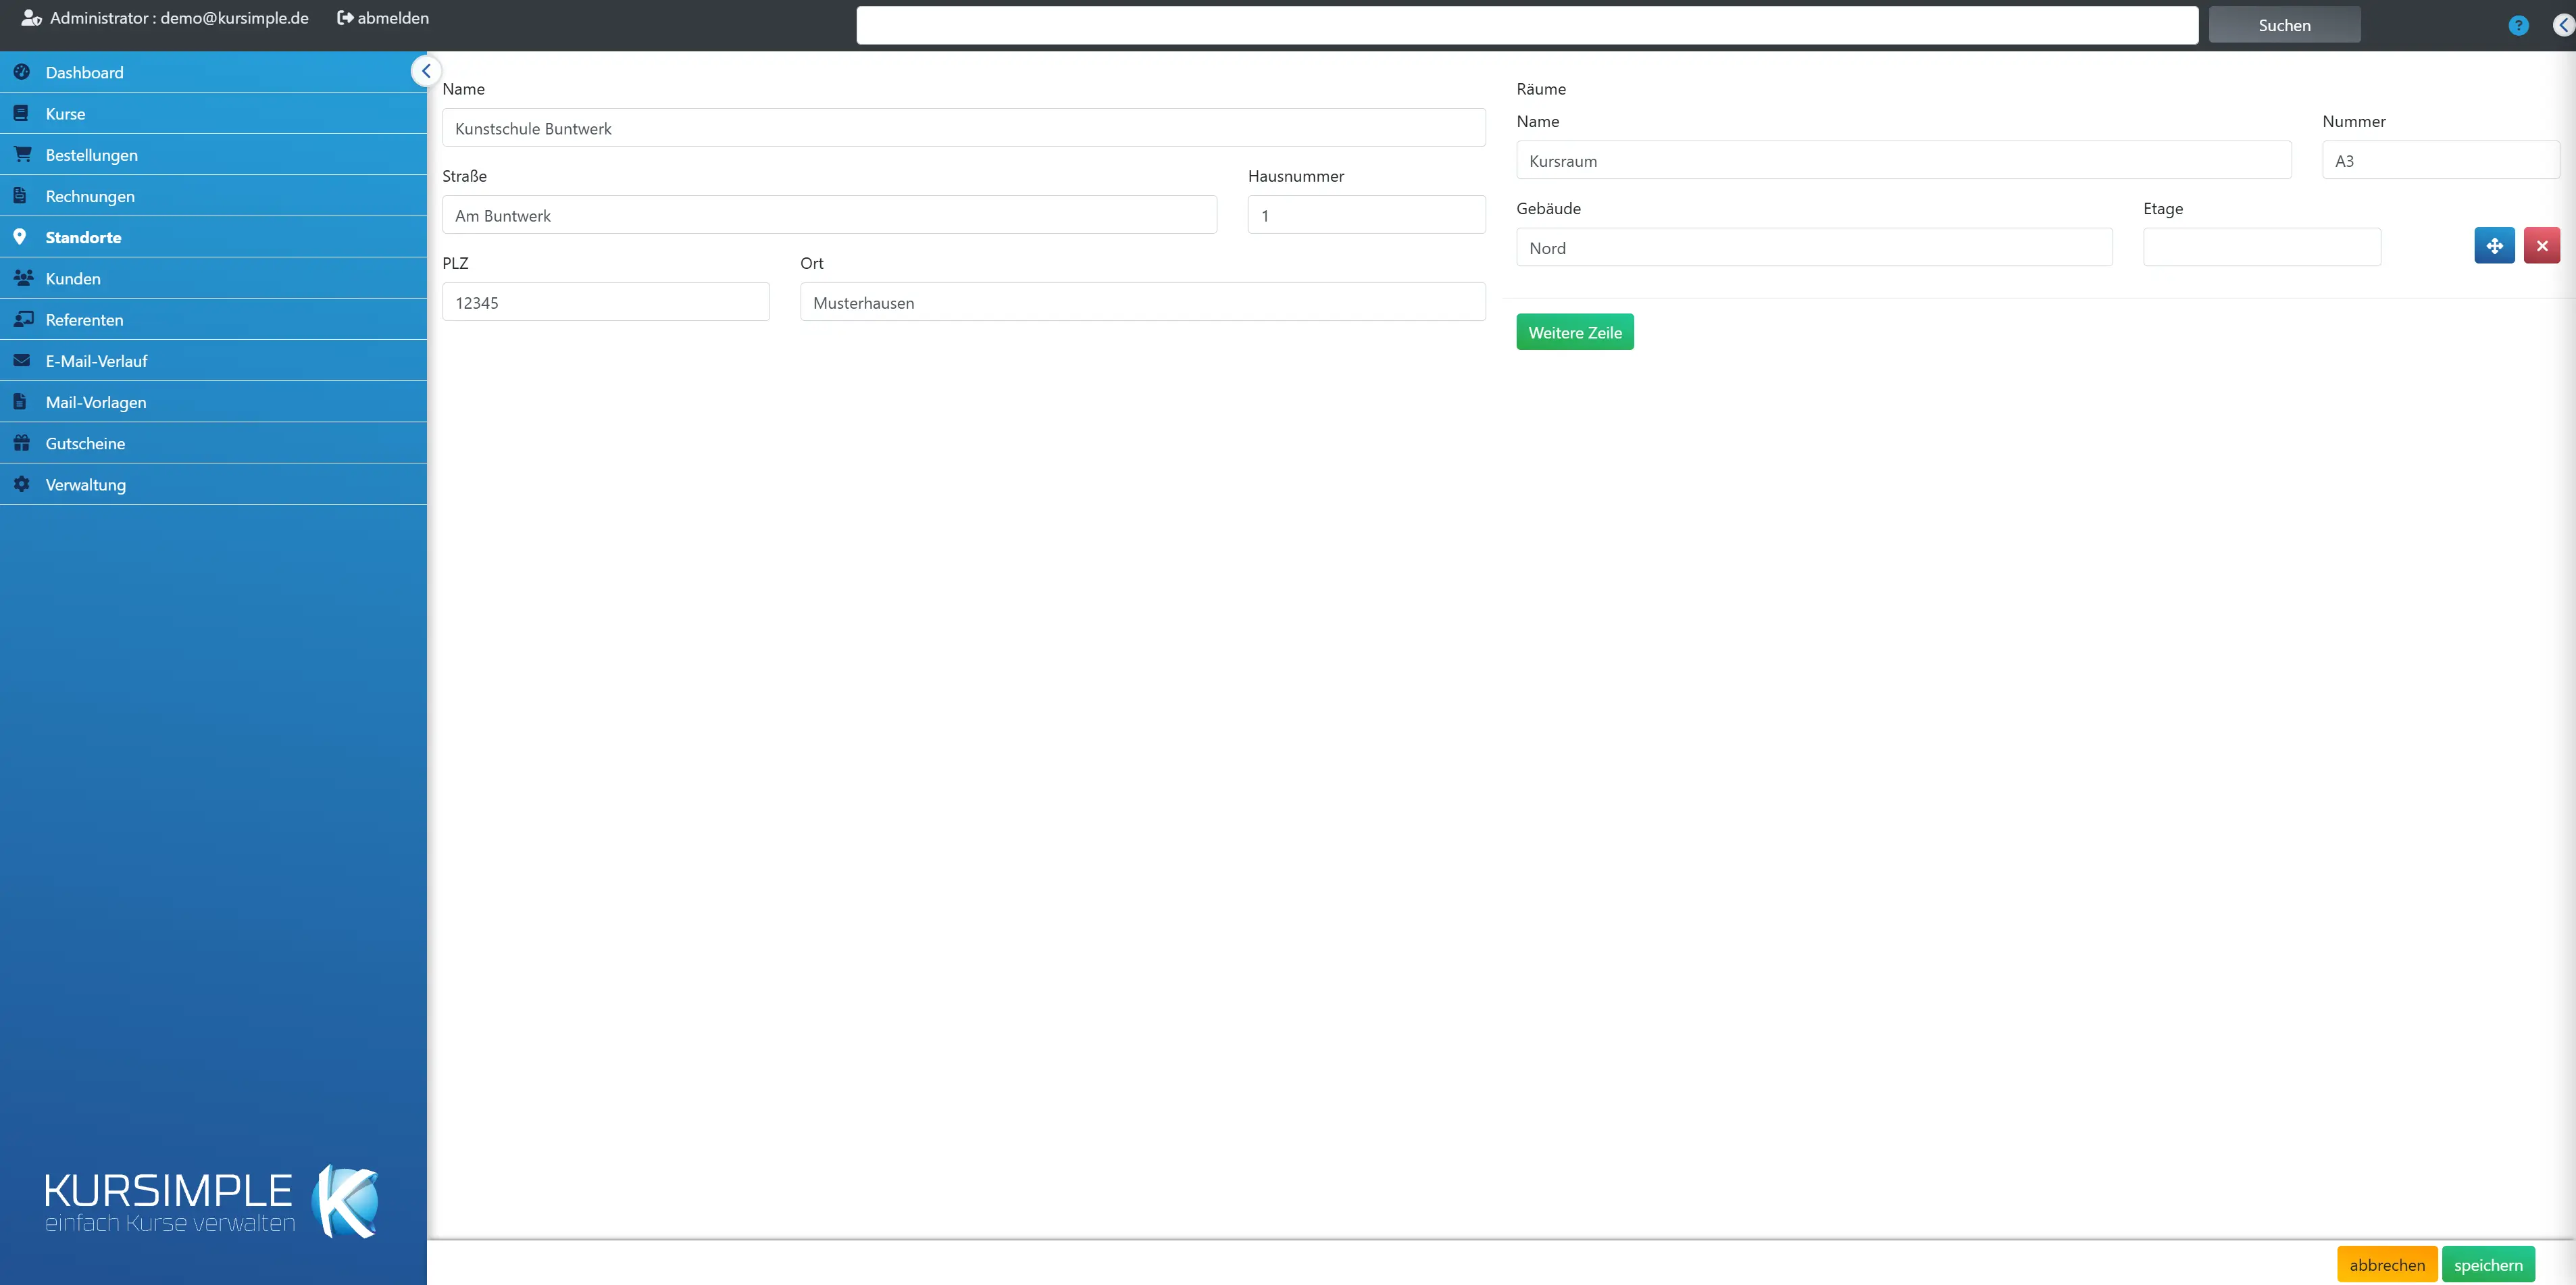
Location name
Required field. This is what the place is called in the portal and in the order confirmation – e.g. “Studio North”, not just the street.
Short and understandable for customers.
Street
Street of the address – customers see it in the portal; the map position is calculated from it.
Enter the house number in the field next to it.
House number
House number, with a suffix if needed (12a).
Important for the map position.
Postcode
Postcode of the location.
Part of the address in the portal.
City
City or municipality of the location.
Part of the address in the portal.
Rooms
Optionally create rooms right away (name, number, floor, building) if several courses run in parallel at the place. You assign rooms later in the course session under “Event room”.
Rooms can also be added later via “edit”.
save
Creates the location, determines the map coordinates from the address and returns to the list (“Location created”). Then select it in the course session.
Required fields are outlined in red as long as they are empty.
cancel
Discards the input; no location is created.
Back to the location list.
Room Overview
Room Overview
The occupancy calendar of this location: you see which room is occupied by which course session and when. With the room filter you narrow it down to individual rooms – this is how you find free times for new sessions and spot double bookings.
Sessions without a room assignment appear only at the location, not at a room – assign an “Event room” in the session so the overview is complete. Course, instructors and participants are linked (new tab), every session has the link “Participant list (PDF)” – see the help icon “Links in the session”.
Room filter
Shows only the occupancy of the chosen room. Without a selection, you see all rooms of the location.
The selection takes effect immediately and is kept when paging.
Calendar view
Month, week or day via the buttons at the top right. Week and day show times – there you spot overlaps of two courses in the same room.
Different colours stand for different courses.
Navigation
Use the arrows to page forwards and backwards; “today” jumps to the current date.
The room filter is kept.
Links in the session
Every session links into a new tab: the course title to the course, instructors to the instructor, participants to the customer’s participant list. “Participant list (PDF)” opens the session’s list in a new tab – in the month view as “PDF” after the title.
As an instructor you only see the links for your own sessions: course title and participants lead to the participant page of your course, plus the participant list as a PDF.
“Print” at the top right opens the currently chosen view as a PDF in a new tab – with the same period and room filter. Month, week and day fit on one A4 page, the session overview runs over several pages.
Month and week appear in landscape format, the day in portrait format. If not all sessions fit in a field, it says “+ n more” there, and long course titles are shortened – you get the complete list with room, instructors and places if you switch to “Session overview” beforehand.
Rather see it than read about it?
In 30 minutes we will show you Kursimple with your own course programme. Or set up your own test system in 30 seconds – both free and without obligation.
Questions? +49 5931 990 99 10 · Mon–Thu 8:30–17:30, Fri 8:00–14:00 (CET)