
Orders, waiting list & withdrawal
Viewing and editing orders, the waiting list, online withdrawals and the occupancy check. These texts sit right next to the fields inside Kursimple – here they are to read through.
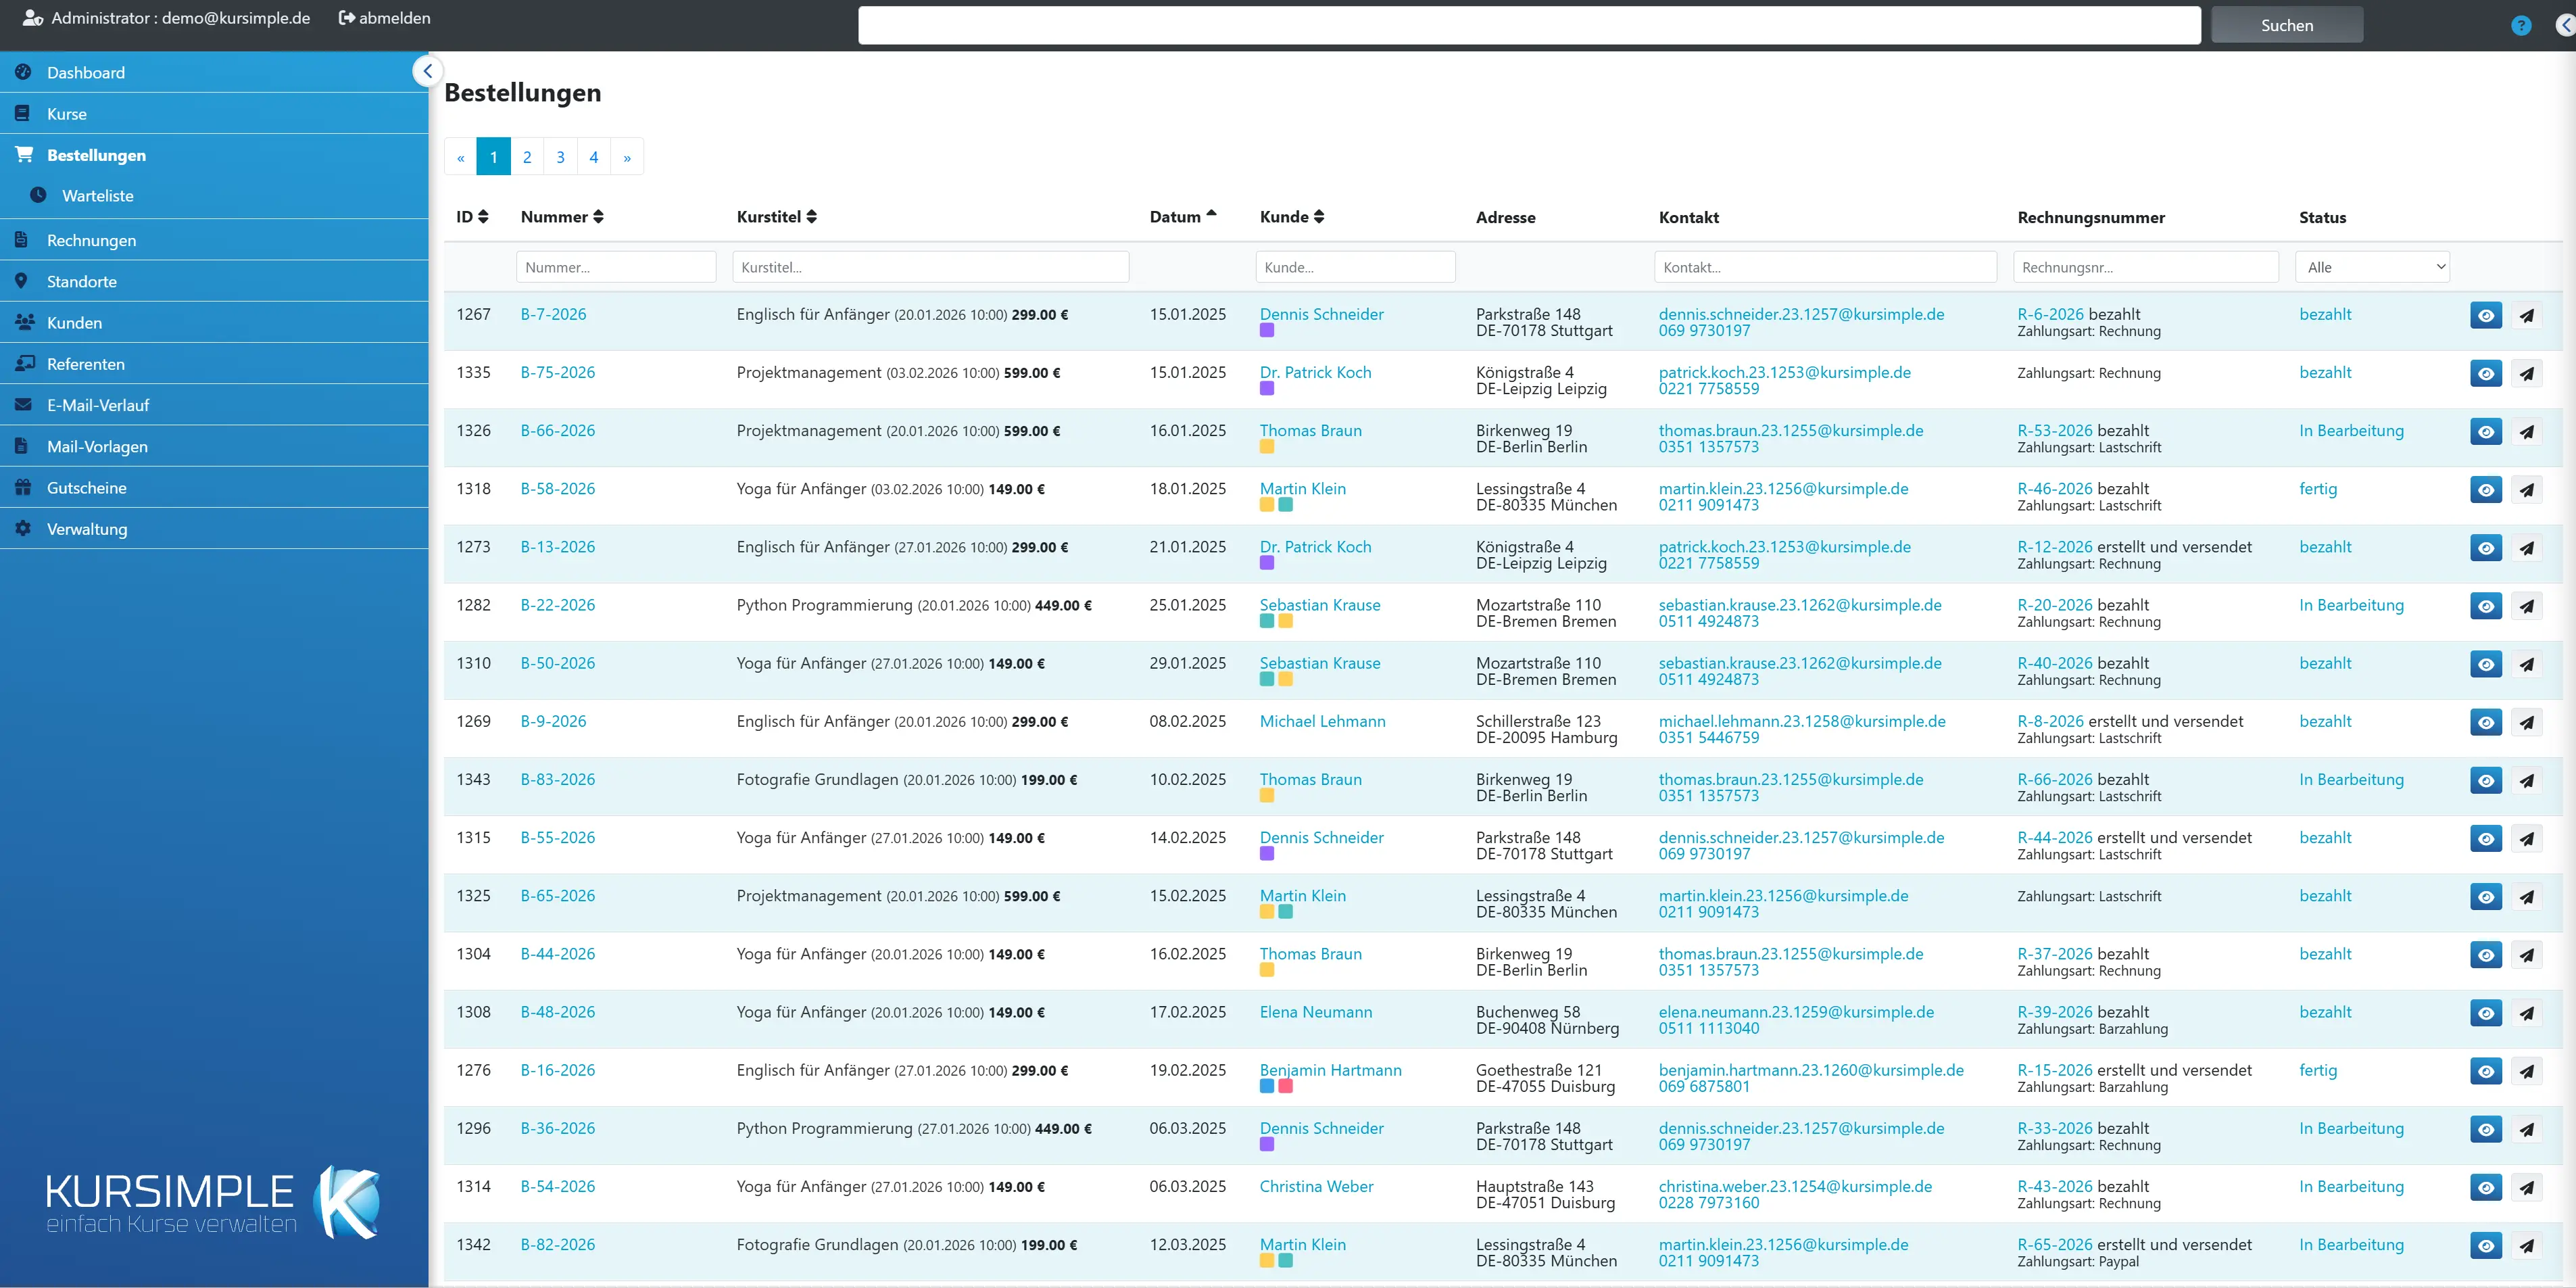
Orders
Orders
Every booking ends up here – whether the customer made it themselves in the booking frontend or you created it in the administration. From here you review new orders, create invoices and send confirmations.
The list shows all orders of your tenant, newest first. Each row is an order with the booked courses, the customer, the invoices and the processing status.
This is how you typically work through the list:
- In the “Status” field, filter by “On hold” – these are the orders nobody has touched yet.
- Open an order via the eye icon and check customer, session and participants.
- Create the invoice there (“Create invoice”) and finalize it – the order automatically changes to “In progress”.
- When everything is done, set the status to “done” or “paid”.
Sorting: click a column heading (ID, number, course title, date, customer). Filtering: type into the fields below the headings – the list updates itself. Paging: via the page numbers above the table.
Creating a new order: this is not done here but from the customer record. Open the customer, switch to the “Orders” tab and click “New order”. This ensures that the customer’s address and participants are taken over.
Number
The order number the customer received in their confirmation. If a customer names a number on the phone, this is it.
The order number is assigned sequentially on creation and never changes afterwards. It appears in the order confirmation, on the invoice and is entered by the customer in the withdrawal form.
Tip: if a customer asks about their booking, enter the number in the “Number…” filter field – part of the number is enough.
An orange star after the number marks a membership application: the order collects the fee invoices of a member. Hover over it with the mouse to see the membership.
Course title
What was booked: per line item the course, the session and below it the participants. Clicking the course opens the course, clicking the date opens the session.
An order can contain several line items, for example two courses or a course plus material costs. For each item you see:
- the course title – clicking opens the course
- in brackets the session with time – clicking opens the course session
- below it the participants – clicking opens the customer’s participant list; an asterisk means the participant left a remark when booking (readable in the tooltip)
- a green badge if a voucher was applied to the item
- a coloured badge if the course has an additional form (e.g. health questionnaire) – as long as it is not filled in, you can resend the form email with a click
Date
The day the order was received. The customer’s withdrawal period runs from here.
For bookings via the frontend, this is the day of booking. For orders you create yourself, today’s date is prefilled – you can change it in the edit form if you are, for example, entering a phone booking from last week afterwards.
The date also determines in which month the order appears in the figures on the dashboard.
Customer
Who ordered. Clicking opens the customer record. The coloured squares are the customer’s tags – you see the tag’s name when you hover over it with the mouse.
The orderer is the person who receives the invoice. They do not have to take part in the course themselves – children or partners appear as participants in the “Course title” column.
If “Customer not active” appears here, the customer has meanwhile been deactivated. The order is still fully preserved.
Address
The customer’s address as it was at the time of the order. If the customer moves later, the old address stays here.
This is intentional: invoices must still match the address they were sent to years later. You always find the current address in the customer record.
If an order that has not yet been billed should get the new address, first correct the customer and then save the order once again in the edit form – the address is then taken over afresh.
Contact
Email and phone of the customer. Clicking the email address opens the send dialog with this order as reference, clicking the phone number starts a call.
Via the send dialog you write to the customer directly from the list, for example when a session is postponed. The email is saved in the email history with a reference to this order, so you can later trace what you wrote to the customer.
Invoice number
The invoices for this order. Clicking opens the invoice. If the column is empty, no invoice has been created yet – you do that in the detail view.
An order can have several invoices: for example a partial invoice per course or, after a cancellation, the invoice plus the associated credit note.
Empty? Then open the order via the eye icon, tick the items and click “Create invoice”.
Status
The processing status. Clicking the status moves one step on after confirmation: On hold → In progress → done. A yellow “Withdrawal” badge means: decide the withdrawal first, then continue working.
The states mean:
- On hold – newly received, not yet processed. Only in this state can the order still be edited.
- In progress – you have started; is set automatically when an invoice is created.
- done – completed, nothing more to do.
- paid – the customer has paid (set the status once you have booked the payment receipt).
- cancelled – cancelled; the places are free again.
Clicking the status: after a confirmation prompt, the order moves one step on (On hold → In progress → done → On hold again). Only the status is changed – no emails are sent and no invoices created. For “paid” and “cancelled” you use the detail view.
Withdrawal pending: the yellow badge shows that the customer has withdrawn via the frontend. Click it to reach the withdrawal management and decide the case before you write an invoice.
Actions
Eye = view order, pencil = edit (only while “On hold”), paper plane = send order confirmation to the customer.
- View (eye): opens the detail view with all items, invoices and the status form. The real work happens here.
- Edit (pencil): opens the edit form to change session, participants, prices or payment method. The pencil only appears while the order is “On hold” – afterwards invoices usually exist already, and changes go via cancellation and re-creation.
- Send confirmation (paper plane): sends the customer the order confirmation with all items. Use this if you created an order yourself (then no email goes out automatically) or the customer did not receive the confirmation.
Reset all filters
Clears all filter fields at once and shows the complete list again. Only appears if a filter is currently active.
If you miss orders, first check whether a filter is still set – for example a status or a remainder in the “Customer…” field. One click here clears everything.
Filter by order number
Type the order number from the customer’s enquiry – part of it is enough. The list filters as you type.
The X next to the field clears only this filter. If nothing is found, check whether the customer perhaps named the invoice number – there is the “Invoice no…” field for that.
Filter by course title
Shows only orders containing a course with this text. Handy for seeing all bookings for a course, e.g. before postponing a session.
The course titles of all items are searched. If you want to write to all participants of a course at once, the route via the course itself (“Participants” tab) is usually more convenient.
Filter by customer
Searches the orderer’s first and last name. Participant names (e.g. the child) are not found here – use the search in the customer record for that.
Part of the name is enough, upper and lower case do not matter.
Filter by contact
Searches email address and phone number. Helpful if a customer calls and you only see the number on the display.
Here too, part of the address is enough, for example just the domain “@company.com”, to find all orders of a company.
Filter by invoice number
Finds the order for an invoice number, e.g. if only the invoice number appears on a bank statement.
Enter the number or part of it. The order found shows all associated invoices in the “Invoice number” column.
Filter by status
Shows only orders in a particular state. Choose “On hold” to work through all still unprocessed orders.
Special case “Waiting list”: shows orders in which at least one participant is waiting for a free place. You find the same cases more clearly in the “Waiting List” menu item.
“Memberships” (only with the module switched on): shows the membership applications. The fee invoices of a member collect on each; its total is the total of these invoices.
“All” removes the filter again.
Order details
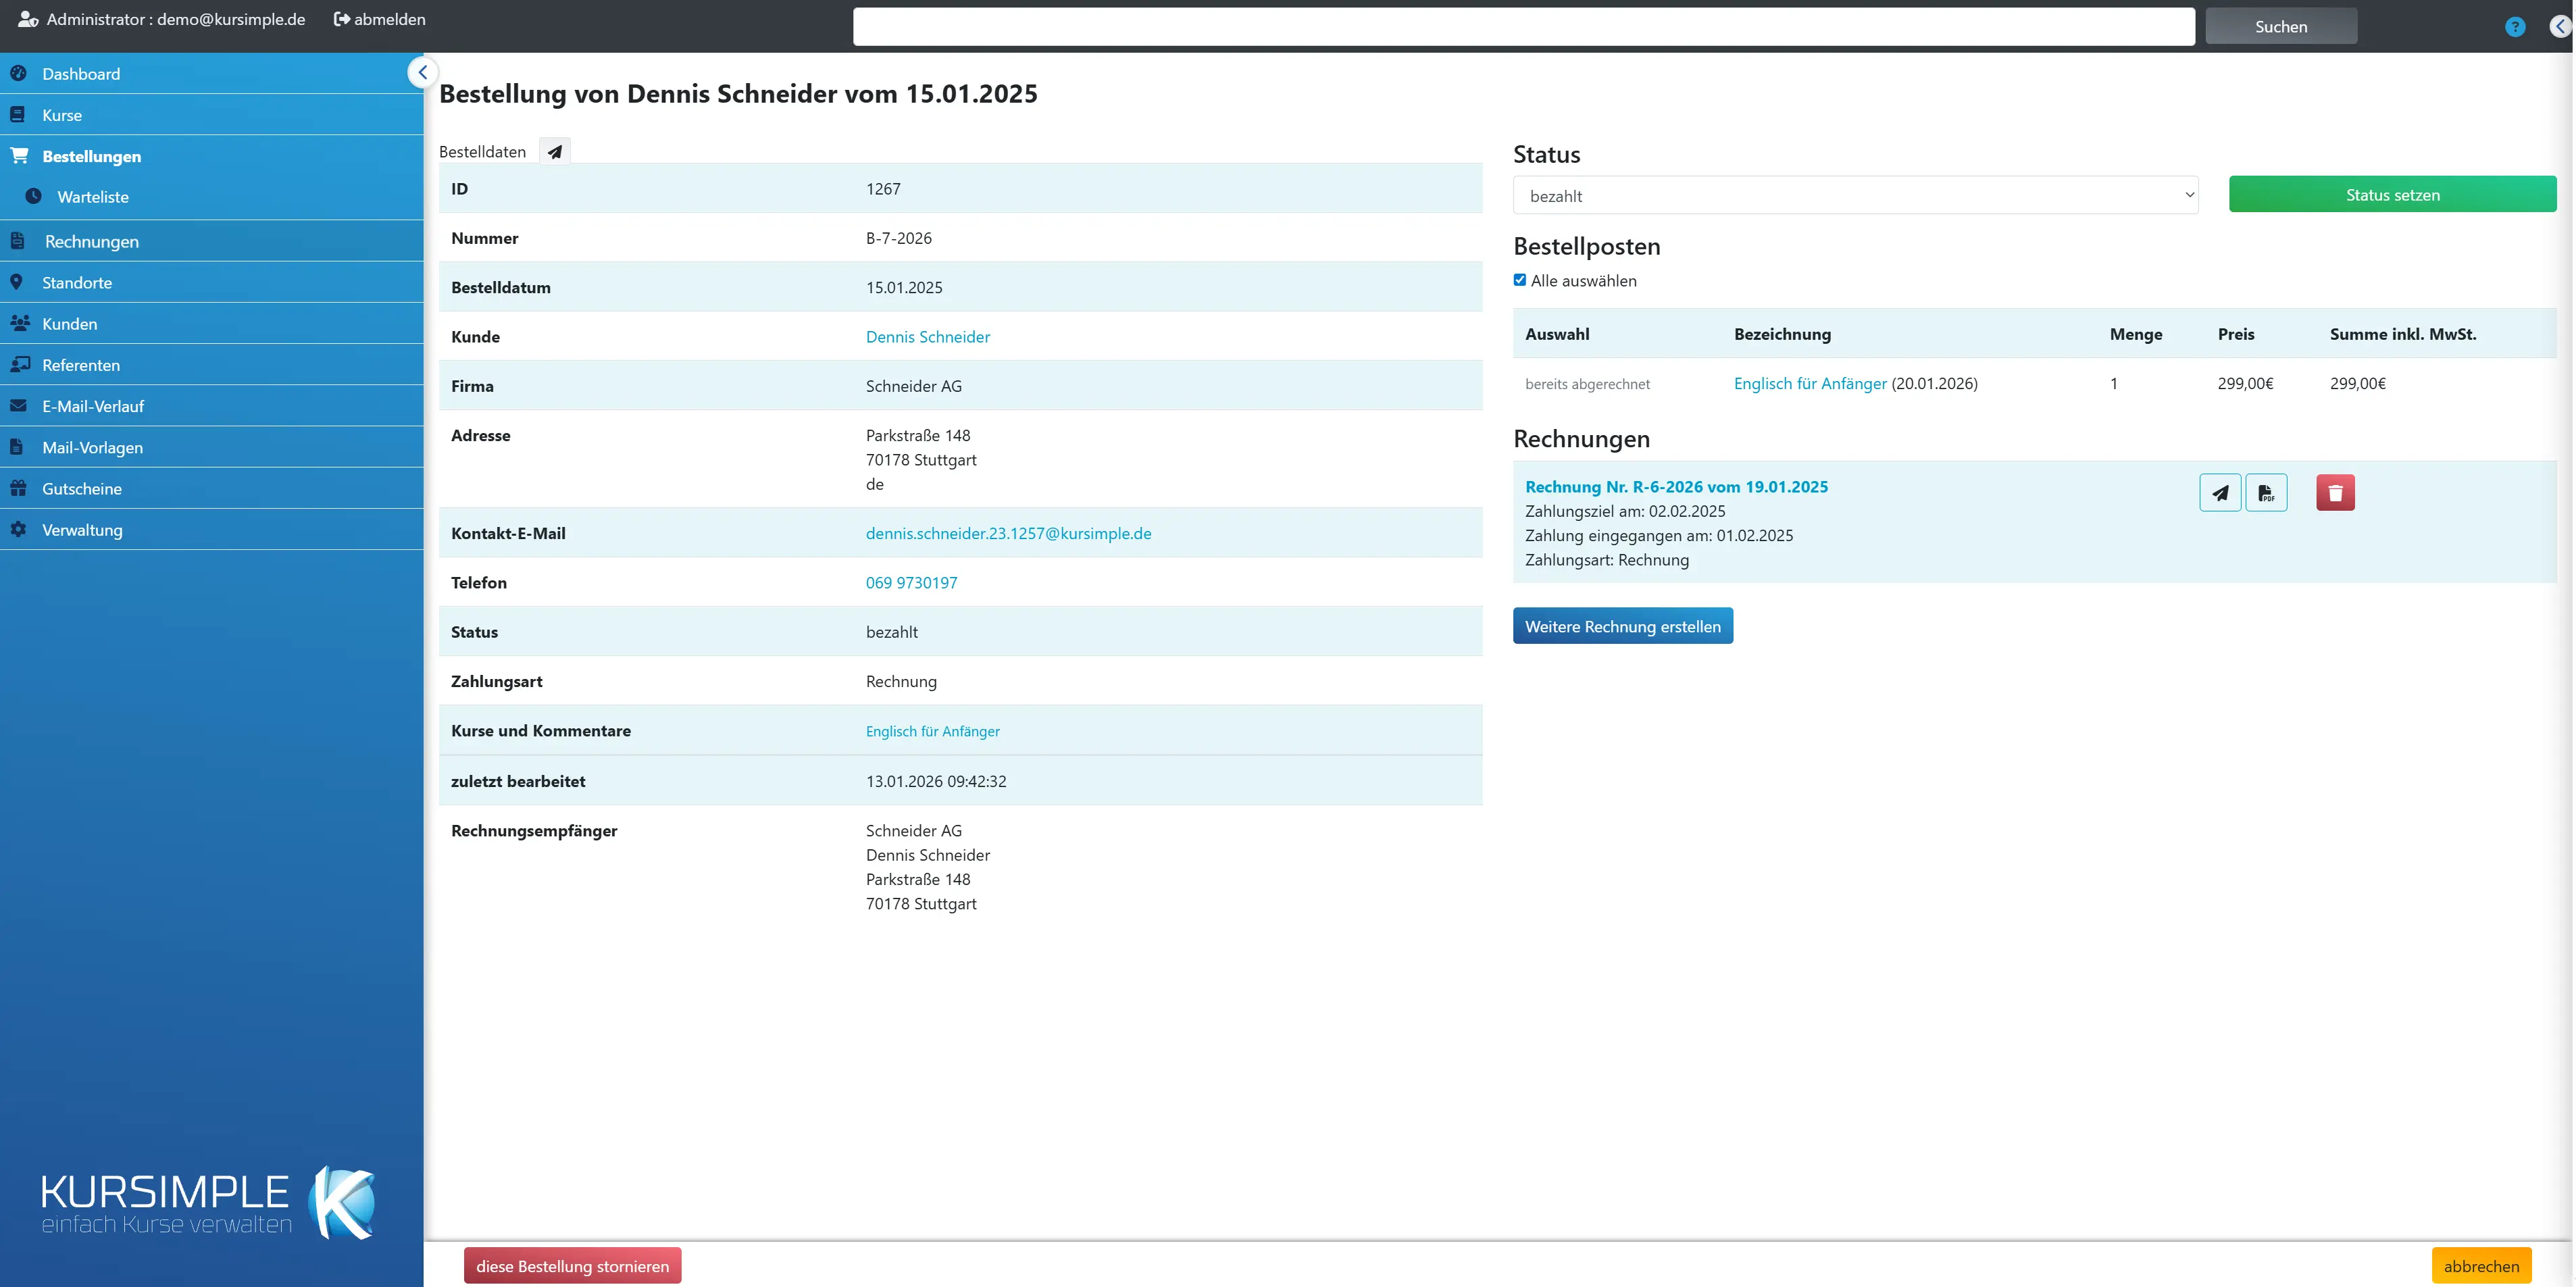
Order details
The working page for an order: here you check the details, create and send the invoice, set the status or cancel.
The page is structured from top to bottom:
- Header data – customer, address, contact, payment method, voucher and the booked courses with comments and additional forms.
- Status – set the processing status.
- Reservations – only visible if participants are on the waiting list.
- Order items – the items with prices; here you tick what should go into the invoice.
- Invoices – all invoices and credit notes with their actions as well as the “Create invoice” button.
The usual procedure for a new order: check items → “Create invoice” → in the invoice list “Finalize and send invoice” → later, when payment is received, set the status to “paid”.
At the very bottom left is “cancel this order” – the way to go if the customer cancels.
Edit order
Opens the edit form for session, participants, prices, payment method and order date. The button only exists while the order is “On hold”.
As soon as you have created an invoice or advanced the status, the button disappears. The reason: an order that has already been billed must not change silently any more.
Do you still have to change something? Then you cancel the invoice concerned (“Invoices” section), reset the status in the status form to “On hold” and then edit. Or you cancel the whole order and create it anew from the customer record.
Send confirmation
Sends the customer the order confirmation with all items. When creating in the administration, no confirmation goes out automatically – click here if the customer should receive one.
The email is generated from your tenant’s order confirmation template (Administration → Application Data) and saved in the email history with a reference to this order. Afterwards you land back in the order list with the message “Order confirmation has been sent”.
You can send the confirmation as often as you like, e.g. if the customer could not find it. If the order contains no items, an error message appears instead.
Status
The current processing status – for display only. You can change it further down in the “Status” section.
What the individual states mean is explained in the help for the “Status” column in the order list. In short: “On hold” = new, “In progress” = invoice created, “done”/“paid” = completed, “cancelled” = cancelled.
Withdrawal
Only appears if the customer has withdrawn this order via the frontend. Decide the withdrawal first – if approved, the order is cancelled automatically.
You see the date and time of receipt and, if given, the customer’s reason. The yellow button takes you to the withdrawal management, where you grant or reject the withdrawal.
Important: do not create a new invoice while the withdrawal is open. If approved, the system cancels the order including invoices and writes to the customer – you then have nothing more to do by hand.
Payment method
How the customer wants to pay: invoice, direct debit, PayPal or cash. For direct debit, the IBAN with which the order was made is shown next to it.
The payment method determines what happens with the invoice: with invoice the customer transfers the money, with direct debit the finalized invoice goes into the SEPA export for collection, with cash you collect on site, PayPal was already paid in the frontend. With online payment (pmPayment) the customer pays after booking on the GovConnect payment page; the invoice only counts as paid once GovConnect confirms the payment. Without payment, the order is cancelled after 24 hours.
Yellow button next to the IBAN? Then the customer now has a different IBAN in their customer record than at the time of the order. One click takes over the customer’s current IBAN into this order after confirmation. Do this before you finalize the invoice, otherwise the old account is debited.
You change the payment method itself via “Edit order” (only while “On hold”).
Voucher
Only appears if the customer redeemed a voucher for the whole order in the frontend. The discount has already been deducted in the final amount below.
Code and discount amount are shown. Vouchers that apply only to a single item appear instead as a green badge directly at the item.
The voucher cannot be removed or changed here. If it is wrong, cancel the order and create it anew; in the edit form, vouchers can be assigned per item.
Courses and comments
The booked courses with session, participants and everything the customer added when booking. Read this through once before the invoice.
For each course you see the session (clicking opens it), the participants and – if present – the customer’s order comment as well as remarks on individual participants. Such comments often contain important notes such as “please send invoice to employer” or “allergy”.
If the course has an additional form (such as a health questionnaire), the customer’s answers are here. If the form has not been filled in yet, the badge shows this; via the badge in the order list you can resend the form email.
Webhook
Only relevant if your tenant passes orders to another program (e.g. a membership management). The button sends the order there once more.
If a webhook address is stored in the tenant settings, Kursimple reports every order automatically to this program. If the transmission failed or the target system lost the data, click here – one message is sent per active participant, and you then see how many were successful.
If no webhook address is set up, a corresponding message appears and nothing happens.
Invoice recipient
Shows who the invoice is addressed to, if not the orderer themselves – for example the employer or grandparents.
The row only appears once an invoice exists and shows the address of the first invoice. A different invoice recipient is chosen in the edit form from the invoice recipients stored with the customer.
Wrong recipient? Cancel the invoice, set the order to “On hold”, choose the right recipient in the edit form and create the invoice anew.
Set status
Choose the new processing status and click “Set status”. Typically: “paid” after payment receipt, “done” after completion.
The status is purely a working marker for you and your team. Setting it does nothing else: no email, no invoice, no release of places.
- On hold – reset if you have to edit the order again (the “Edit order” button then reappears).
- In progress – is set automatically when an invoice is created.
- done – everything completed.
- paid – the money has arrived.
Do not cancel via the status: for that there is “cancel this order” at the bottom left. Only this route releases the course places and creates the credit notes. For a cancelled order, the form is hidden.
Downloads
For download articles of this order: approval status, consent to immediate download and how often downloaded. With “approve” you release the download by hand, e.g. for cash payment at the till.
Approval is automatic: with PayPal immediately, with online payment (pmPayment) as soon as GovConnect confirms the payment, with invoice and cash as soon as the invoice is paid, and with direct debit with the SEPA export. With approval, the link goes by email to the order’s address.
- Send link – sends a new link; the previous one then no longer applies.
- Reset counter – all files can be downloaded again up to the limit.
- block – e.g. after a returned direct debit. On cancellation the download is blocked anyway.
- Check payment – creates missing approvals and approves if the payment has arrived.
Reservations
Participants of this order who are waiting for a free place because the session was full when booking. They are not yet billed.
The section only appears if such reservations exist. For each row you see the session and the number of places waiting.
When a place becomes free: contact the customer and book the session firmly – either via “Edit order” as a new item in this order or as a new order from the customer record. Afterwards remove the reservation in the “Waiting List” menu item via the minus icon so that the customer is not listed twice.
Order items
The individual items with quantity, unit price and total – exactly as they appear on the invoice. Check prices and quantities here before you create the invoice.
An item is either a course session (with the participants), a material cost line for a course or a free item without a course. Cancelled items are struck through in grey and are not billed.
Items that are already on an invoice no longer have a checkbox – they cannot be billed a second time.
Notes such as “booked after course start” or a date selection for courses with flexible date selection are shown directly in the row.
Select all
Sets or removes the ticks for all items not yet billed. Only ticked items go into the next invoice.
By default all open items are ticked – then everything goes onto one invoice. Remove individual ticks if you want partial invoices, for example because two courses go to different payers or a participant pays later. You then bill the remaining items via “Create further invoice”.
Create invoice
Creates an invoice as a draft from the ticked items. Then: in the “Invoices” section click “Finalize and send invoice”.
What happens on click:
- From the ticked, not yet billed items an invoice in the draft state is created. It does not yet have a final number and has not been sent.
- The order automatically changes to “In progress”.
- You see the message “Invoice created”; any warnings (e.g. missing IBAN for direct debit) are shown below it.
Next step: check the draft via “View invoice” and then click “Finalize and send invoice”. Only then is the invoice number finally assigned and the PDF emailed to the customer.
If no item is ticked or all are already billed, an error message appears and nothing is created. After the first invoice, the button is called “Create further invoice” and bills the remaining items.
Invoices
All invoices and credit notes of this order. For a draft, “Finalize and send invoice” (green) is the next step.
For each invoice – depending on its state – these icons are available (the meaning appears when you hover over them with the mouse):
- Finalize and send invoice (green, drafts only) – assigns the final number and sends the invoice as a PDF to the customer. This is the normal case.
- Finalize invoice (drafts only) – assigns the number but sends nothing. Use this if you print the invoice and send it by post.
- View invoice – opens the PDF, also for a draft for checking.
- Resend invoice (for finalized invoices) – sends the PDF once more, e.g. if the customer has misplaced it.
- Cancel invoice (red) – after confirmation creates a credit note (cancellation invoice) for everything not yet credited. The items thereby become free again and can be billed anew. The order itself remains.
- View credit note – for cancellation invoices, opens the credit note PDF.
Finalized invoices can no longer be changed – for errors always cancel and create anew.
Credit notes have the same icons with “credit note” in the name: a credit note in draft (e.g. after cancelling a participation) you send with “Finalize and send credit note” as a credit note PDF to the customer; “Finalize credit note” finalizes it without email. The order keeps its status.
cancel this order
Cancels the complete order: all items are cancelled, the course places become free again, credit notes are created for finalized invoices. Cannot be undone.
After the confirmation prompt, the following happens automatically:
- All items and participants are set to “cancelled”.
- The occupancy of the course sessions concerned is corrected – the places can be booked again immediately.
- For every still valid invoice, a credit note (cancellation invoice) is created.
- The order receives the status “cancelled”.
The customer is not informed automatically. If necessary, write to them via the email address in the order list and attach the credit note (download via “View credit note”).
Only one participant cancels? Then do not cancel the whole order but cancel the individual participant in the course under “Participants” – there the credit note is created only for that share.
The button is hidden for orders that are already cancelled.
cancel
Back to the order list. There is nothing to lose on this page – all actions were already carried out on click.
Only exception: a selection changed in the status form is only saved with “Set status”. Ticks in the item list are only a preselection for “Create invoice” and are lost when you leave.
ID
Internal number of the order, assigned by the system. For customers, the “Number” next to it is what counts.
The ID helps with internal retrieval, for example in the occupancy reconciliation or when a colleague tells you “order 4711”. It does not appear on invoices or confirmations.
Number
The order number the customer knows. It appears in the order confirmation and on the invoice.
Sequential per tenant, assigned on creation and never changed. If a customer withdraws, they name this number in the withdrawal form – the system recognizes the order by it.
An orange star after the number marks a membership application: the order collects the fee invoices of a member. Hover over it with the mouse to see the membership.
Order date
When the order was received. The customer’s 14-day withdrawal period runs from this day.
You can only change the date in the edit form while the order is “On hold” – e.g. if you record an older phone booking afterwards.
Customer
The orderer and invoice recipient. Clicking opens the customer record with address, participants and all further orders.
If “Customer not active” appears here, the customer has been deactivated; the order is kept for traceability. Who actually takes part in the course you see under “Courses and comments”.
Company
The customer’s company name, if stored in the customer record. It appears above the name on the invoice.
The row is only visible if a company was entered. If the invoice should go to a different company, use an invoice recipient instead (customer record → “Invoice Recipients” tab).
Address
The address at the time of the order – a copy from the customer record. Later moves do not change it.
This keeps it traceable where the invoice went. If an order not yet billed should get the new address: correct the customer, then save the order once again via “Edit order”.
Contact email
Address to which confirmation and invoice go. Clicking opens the send dialog with this order as reference.
The address comes from the customer record. If it is wrong, correct it at the customer – sending always reads the customer’s current address.
Phone
The customer’s phone number as a call link. Handy for queries before you write an invoice.
On devices with a phone function, a click starts the call directly.
Age group
The age group the customer stated when booking – only visible if your frontend asks for it.
Pure information for course planning; it has no influence on price or invoice.
last edited
When someone last changed something in this order. Helps when you clarify with colleagues who touched it when.
Updates with every save in the edit form and with status changes.
Selection
Tick the items that should go into the next invoice. Items already billed or cancelled have no checkbox.
For a single overall invoice, leave all ticks. For partial invoices, tick only the items you want and then click “Create invoice”; you bill the others later via “Create further invoice”.
Description
The text that appears like this on the invoice: course title with session, material costs or a free item.
For course items, clicking the course leads to the course page. Additional notes in the row: a date selection for courses with flexible date selection, “booked after course start” or a badge for an additional form.
You change the text in the edit form (“Item description” field) while the order is “On hold”.
Quantity
Number of places or units booked. For course items it should match the number of participants.
If the quantity differs from the number of participants, the occupancy reconciliation reports it. Correct this in the edit form: adjust the quantity or add missing participants.
In the “Reservations” section, the quantity is the number of places waiting.
Price
Unit price per place or unit, including VAT. A voucher discount is shown deducted below it.
The price was taken over from the course session on creation and may have been overwritten in the edit form (e.g. sibling discount). The value shown here applies to the invoice.
Total incl. VAT
Price times quantity, minus an item voucher. This is the amount shown for this item on the invoice.
Cancelled items are shown struck through and do not count.
Total of items
The sum of all items before the voucher for the whole order is deducted.
These rows only appear if an order voucher was redeemed. Without a voucher, the invoice amount results directly from the item totals.
Voucher
The discount of the order voucher with its code. It is deducted from the item total.
The code is the same one you find under “Vouchers” in the administration – there you also see how often it can still be redeemed.
Final amount
The amount the customer actually has to pay – the basis of the invoice.
If the final amount differs from what you agreed with the customer, correct prices or quantities in the edit form before you create the invoice.
Edit an order
Customer
For whom the order is created. Address and contact details come from the customer record and are copied into the order when saving.
The customer is already fixed because you opened the order from their customer record. Briefly check whether address and email are correct – the invoice later goes exactly there.
Customer without participants? Then the new order takes over the customer themselves as a participant: under them a participant record with their name is created (as with “New customer”), and a notice appears at the top. If they book for someone else, you create this person in the “Participants” tab. Participants are always booked, never the customer record itself; an invoice recipient does not count as a participant.
Edit customer
Opens the customer record if address, email or IBAN are not correct. After saving, you automatically return here.
Typical case: the customer wants to pay by direct debit but has not stored an IBAN yet – then you add it here, come back and can then choose “Direct debit”.
Input not yet saved in this order form is lost when switching – so save the customer data first and fill in the order afterwards.
Payment method
How the customer pays. Invoice = customer transfers the money. Direct debit = you collect via SEPA (only with IBAN and collection permission in the customer record). Cash = on site.
- Invoice – the standard case. The customer receives the invoice by email and transfers the money.
- Direct debit – the finalized invoice goes into the SEPA export under “Invoices”, and you collect the amount. Prerequisite: IBAN and consent to direct debit collection are stored in the customer record – then the field is called “Direct debit allowed” here.
- Cash – the customer pays you on site; the invoice serves as a receipt.
- PayPal – only sensible for bookings via the frontend, because payment is made immediately there.
- Online payment (pmPayment) – also only via the frontend: the customer pays on the GovConnect payment page (for municipalities).
The payment method can only be changed while the order is “On hold”.
Order status
For a new order, leave “On hold”. The status moves on by itself later when you create the invoice.
The states: “On hold” (new), “In progress” (invoice created), “done”, “paid”. Please never set “cancelled” via this field – for that there is “cancel this order” in the detail view; only this route releases places and creates credit notes.
Note: as soon as you save a status other than “On hold” here, the order can no longer be edited afterwards.
Order date
Prefilled with today. Enter the actual date if you record an older phone or written booking afterwards.
The date determines the customer’s withdrawal period and the month in the statistics. It has no influence on the invoice date – that is set when the invoice is finalized.
Invoice recipient
Should the invoice go not to the customer themselves but e.g. to the employer? Then choose one of their invoice recipients here. Otherwise leave empty.
The list only shows invoice recipients stored with the customer (customer record → “Invoice Recipients” tab). If the one you want is missing, create it there first and then come back here.
After the selection, the address is shown below the field for checking. All invoices of this order then carry this address. If an invoice is already finalized, the field is locked.
Free item
Tick if this item is not a course – for example a textbook, an exam fee or a special service. Then you enter description, price, quantity and tax rate yourself.
With the tick, course session and participants disappear for this row, and no course place is occupied. Without the tick, the row is a course booking with session and participants.
Material costs that belong to a course do not need to be created as a free item – the system generates them automatically from the course settings as a separate line.
Course session
Choose the session the customer books. Type part of the course title to narrow down the list. Price and description are taken over automatically.
Course, date and – if present – time are shown. After the selection, “Price” and “Item description” are filled with the session’s values; you may still change both afterwards.
Session is full? You can still choose it. When saving you receive a message, and the participants are placed on the waiting list as a reservation instead of being booked firmly. When a place becomes free, you book them afterwards.
For courses with flexible date selection, you choose the course here and then the specific time slot via “Choose session”.
Session (flexible date selection)
Only for courses with flexible date selection: click “Choose session” and pick the time slot the customer wants in the calendar.
The calendar shows the bookable time slots per day; full or past ones are greyed out. The chosen slot is marked with a frame and tick and is occupied when saving.
For normal courses with a fixed session, the field stays empty and the button does not appear. Saving without a chosen time slot for a course with flexible date selection leads to an error message.
Participants
Who actually takes part in the course. The participants created with the customer (e.g. children) are available for selection. One place is occupied per participant.
With the plus you add further participants for this item, with the minus you remove one. The item’s quantity should match the number of participants – otherwise the place occupancy is wrong.
Person missing from the list? Then they have not yet been created as a participant with the customer. Use “Edit customer” or the customer record (“Participants” tab), create the person and reload this page.
Saving without participants for a course item is rejected with the message “The course contains no participants”.
Changing participants: if you choose a different person in a booked row, the booking takes over that person’s name, salutation, date of birth and remark from the record when saving – so the new name also appears in the course’s participant, booking and attendance lists.
Item description
The text that appears on invoice and confirmation. For course items the course title is given; for free items you must enter it yourself.
For course items, the system resets the description to the course title when saving – so it is better to put your own additions in the “Description” field. For free items your text is kept.
Description
Optional addition that appears in brackets after the description on the invoice, e.g. “incl. script” or “sibling discount”.
Use the field for everything the customer should read on the invoice. Internal notes do not belong here but in the notes of the customer record.
VAT rate
For course items the course’s rate is taken over. For free items you choose the right rate – prices are always gross prices.
The rate is needed for the tax statement on the invoice and for the DATEV export. If you are unsure which rate applies (e.g. educational services are often tax-exempt), ask your accounting before you finalize the invoice.
Price
Unit price per place including VAT. Filled automatically when choosing the session and may be overwritten, e.g. for a discount.
The price applies per unit; the total is price × quantity. You can either deduct a discount directly from the price here (then please mention it in the description) or grant it via the “Voucher” field so that it is shown on the invoice.
Quantity
Number of places or units. For course items as many as participants entered.
For material costs “per participant”, the system takes the quantity automatically from the number of participants. For free items the quantity is simply the number of pieces.
If quantity and number of participants do not match, the session later appears in the occupancy reconciliation.
Voucher
A voucher that applies only to this item. The list only shows vouchers that fit the chosen course session and this customer.
The discount is shown on the invoice and the redemption is counted at the voucher. If the voucher has meanwhile expired or been used up, you receive a message when saving and must remove it.
If the expected voucher does not appear: check under “Vouchers” whether it is valid for this course, this period and this customer. Vouchers for the whole order can only be redeemed by the customer in the frontend checkout.
Book sessions from course bundles completely
Prefilled: if a newly booked session belongs to a course bundle, the other sessions of the bundle are added to the order with the same quantity and the same participants.
Remove the tick if you deliberately want to book only individual sessions – e.g. for latecomers who join later. Price and tax come from the respective session. Only appears if course bundles are switched on.
save
Saves the order including items and occupies the course places. No confirmation is sent to the customer – you do that afterwards in the detail view via “Send confirmation”.
When saving, the system checks: is the customer data complete? Does every course item have a session and participants? Is the voucher valid? Are enough places free? If something is missing, you stay on the page with a red message; required fields are outlined in red.
Not enough places: the order is saved anyway, but the participants concerned end up as a reservation on the waiting list – you see a message with how many places are missing.
Afterwards: you land in the order list or at the customer record. Open the order, send the confirmation if needed and create the invoice.
cancel
Discards all input and returns to the customer record or the order list. Nothing is saved, no places are occupied.
If you have already created participants via “Edit customer”, they are of course kept – only the order itself is not created.
Waiting List
Waiting List
All orders in which participants are waiting for a free place because the session was full when booking. When a place becomes free, you work through this list from the top (oldest first).
A waiting list place is created automatically when a customer books a fully booked session in the frontend or when you book more places in the administration than are free. The customer receives no invoice for it but waits.
This is what you do when a place becomes free:
- Filter by the course and take the oldest entry (“Date” column).
- Call the customer or write to them via the email address in the “Contact” column.
- If they accept, book the session firmly: open the order via the pencil and enter the session as an item with participants – or create a new order from the customer record.
- Afterwards remove the waiting list entry via the red minus next to the participant so that the place is not listed twice.
If the customer declines, also remove the entry via the minus.
ID
Internal number of the order. Clicking opens the detail view with all details and the “Reservations” section.
The same ID as in the order list. An order can contain firm bookings and waiting list places at the same time – it appears here as soon as at least one participant is waiting.
Number
The order number the customer received in their confirmation. Mention it when you call the customer about the place that has become free.
No invoice is created for waiting list places. Only when you book the participant firmly does a billable item arise.
Course title
The session being waited for, and below it the waiting participants. The red minus next to a name removes only this person from the waiting list, after confirmation.
Clicking the course opens the course, clicking the date opens the session – there you see how many places are currently free. An asterisk after the name means the participant left a remark when booking (tooltip).
Minus icon: removes only this person from the waiting list – other people in the same order keep waiting. The order and any firm bookings in it remain unchanged. Use it after you have booked the participant firmly or when they are no longer interested.
Date
When the reservation was received. The list is sorted by it – whoever booked first should be offered the place first.
Click the column heading to reverse the sort order.
Customer
The orderer you contact when a place is free. Clicking opens the customer record; coloured squares are the customer’s tags.
From the customer record you can also create a new order directly with the session that has become free.
Address
The customer’s address at the time of the reservation – a copy from the customer record.
You find the current address in the customer record; the address plays no role for the waiting list place.
Contact
Email and phone to offer the customer the place that has become free. Clicking the email opens the send dialog, clicking the number starts the call.
The email is saved in the email history with a reference to the order – so colleagues see that the customer has already been written to.
Invoice number
Usually empty, because waiting list places are not billed. If a number appears here, the order additionally contains firm bookings.
Clicking the number opens the invoice.
Status
Processing status of the order; waiting orders are normally “On hold”. Clicking moves one step on after confirmation.
Leave the status at “On hold” as long as participants are waiting – only then can the order still be edited to book the session firmly later.
Actions
Eye = view order, pencil = edit. Via the pencil you book a waiting participant firmly as soon as a place is free.
In the edit form you add the session as a new item and enter the participant. Saving occupies the place. Then remove the waiting list entry via the minus in the “Course title” column.
Withdrawal
Withdrawal
Withdrawals that customers send via the withdrawal form in the frontend end up here. Every open case needs a decision from you: “Grant” or “Reject”.
For online bookings, customers generally have a 14-day right of withdrawal. When a customer fills in the form, they automatically receive an acknowledgement of receipt, your tenant a notification, and the case appears here with the status “Open”. The yellow badge in the heading shows how many cases are open.
This is how you process a withdrawal:
- Check name, email and order number: if the order number is linked in green, the system found the order.
- Check whether the withdrawal is justified (deadline, type of booking). You find the order date via the link to the order.
- Grant: the system cancels the order, creates credit notes, releases the places and writes to the customer. You do not have to do anything else.
- Reject: you choose a legal reason for rejection, the customer receives a reasoned refusal, the order remains.
Decide promptly – in the order list the order is marked “Withdrawal pending” in the meantime. Submissions that the system considers spam or implausible do not appear here but under “sorted out”.
sorted out
Opens the submissions that the system set aside automatically – for example because name and email do not match the order. Look there occasionally so that no genuine withdrawal gets lost.
For sorted-out submissions, no acknowledgement of receipt was sent and the order was not marked. The number in the badge shows how many entries are there.
Date/time
When the customer submitted the form. This point in time counts for the question of whether the withdrawal was still within the deadline.
Compare it with the order date: if more than 14 days lie between them, the rejection reason “Deadline expired” comes into question. The timestamp also appears in the emails to the customer.
Name
The name the customer typed into the form. It may differ slightly from the name in the customer record (nickname, typo).
If the name differs clearly from the orderer, check the case more closely: perhaps a participant is withdrawing instead of the orderer, or it is a mistake. When in doubt, call the customer before you decide.
The address to which all emails about this withdrawal go: acknowledgement of receipt, approval or rejection.
The address comes from the form, not from the customer record. If the customer made a typo, the decision does not reach them – then inform them additionally via the address from the order.
Order no.
The order number from the form. Linked in green = order found, it is cancelled automatically when granted. Grey with warning triangle = not found, you must cancel by hand.
Click the linked number to open the order and check order date, course and invoices.
Not found? Search for the order via the order list (filter “Customer” or “Contact”). If you grant the withdrawal, you then cancel the order yourself in the detail view – the system cannot do it without a match.
Course title
The course the customer named in the form – for orientation. When granting, the entire assigned order is always cancelled.
If the customer only wants to withdraw one of several courses in the order, do not grant via this page. Instead cancel only the participant concerned in the course under “Participants” and answer the withdrawal by email; afterwards close the case here via “Reject” with a suitable note or leave it open as documented.
Reason
What the customer stated as the reason – voluntary, a withdrawal is also valid without a reason. You see the full text in the tooltip and in the decision dialog.
The reason must not influence your decision as long as the withdrawal is within the deadline. It does help to spot misunderstandings, though – e.g. if the customer actually only wants to change the session. Then a call before the decision is worthwhile.
Status
Open = waiting for your decision. Approved = order cancelled, customer informed. Rejected = customer has received the refusal with reasons.
For rejected cases, the chosen rejection reason is shown below. A decision cannot be taken back – in case of a mistake after a rejection, you cancel the order by hand and write to the customer.
Processed by
Who decided the withdrawal and when. This way you can later prove that you responded in time.
For open cases the column is empty.
Actions
For open cases: “Grant” (red) or “Reject” (green). Both open a dialog that explains what happens afterwards. Decided cases only show an icon.
The colours are chosen deliberately: red, because granting cancels the order irrevocably; green, because rejecting preserves the order. Read the dialog before you confirm.
Grant
You accept the withdrawal. After confirmation in the dialog, the system cancels the order, creates and sends the credit notes, releases the places and sends the customer the approval email.
In detail, the following happens automatically:
- The assigned order is cancelled (all items and participants).
- For every finalized invoice, a cancellation invoice is created and emailed to the customer.
- The course places are released and can be booked again immediately.
- The customer receives the approval email from your template (Administration → Application Data).
If no order could be assigned (warning in the dialog), only the approval email goes out. Then cancel the order yourself in the detail view.
A payment that has already been refunded must be arranged outside Kursimple (bank transfer, PayPal refund).
Reject
You reject the withdrawal because there is no right of withdrawal – e.g. deadline expired or course already held. The customer receives a refusal with the chosen legal reason; the order remains.
In the dialog you choose a rejection reason (required) and can add a personal note, for example the offer of a replacement session. Then you confirm with the red button.
Caution: an unjustified rejection can have legal consequences. For withdrawals by consumers within the deadline, granting is almost always the right way – when in doubt, ask your management.
Rejection reason
Required field. Choose the reason that applies to the case – the ready-made legal text for it is inserted into the refusal to the customer.
The reasons correspond to the legal exceptions to the right of withdrawal, among others:
- Fixed date – course booked for a specific date/period (leisure event)
- Deadline expired – more than 14 days since the order
- Service fully provided – the course has already taken place
- Not a consumer / not distance selling – company booking or booking on site
- Booking cannot be matched – the details match no order
The written-out text ends up in the rejection email via the placeholder “Widerruf_Ablehnungsgrund”. Without a selection, the dialog cannot be submitted.
Personal note
Optional text that is additionally included in the refusal – for example “We would be glad to offer you a place in the follow-up course on 12 March”.
Write as you would say it to the customer on the phone. The text is inserted into the email via the placeholder “Widerruf_Mitarbeiter_Notiz”; if the note is missing, the spot stays empty.
Sorted-out Withdrawals
Sorted-out Withdrawals
Submissions from the withdrawal form that the system considers spam or implausible. No emails were sent and no order was marked. Check occasionally whether a genuine withdrawal is among them.
The “Reason” column says why an entry is here. Most common genuine case: the customer made a typo in the name or email, so the details do not match the order.
Is it a genuine withdrawal after all? This page offers no buttons for that. Proceed like this instead: search for the order via the order list, “cancel this order” there, and reply to the customer by email (attach the credit note). The withdrawal period applies from the receipt shown here.
Received
When the form was submitted. This point in time also applies to sorted-out submissions if a withdrawal turns out to be genuine after all.
Note the point in time if you process a sorted-out withdrawal by hand – it proves that the customer met the deadline.
Name
The name from the form, unchecked. Compare it with the orderer of the order named.
With spam, fantasy names or advertising texts often appear here. With genuine customers, usually just a typo.
The sender address given. No confirmation was deliberately sent to it.
If you follow the case up by hand, better write to the address from the customer record – the one entered here may be wrong.
Order number
The order number named. Search for it in the order list to check whether the order really exists and whether name and email match.
If the order exists and the customer matches, it is very likely a genuine withdrawal with a typo.
Course
The course title from the form – merely the sender’s statement for orientation.
If the course matches the order named, that is a further indication of a genuine withdrawal.
Reason
Why the system sorted out the submission: “Name and email do not match the order” (often a typo – check!), “Submitted too quickly” or “Honeypot field filled in” (both typical of spam programs).
- Name and email do not match the order – the order number exists, but the details do not match the orderer. This can be a genuine customer with a typo: open the order and compare.
- Submitted too quickly – the form was filled in in fewer seconds than a human needs. Almost always an automatic program.
- Honeypot field filled in – an invisible field that only spam programs fill in. Certainly spam.
Occupancy Reconciliation
Occupancy Reconciliation
A control page: it checks whether the number of “occupied places” at each course session matches the actual orders. If anything is listed here, the frontend is currently showing wrong availability – with “correct” you put it right.
Each course session remembers how many places are occupied so that the frontend and course lists can quickly show “3 places left”. This stored counter can deviate from reality – for example after imports, cancellations or older program errors.
The page recalculates the occupancy from the non-cancelled order items and shows every session where the counter and calculation do not match.
What you do:
- If it says “No discrepancies”, everything is fine – nothing to do.
- Otherwise click “Correct all discrepancies” (or “correct” per row). This only sets the counter right; nothing changes in the orders. The process is harmless and can be repeated as often as you like.
- Rows marked yellow remain even after the correction: there, quantity and participants of an order do not fit together. Click “Items”, open the order concerned and clean it up (add participants, adjust quantity or cancel the item).
On the server the reconciliation also runs automatically at regular intervals; this page is for a look in between.
Show discrepancies only / all sessions
Switches between “only sessions with problems” (default) and “all sessions”. You use the latter for checking after a correction.
In the “All sessions” view you also see the consistent sessions with a green 0 in the “Difference” column. For daily work the default view is enough.
Correct all discrepancies
Sets the stored counter to the calculated value for all sessions shown. Orders are not changed – the action is harmless.
After confirmation you see the message “… occupancy counters corrected”. If rows marked yellow remain afterwards, a notice additionally appears: there, quantity and participant list in the order do not match, which has to be cleaned up by hand in the respective order.
Course
The course the session belongs to. Clicking opens the course.
In the course you see all bookings of the session in context under “Participants” – helpful if you have to clarify a yellow row.
Session
Start of the course session, so you can find it again in the course.
A course can have several sessions; each session has its own counter.
Places
How many places the session has in total (setting on the session). For comparison with counter and calculation.
If “Calculated” is greater than “Places”, the session really is overbooked – you resolve that in the orders, not here.
Counter
The occupancy currently stored on the session. The frontend shows this value as “occupied” – if it is wrong, customers see wrong availability.
A counter that is too high blocks bookings although places would be free. A counter that is too low allows overbooking. “correct” fixes both.
Calculated
The occupancy as it results from the non-cancelled order items (sum of quantities). This is the correct value to which the counter is set on “correct”.
Cancelled orders and cancelled items do not count. For course templates with material costs per participant, the number of participants is taken from the material lines, because the course line is carried there as a flat quantity of 1.
Participant rows
How many participants are entered for this session in the orders. Should equal “Calculated” – otherwise the row is yellow.
If the number differs, places were booked without an assigned person or more people were entered than places paid for. Via “Items” you find the order concerned and correct the quantity or participants there.
Difference
Counter minus Calculated. Green 0 = everything matches. Red with plus = session counts as fuller than it is. Red with minus = session could be overbooked.
In both red cases, “correct” is the solution. The difference says nothing about quantity-versus-participants problems – the yellow marking of the row stands for that.
Actions
“Items” shows all order items of the session. “correct” sets the counter of only this session to the calculated value.
Use “Items” if you want to know which orders are behind the number – especially for yellow rows. “correct” only appears if the difference is not 0.
Items of a session
Items of a session
All non-cancelled order items for this course session. Red rows are the problem: there, occupied places and entered participants do not fit together – open the order and clean it up.
You reach this page via “Items” in the occupancy reconciliation. It shows which orders make up the calculated occupancy.
Cleaning up a red row: “Open order” → “Edit order” (if necessary set the status to “On hold” first) → either enter missing participants at the item, set the quantity to the number of participants or cancel the item → save. When saving, the system recalculates the counter automatically.
Order
The number of the order the item belongs to.
Via “Open order” on the right in the row you go directly to the detail view.
Customer
The orderer – helpful if you want to call the customer to clarify.
You find contact details in the opened order or in the customer record.
Status
Status of the order and, if different, of the item. Cancelled orders and items do not appear here at all.
An item can be “partially cancelled” if individual participants have cancelled – then only those remaining count.
Places occupied
How many places this item occupies (quantity minus cancelled shares). This number feeds into “Calculated”.
If the number is higher than the participant rows, the customer has booked more places than people entered – often with bookings “for two” without a second name.
Participant rows
How many non-cancelled participants are entered for this item. Should equal “Places occupied”.
If the number is higher than the places occupied, more people are entered than paid for – check whether the quantity in the order needs to be increased.
Actions
“Open order” leads to the detail view, where you clean up the item.
After saving the order, you return here via the occupancy reconciliation and check whether the row is no longer red.
Back to reconciliation
Back to the overview of all sessions with discrepancies. Nothing was changed here.
In the overview you can then carry out “correct” if the difference still exists.
Rather see it than read about it?
In 30 minutes we will show you Kursimple with your own course programme. Or set up your own test system in 30 seconds – both free and without obligation.
Questions? +49 5931 990 99 10 · Mon–Thu 8:30–17:30, Fri 8:00–14:00 (CET)