
Email & bulk sending
Sending single emails and serial mails, the email history and bulk sending with approval. These texts sit right next to the fields inside Kursimple – here they are to read through.
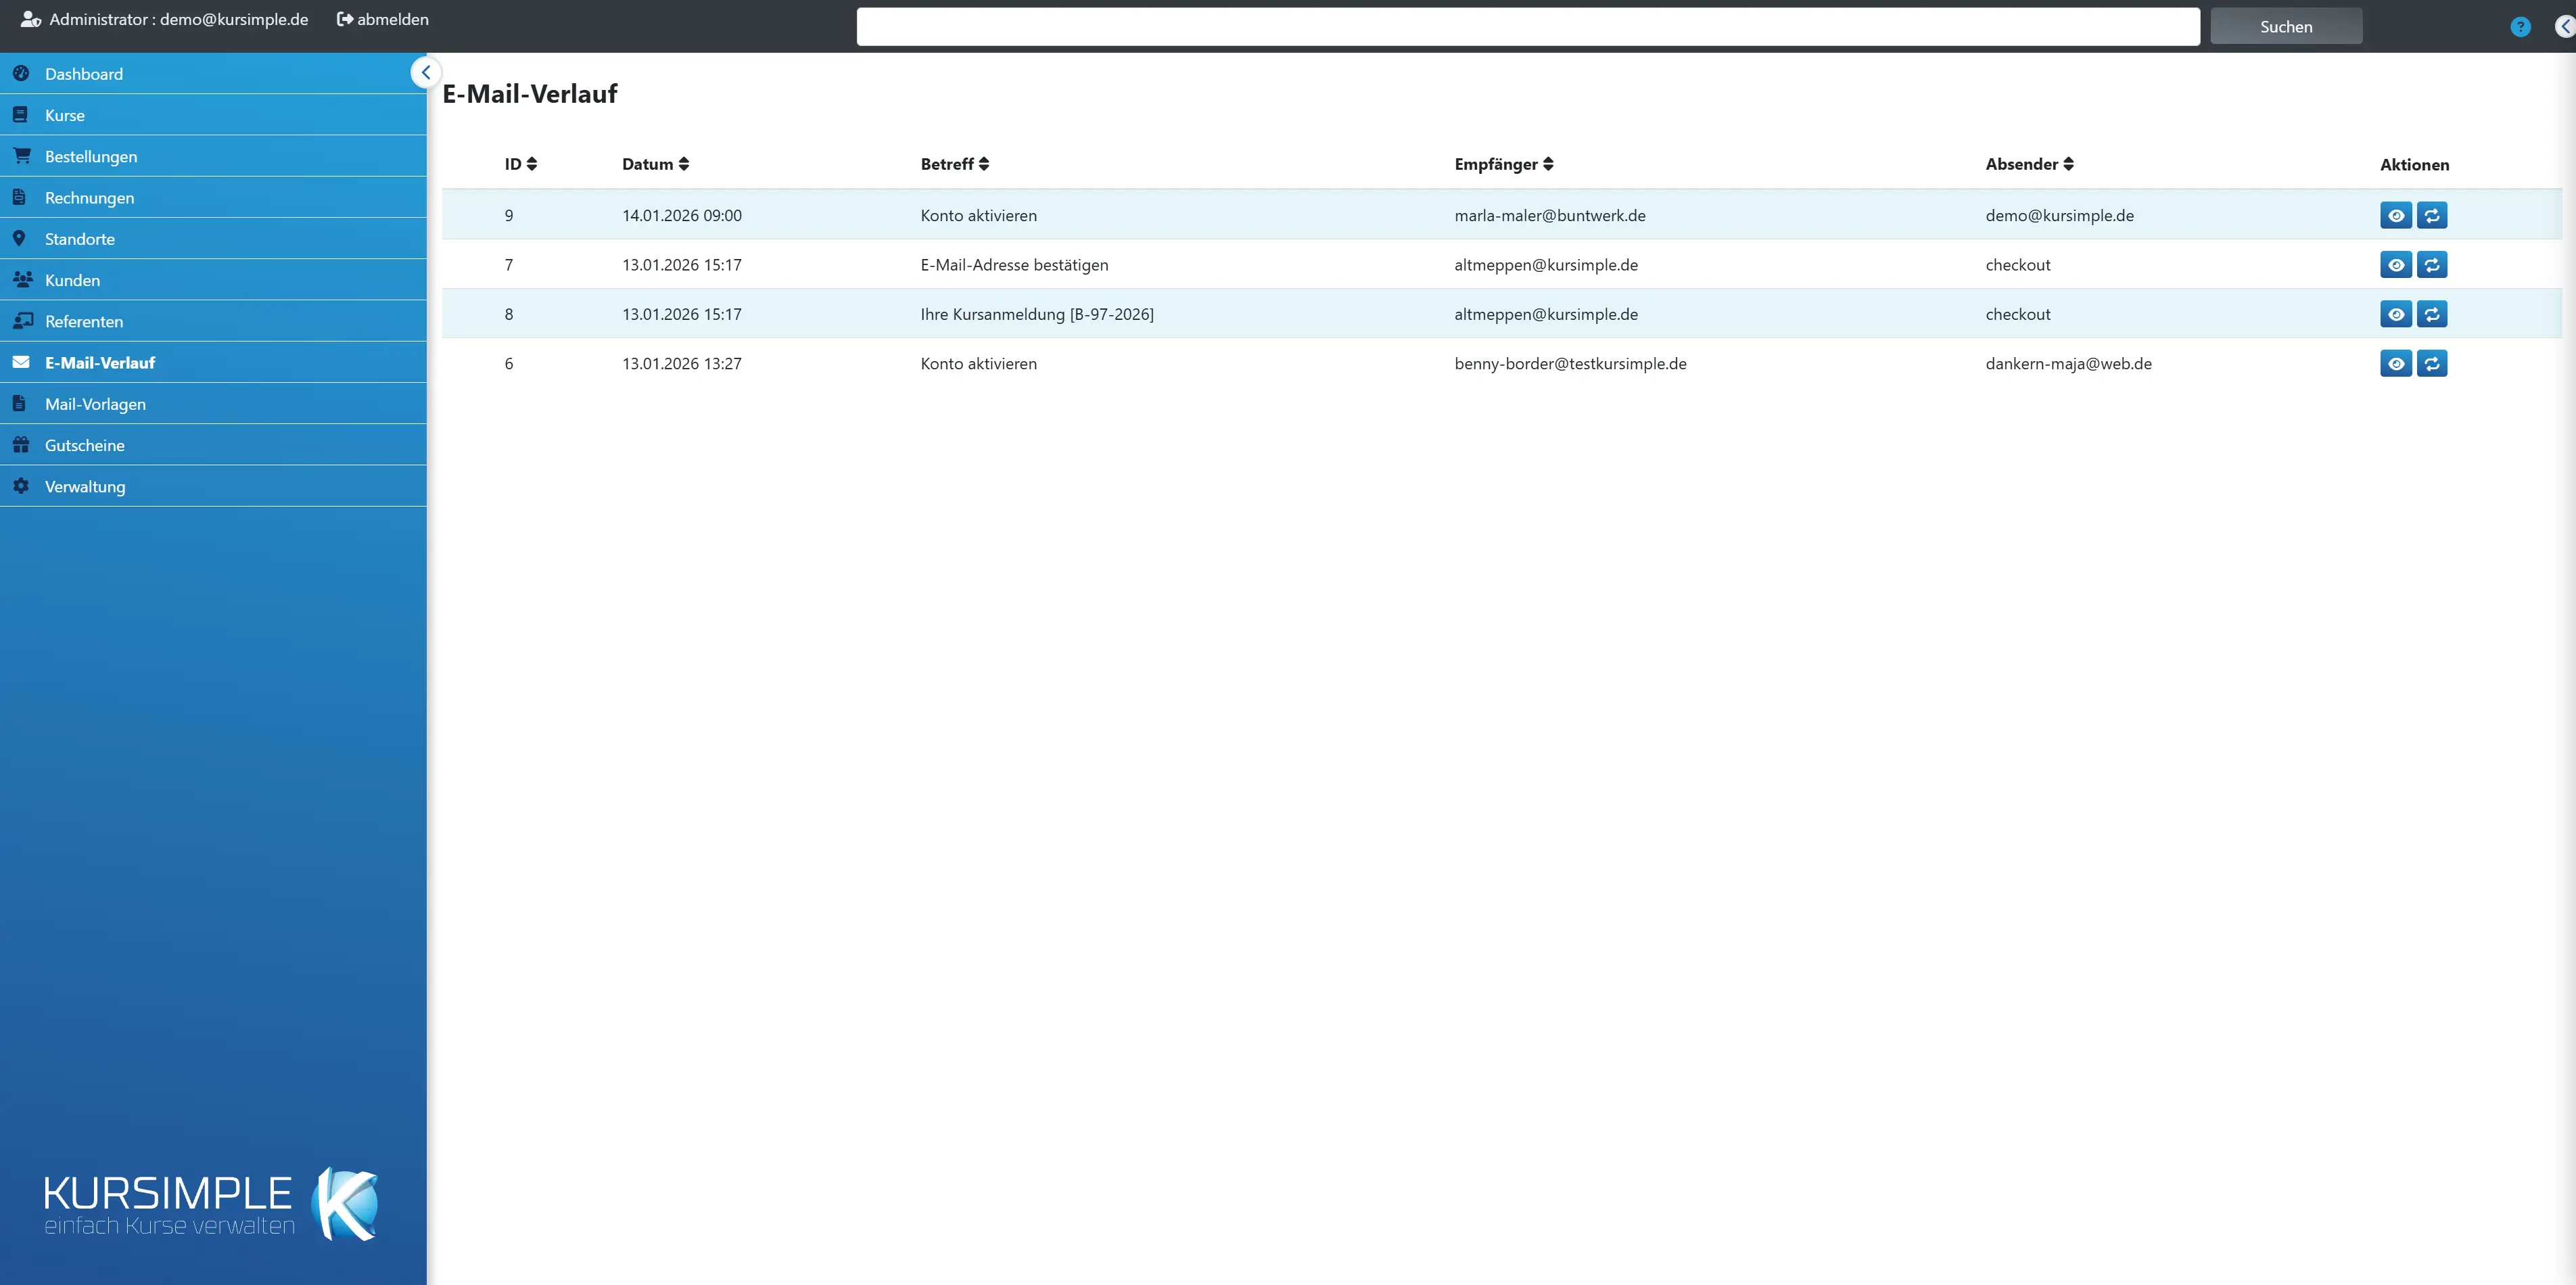
Email history
Email history
The log of all emails that kursimple has sent – order confirmations, invoices, reminders, certificates and your own emails from the send dialog. Here you check whether and when a customer received something, and resend emails.
Typical questions the history answers: “Did the customer receive the invoice?” → filter by recipient. “What did we send for order 123?” → the reference is shown in the order or invoice, and here via the icon in the first column. “Why didn’t the email arrive?” → open the red row, the failed recipients are listed in the details.
Red rows mean: at least one recipient could not be reached. Usually the email address is wrong – correct it in the customer record and send again via the “resend” icon.
Bulk emails to many recipients run in the background as mass sending; you can follow their progress via the “Mass sending” button at the top right.
Mass sending
Opens the overview of bulk email runs: there you start prepared sendings, see the progress and find delivery errors per recipient.
Every bulk email from the “Send bulk email” dialog is only prepared at first and has to be released there with “Start sending”.
Reference
An icon shows what the email belongs to: dollar = invoice, shopping cart = order. Clicking opens the invoice or order; the number is in the tooltip.
Without an icon the email was sent without a reference, e.g. a free email from the customer list or a bulk email.
ID
Number of the history entry. Invoice and order lists refer to the sent email with this number (envelope icon).
Sortable via the heading.
Date
When the email was sent. The newest are at the top; clicking the heading reverses the sort order.
The time is the moment of handover to the mail server – not the moment the customer reads the email.
Subject
The subject line as the recipient sees it (placeholders already replaced). The eye in the “Actions” column shows the full content.
Sortable and filterable.
Recipients
Who the email went to. For bulk emails only the first addresses are shown – all are listed in the details. A red badge warns about failed recipients.
Filter by an address to see all emails to one customer.
Sender
The sender address of the email and, if a user triggered it, their name. The default is the sender address from the application data.
Replies from the customer end up at this address – make sure it is read.
Actions
Eye = details with content, recipients and errors. Paper plane = send the email again to the same recipients (for invoices with a freshly generated PDF). Download = download the attachment.
“Resend” is the quickest way when a customer says they received nothing: check the address in the record, then click here. A new history entry is created. If the recipient address is invalid, an error message appears.
Reset all filters
Clears all filter fields at once. Appears only when a filter is active.
You clear individual filters with the X next to the field.
Filter by subject
Searches the subject line, e.g. “invoice” or “reminder”. A part is enough.
Takes effect as you type.
Filter by recipient
Searches the recipient addresses – this way you see all emails a particular customer has received.
A part of the address is enough.
Filter by sender
Searches the sender address, e.g. to find emails from a particular mailbox.
A part is enough.
Email details
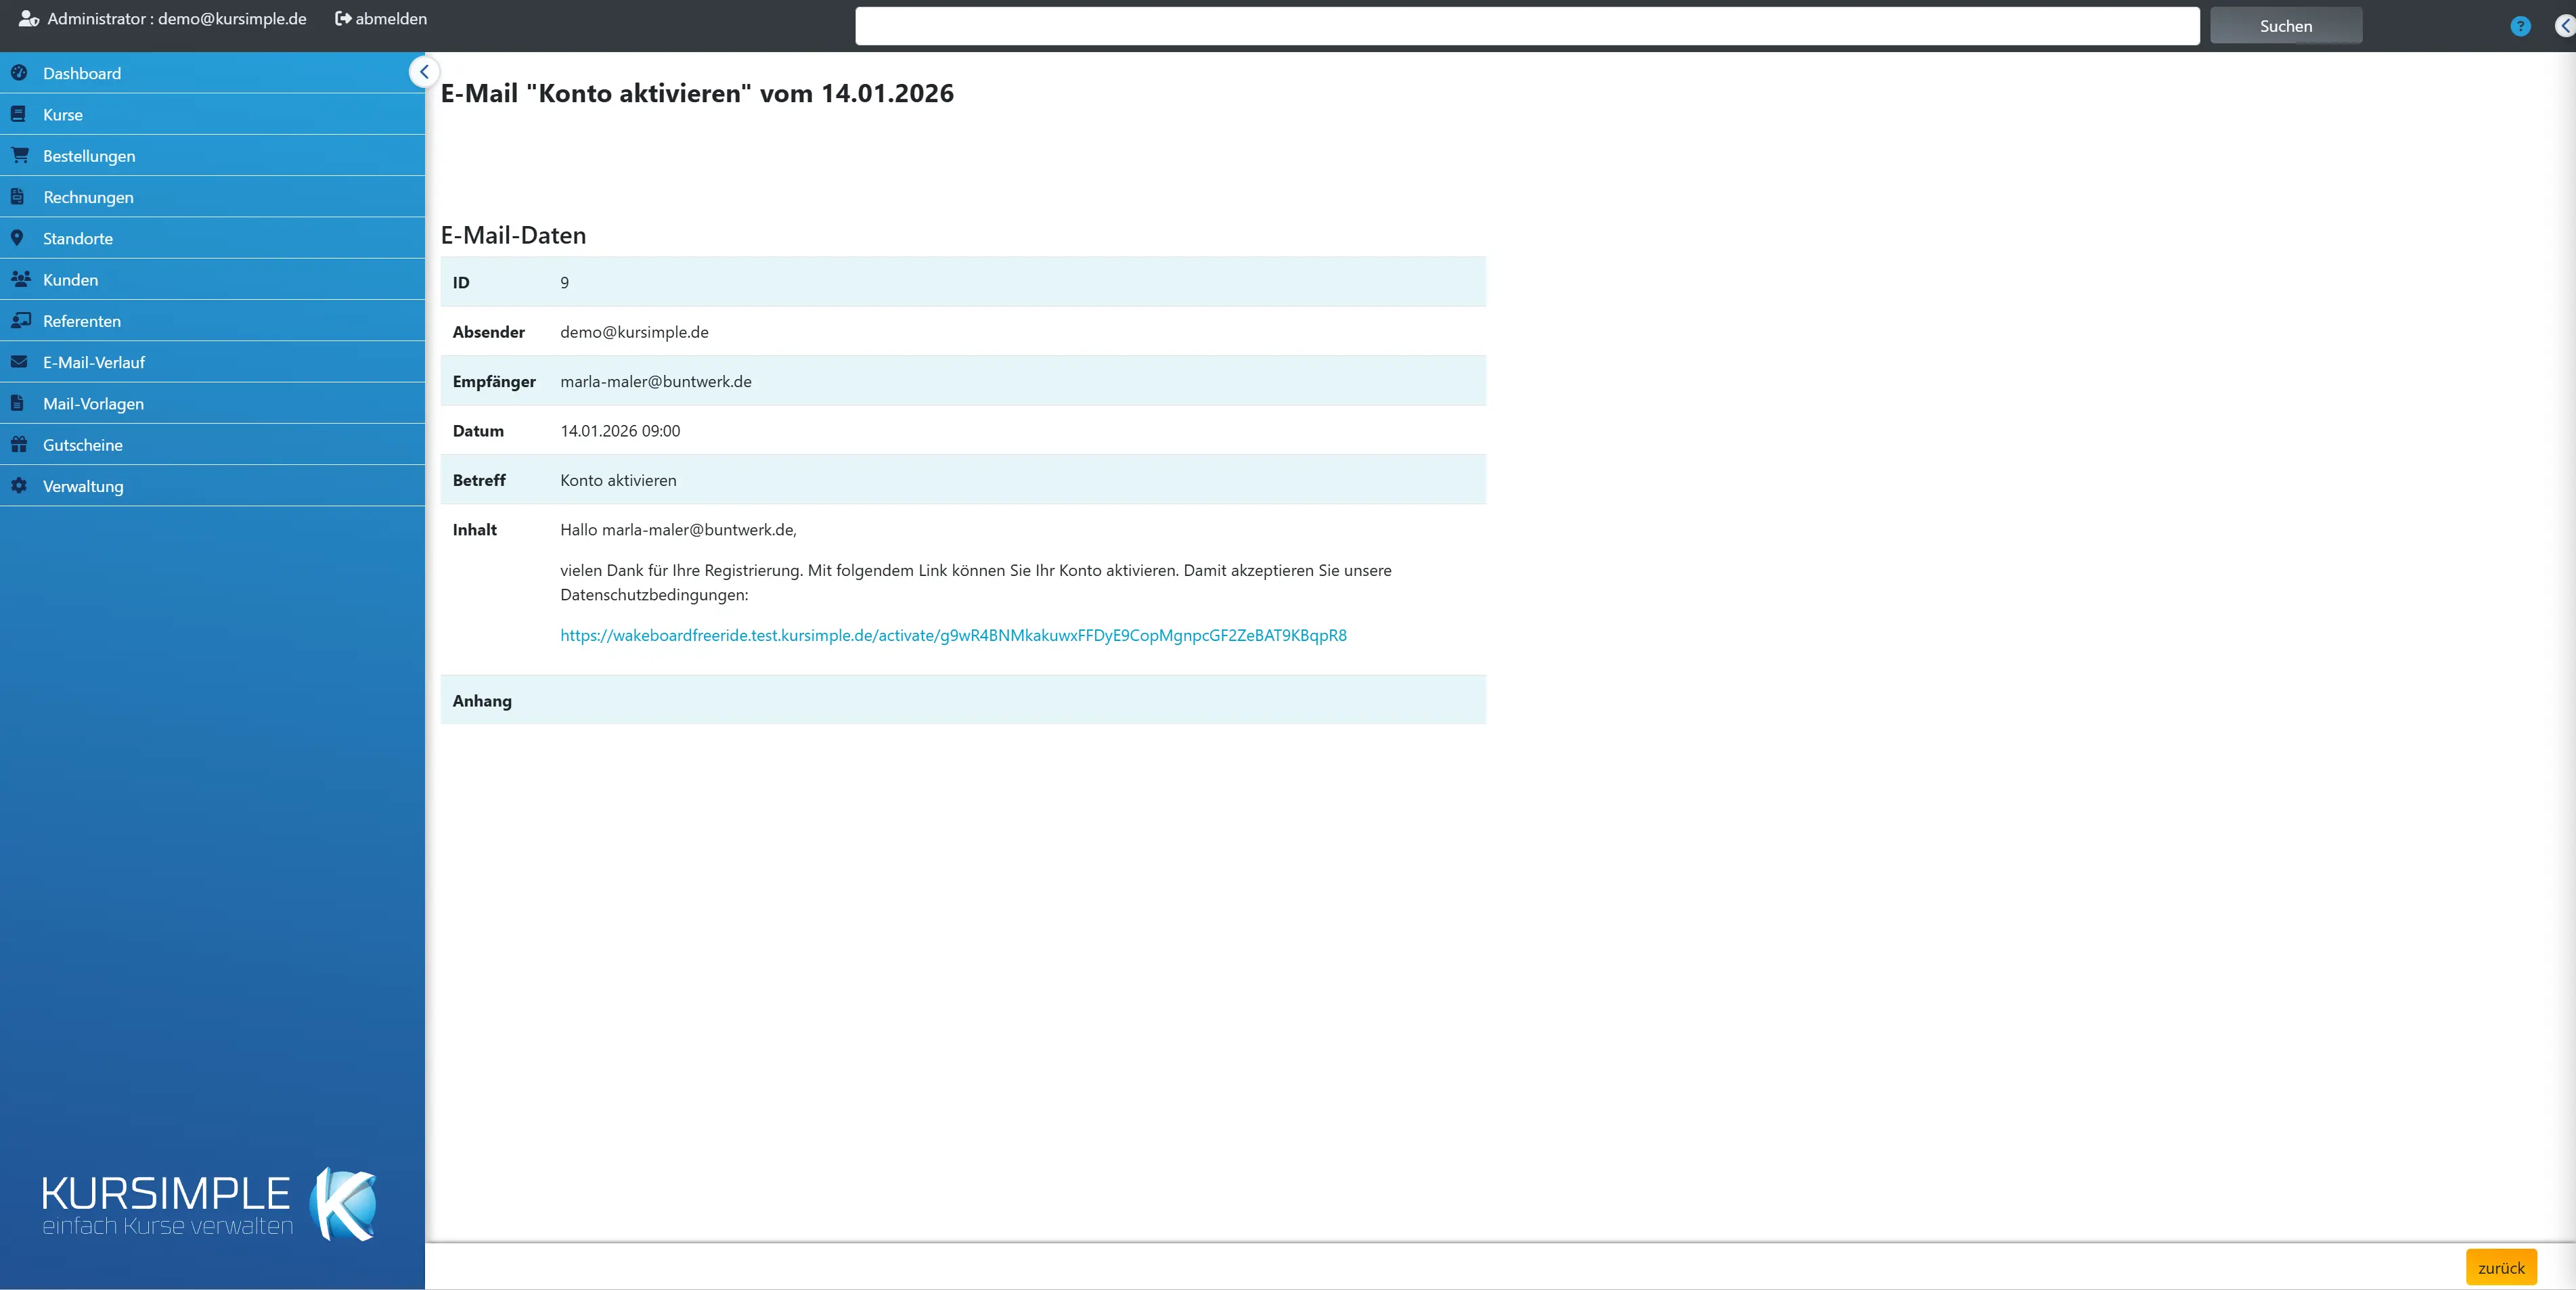
Email details
The sent email as a whole: sender, recipients, subject, content (as in the mail program), attachments and the link to an order or invoice. Marked red: recipients for whom delivery failed.
Customer received nothing? First check the recipient address and the section “Failed recipients” here. Then correct the address in the customer record and send it again via “Resend email” (for system emails) or the paper plane icon in the history.
Email data
All header data and the content of the email in one table.
Read from top to bottom: sender, recipients, if applicable sending run and errors, date, subject, content, attachments, reference.
Sending run
Only for bulk emails: the mass-sending run this email belongs to. Clicking opens it with the status per recipient.
There you see whether the run is finished and which recipients failed.
Sending status
Only for bulk emails: on the left the addresses the email has already been sent to, on the right all that have not received it yet – with the reason (open, failed, cancelled, no address).
While sending is in progress, the two lists refresh by themselves every few seconds; when it is finished, the page reloads once. If you hover over the “failed” (or “paused”) label, you see the mail server’s error message – e.g. an invalid address or a sending limit.
If the mail provider has reported a sending limit, sending pauses: at the top a countdown runs down to the next pass, which then starts by itself.
Next to a failed address, the small green button opens the record the address belongs to in a new tab – for customers “Edit customer”, for participants the “Participants” tab with the edit window already open. Correct the address, save, then click “Resend failed emails” here.
Resend failed emails
Sends the bulk email again to all recipients for whom sending failed. Those who already received it do not get it twice.
Useful when the mail server rejected temporarily (e.g. “451 … limit exceeded”). If an address was misspelled, correct it in the customer record first – otherwise sending fails again. A cancelled sending cannot be continued this way.
Failed recipients
Addresses to which the email could not be delivered. Most common cause: a typo in the address or a full/disabled inbox.
Correct the address in the customer record and send the email again. Repeated errors with a correct address point to a problem at the recipient’s mail server – then follow up by phone.
Content
The email as the recipient saw it – with replaced placeholders and formatting.
The preview is read-only. If you want to use the same text again, copy it into the send dialog or save it there as a template.
Attachment
The files sent along (e.g. invoice PDF, certificate) for download – handy if you want to get the file to a customer by other means.
Clicking the file name downloads the file.
Order
The order the email belongs to. Clicking opens it.
Only for emails with an order reference (confirmations, form emails, emails from the order list).
Invoice
The invoice the email belongs to. Clicking opens it.
Only for invoice and reminder emails.
Resend email
Sends this system email again unchanged to the same recipients and creates a new history entry.
The button appears for automatically generated emails (confirmations, invoices). You resend manually sent emails via the paper plane icon in the history. Check the recipient address first – otherwise it fails again.
ID
Number of the history entry that invoice and order lists refer to.
Useful when you talk to colleagues about a particular email.
Sender
The sender address and, if applicable, the user who triggered the email.
For system emails, the address from the application data or the template.
Recipients
All recipients of the email. For bulk emails the list can be long and is scrollable.
Clicking an address opens the customer record where possible.
Date
Time at which the email was handed to the mail server.
Suitable as proof towards customers.
Subject
The subject line with placeholders already replaced.
This is how it appeared in the customer’s inbox.
Send a single email
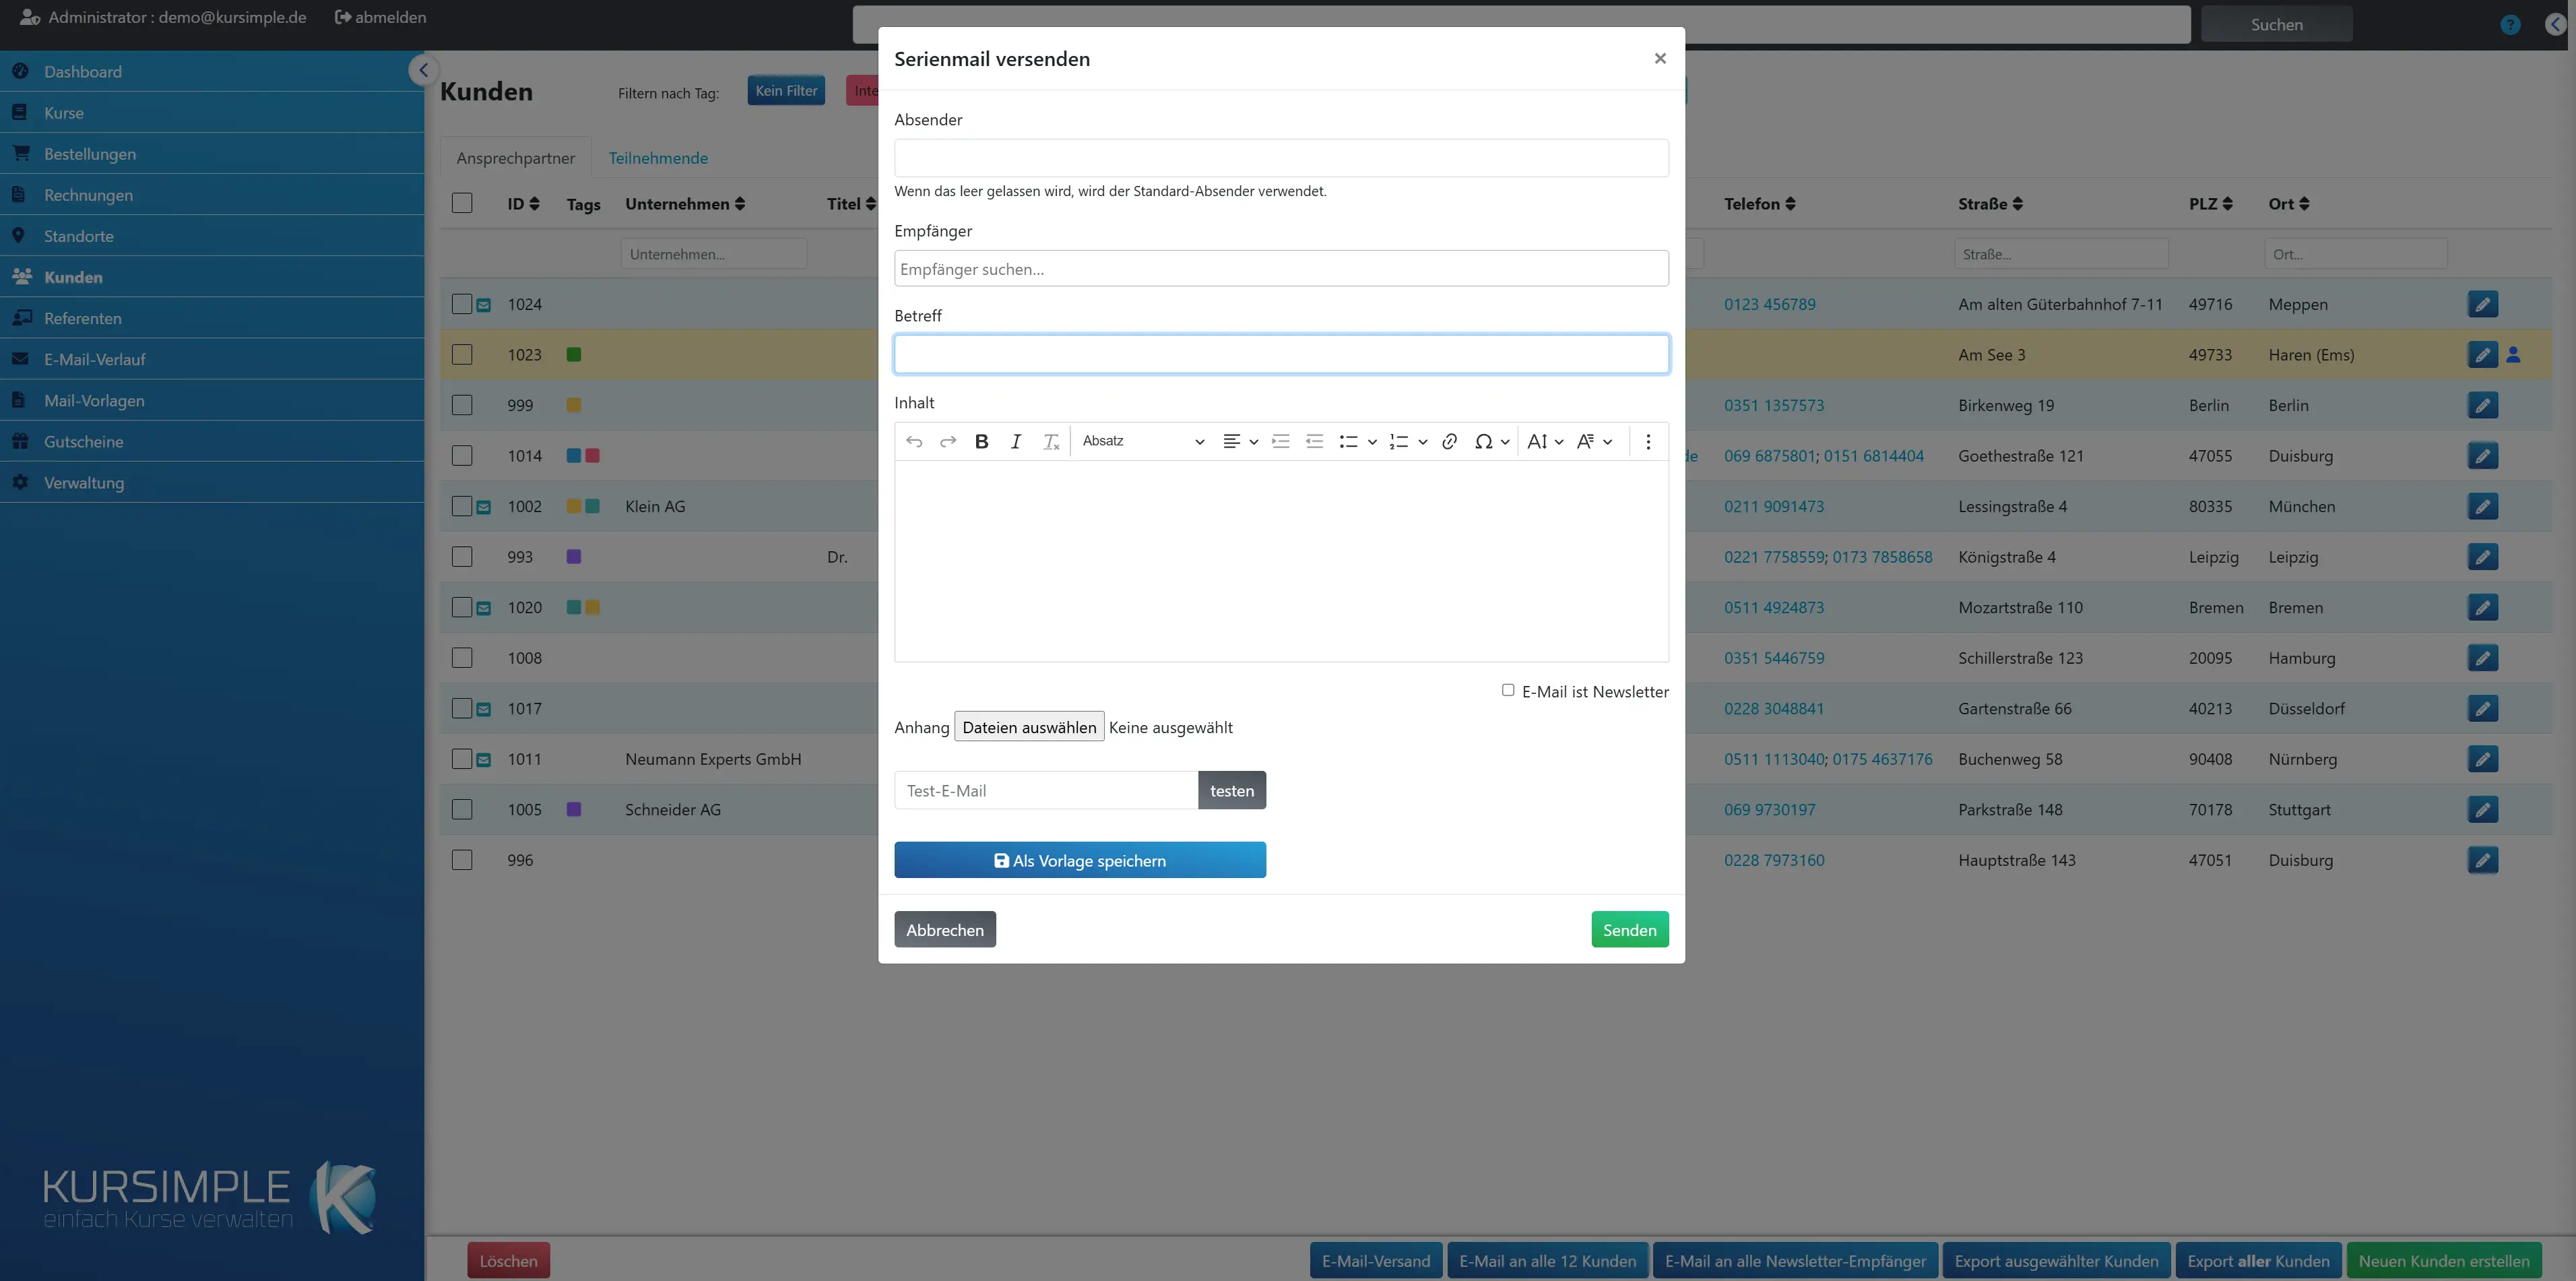
Send a single email
Write an email to one recipient – e.g. from the customer, order or invoice list, where the recipient is already filled in. Steps: choose a template if needed → check subject and text → “test” if needed → “Send”.
Placeholders such as {Kunden_Vorname} or {Bestellnummer} are replaced with the recipient’s real data when sending. Which placeholders exist is shown in the expandable box below the text; a click inserts the placeholder at the cursor. Notes such as “Invoice reference: …” tell you which placeholders are filled with data.
After sending, the email lands in the email history – you and your colleagues can look up later what was sent. With the icon at the top right you enlarge the dialog.
Send bulk email
One email to many recipients – each gets their own, personalized email. The recipients come from your selection in the list or from “Email to all …”. After “Send” the sending is only prepared: you land on the mass-sending page and start it there with “Start sending”.
Steps: check recipients (people without an email address are skipped) → choose a template or write text → test email to yourself → “Send” → on the mass-sending page “Start sending”. You can also discard the run there if you notice a mistake.
If a course is the reference (e.g. sending from the “Participants” tab), the course placeholders are filled with that course. For newsletter sign-ups without an account, {Vorname} and {Nachname} stay empty – then word the salutation neutrally.
Email template
Takes over subject, sender and content of a saved template into the dialog. You can still adjust everything afterwards. You maintain templates under Communication → Mail templates.
Choose the template before writing your own text – the selection replaces the content. Templates with saved recipients offer in the bulk email dialog to take over, add to or replace the recipient list.
Sender
The sender address. Leave empty = default sender of your tenant (application data). Only use an address on your own domain, otherwise the email ends up in spam.
Replies from the recipient go to this address. If you enter a personal address, make sure it is read.
Recipient
The recipient’s email address – prefilled from the list you opened the dialog from. You can change it.
For several recipients use the bulk email dialog (tick the boxes in the list → “Send email”).
Recipients
The selected people. Clicking the X removes one; type in the field to search for and add more people. People without an email address are skipped when sending.
A note appears below the field if ticked people could not be taken over. For “Email to all …” only the number of recipients is shown here.
Deactivated records are not recipients – neither for “Email to all …” nor in the selection: ticked deactivated ones are dropped with a note, the search does not find them. This also applies to participants without an address of their own whose customer record is deactivated. If you do want to reach a deactivated person, use the link on their email address in the record.
Subject
The subject line – short and specific, e.g. “Your yoga course on 12 March starts 30 minutes later”. Placeholders are allowed: “Your booking {Kurs_Titel}”.
The subject decides whether the email is opened. Avoid “Info” or “Important”.
Content
The text of the email. Formatting via the editor toolbar, placeholders via the expandable box below (a click inserts at the cursor). Start with a salutation made of placeholders, e.g. “Hello {Kunden_Vorname} {Kunden_Nachname},”.
You insert images via the image icon of the editor toolbar; they are uploaded and linked in the email. Keep long texts short and link to details in the portal instead.
Classic editor / Builder
Classic = simple running text with formatting, right for most emails. Builder = designed emails with columns, images and buttons (newsletters). Do not switch back and forth: a Builder email loses its layout in the classic editor.
In the Builder you drag blocks with drag & drop; you find placeholders behind the tag icon at the top right, ready-made layouts behind the layout icon at the top left. Both editors ultimately produce ordinary email HTML.
Email is a newsletter
Tick for advertising and news: the email then counts as a newsletter and only goes to recipients who have agreed to receive the newsletter. Without the tick it is normal customer information (e.g. a date change) that all selected people receive.
Legally important: advertising emails without consent are not allowed. For “Email to all newsletter recipients” the tick is the normal case.
Test sending
Enter an address (prefilled with your own) and click “test”: you receive the email in advance, with placeholders filled with sample data. This way you check text, layout and attachments before real recipients see anything.
The test changes nothing – the dialog stays open and you can keep editing. Always test bulk emails beforehand: otherwise a mistake goes to everyone.
Save as template
Saves subject, sender and content of the current email as a mail template so you can load it with one click next time. Opens a small dialog for name and description.
Useful for anything you write more often: course cancellation, reminder of course start, payment reminder in your own words. You then find the template under Communication → Mail templates.
Send
Single email: sends the email immediately and logs it in the history; you see a success or error message. Bulk email: creates a mass-sending run and takes you to the run page, where you release it with “Start sending”.
A yellow warning after single sending means that some of the recipients could not be reached – details in the email history.
Save as template
Enter name and description for the new template, optionally save the recipients too and make it available to all users, then “Save”. The email itself is not sent in the process.
The template then appears in the template selection of this dialog and under Communication → Mail templates, where you can edit it further.
Name
Required field. A descriptive name so you recognize the template immediately in the selection, e.g. “Reminder course start”.
Customers never see the name.
Description
Optional: what and when the template is meant for, e.g. “to all participants one week before course start”.
Helps colleagues choose the right template.
Save recipients too
Saves the current recipients in the template – for fixed distribution lists you write to regularly (e.g. a circular to speakers).
When loading later you can choose whether these recipients replace or add to the current selection.
Available to all users
Ticked = all users of your tenant see and use the template. Without the tick only you.
Tick it for official texts, leave it out for personal drafts.
Mass sending
Mass sending
The bulk email runs of your tenant. At the top are runs still waiting for “Start sending” or currently running; below the completed ones with number of recipients and errors. “Details” shows the status per recipient.
How a run works: in the “Send bulk email” dialog click “Send” → the run appears here as “waiting” → in the details “Start sending” → the server sends in the background, you can leave the page → at the end status “done”; for delivery errors you see their number.
A waiting run sends nothing until you start it – do not forget the second step.
Open and running sendings
Runs with status “waiting” (not started yet) or “sending” (in progress). Via “Details” you start, discard or cancel a run.
Running sendings update their progress automatically.
Progress
How many of the recipients have already been sent to, e.g. 120 / 350. Updates by itself during sending.
If progress stays still for a long time, check in the details whether errors occur.
Status
waiting = not started yet; sending = running; done = completed (with a note if recipients failed); cancelled = stopped by you.
“Done with errors” does not mean nobody received anything – only the named recipients are missing. Details show the error message per address.
Recent
The completed runs. With the filter fields you find a run by subject, check whether a particular address was written to, or search for error texts.
A run cannot be started again – for a follow-up sending to failed addresses you correct the addresses and send the email via the history or a new bulk email.
Date
When the run was created. Newest first.
The start time is shown in the details.
Recipients
How many recipients the run had – excluding people without an email address.
People without an address appear in the details with the status “no address”.
Sent
How many emails the mail server accepted. Whether they arrived at the recipient cannot be seen by the system – bounces end up in your mailbox.
Sent + errors normally equals the number of recipients.
Errors
Number of recipients the mail server rejected. Which ones and why is shown in the details.
Typical: typo in the address, full mailbox, domain that no longer exists.
Reset all filters
Clears all filter fields. Appears only when a filter is active.
You clear individual filters with the X next to the field.
Filter by subject
Searches the subject line of the runs – a part is enough.
Takes effect as you type.
Filter by recipient
Shows runs in which this address occurred – this way you check whether a customer received a bulk email.
A part of the address is enough.
Filter by error
Searches the error messages of the runs, e.g. “mailbox unavailable” or “not found”.
Useful for finding all runs with the same delivery problem.
Mass sending details
Mass sending details
A single bulk email run: at the top subject, sender, creation and end time, status; below that the controls (start, discard, cancel) and the list of all recipients with status and error message.
A new run waits until you click “Start sending”. During sending the page updates automatically; afterwards you see for each recipient when the email went out or why not.
Errors for individual recipients: correct the address in the customer record and send the email to these people individually via the email history or a new bulk email.
Start sending
Releases the run: the server sends the emails in the background, recipient by recipient. You can leave the page. Once started, the run can be cancelled but not reset.
Check subject and number of recipients once more beforehand – after the start, the email has already reached the first recipients before you can cancel.
Discard sending
Deletes a run that has not been started. Nothing is sent. Use this if you noticed a mistake in the text or the recipient selection – and create the bulk email anew.
After the confirmation prompt the run is gone; the associated history entry is kept as documentation.
Cancel sending
Stops a running sending. Emails already sent stay sent; the remaining recipients receive nothing and get the status “cancelled”.
After cancelling you see how many recipients were stopped. A cancelled run cannot be continued.
Recipients
Every person of the run with address, status, time and, if applicable, error message. Failed recipients are marked red.
Clicking a name opens the customer record where possible, so you can correct the address.
Status
open = not its turn yet; sent = accepted by the mail server; failed = rejected (see error); cancelled = run was stopped; no address = person has no email address.
For “no address” you add the email in the customer record and send the email individually.
Error
The mail server’s message when delivery failed, e.g. “mailbox unavailable” (mailbox does not exist or is full).
Check the address, correct it, resend the email individually. For repeated errors despite a correct address, follow up by phone.
Rather see it than read about it?
In 30 minutes we will show you Kursimple with your own course programme. Or set up your own test system in 30 seconds – both free and without obligation.
Questions? +49 5931 990 99 10 · Mon–Thu 8:30–17:30, Fri 8:00–14:00 (CET)