
Customers & participants
The customer record: customer data, participants, invoice recipients, documents, history, tags, extra fields, the customer import and deletion after a set period. These texts sit right next to the fields inside Kursimple – here they are to read through.
Customer documents
Customer documents
Files that belong to this customer – registrations, contracts, certificates, funding evidence. Upload via title + “Upload file” + “save”; PDF, JPG and PNG are allowed.
This way all colleagues have a customer’s documents in one place instead of in email inboxes. Each document shows who uploaded it and when.
The customer themselves does not see these documents. Images from a phone (JPG/PNG) work; save Word files as PDF beforehand.
search
Searches the titles of this customer’s documents. Enter a term and click “search”.
An empty field and “search” shows all again.
Upload file
Chooses the file from your computer (PDF, JPG or PNG). Then enter a title above and click “save” – only then is the document saved.
After saving, “Document uploaded” appears and the file is in the list. Other file types are rejected.
Document title
A descriptive title so colleagues can find the document later – e.g. “Registration swimming course 2027” or “Education voucher employment agency”.
The file name alone (e.g. “scan0034.pdf”) will help nobody later.
Date
When the document was uploaded. Clicking the heading sorts.
Not the date of the document itself – put that in the title if important.
Description
The title assigned on upload.
Sortable via the heading.
File
The file name; clicking opens the document in a new window or downloads it.
Files are stored separately per tenant on the server.
Employee
Who uploaded the document – the right contact person for queries.
Taken automatically from the logged-in user.
Additional details
Additional details
Opens the custom fields for customers, e.g. “How did you hear about us?”. Blue means still empty, yellow means filled in.
An admin defines which fields exist under Administration → Custom Fields Customers/Participants (“applies to” customers or both). The button only appears if such fields exist. If they are asked at checkout, customers fill them in there and also themselves in “My Account”.
Edit Customer
The customer data in two tabs: “Master Data” (name, address, contact, email/login name, newsletter) and “Bank Details” (IBAN, direct debit). Changes apply from saving onwards to new orders and invoices; existing invoices keep their address.
At the top are the tabs of the customer record: Courses, Orders, History, Tag, Documents, Participants, Invoice Recipients. At the very bottom left, “delete” only deactivates the customer – nothing is lost.
A red heading “NOT ACTIVE” means: the customer is deactivated and cannot log in. Administrators reactivate them via the “Customer active” switch.
Gender
Male, female or diverse – optional. Independent of the salutation; the information is mainly needed for statistics (e.g. participants by gender for funding applications).
The field only appears with the tenant variable GESCHLECHT = 1. In the statistics builder it is then available for the row types “Participation” and “Order” (customer) as well as “Member”. If you create a new customer, their participant entry takes over the gender.
Salutation
Mr, Ms or Diverse – emails, invoices and certificates form the salutation from it (“Dear Ms …”).
For companies as customers, choose the salutation of the contact person.
Title
Academic title such as Dr. or Prof., optional. Appears in salutation and address.
Do not enter job titles here.
First name
Required field. As it should appear on the invoice and certificate.
For company customers, the first name of the contact person; the company goes in the “Company” field.
Last name
Required field. The customer list is sorted by last name.
If a name changes (marriage), simply change it here – old invoices remain unchanged.
Company
Company name if the customer books for a company. Appears on invoices above the name. Leave empty for private customers.
If only the invoice should go to a company while the customer stays private, create the company in the “Invoice Recipients” tab instead.
Two fields: “Contact email” for confirmations, invoices and newsletters, and “Email” as the login name for the booking portal. Both are normally the same; the login name must be unique.
If the customer changes their address, you adjust both fields. If “The email / username … already exists” appears when saving, a record with you already has this address – check for duplicates instead of creating a second record.
The login email applies to all providers on Kursimple. If the customer is also with another provider, only they themselves can change it in their profile – you can change the contact email at any time. Every change of the login email goes to the login server; if that fails, the old address remains and you get a notice.
A tick notice next to the field shows whether the customer has confirmed their address.
If the record has no login (guest order or login removed in user management), the field is empty and optional: if you leave it empty, only the record is saved. If you enter an email address, the customer gets a login and – depending on the tenant setting – an activation email; if they already have a Kursimple account with another provider, it is taken over.
Phone 1
Main number for queries and short-notice cancellations. Your tenant can adapt the field’s label (e.g. “Landline”).
Appears in the customer list and participant lists as a call link.
Phone 2
Second number, usually mobile. Label adaptable.
For availability during the course (e.g. parents).
Street
Street of the billing address. Whether the field is required is shown by the asterisk.
House number in its own field next to it.
House number
House number, with a suffix if needed (12a). Separate from the street so that exports and letters work cleanly.
Required if there is an asterisk on the field.
Postcode
Postcode of the billing address.
Required if there is an asterisk on the field.
City
Home or company city of the billing address.
Required if there is an asterisk on the field.
Country
Country of the address. Which countries are available is defined by Administration → Countries.
Important for foreign addresses, because invoice and SEPA direct debit depend on it.
Date and place of birth
The customer’s date of birth – needed for age-restricted courses and some funding evidence. Place of birth only if certificates or authorities require it.
Whether the date of birth is required is shown by the asterisk; depending on the tenant setting, only the year or the full date is recorded.
Comment, web, deletion date, instructor
Further details: “Comment” = internal note (the customer does not see it). “Web” = homepage. “Deletion date” = date from which the record is due for deletion. “convert to instructor” = additionally creates an instructor profile.
- Comment: everything colleagues should know – payment agreements, special features, conversation notes. Also appears in participant lists.
- Deletion date: prefilled automatically when created according to your tenant’s retention period and serves GDPR data deletion. Extend it if the customer remains active.
- convert to instructor: tick and save – the customer then also appears under “Instructors” (message “Customer was converted to instructor”) and can be assigned to sessions.
Tags
The coloured markers of this customer. To change them, switch to the “Tag” tab. Tags serve to filter the customer list and for bulk emails.
Only visible if tags are switched on for your tenant.
Note, member vouchers and direct debit
“Note” = free text, e.g. club or old membership number; only with an entry and the tick “Allow member vouchers” can the customer redeem member vouchers. In the Bank Details tab: “Direct debit” allows direct debits, “Invoice by email” the email dispatch, “Direct debit consent” documents where the permission comes from.
- Note: free field (formerly “Member”), e.g. club or old membership number. A star in the customer list shows an entry. You manage real memberships with fees under “Membership Contracts” – they show the orange badge with a star at the name.
- Allow member vouchers: vouchers that apply only to members only work with this tick. If the Memberships module is switched on, the tick is hidden: then only a current membership counts (orderer or booked participants).
- Direct debit: tick = the customer has agreed to SEPA direct debit collection; only then can “Direct debit” be chosen in orders. IBAN and bank belong to it.
- Invoice by email: tick = invoices are emailed (normal case). Without the tick you print the invoice and send it by post.
- Direct debit consent: form, admin setting or order – as evidence of how the mandate came about.
IBAN
Account number for direct debits, without spaces (e.g. DE89370400440532013000). Required if the customer is to pay by direct debit. Is copied into an order when it is created.
If the customer changes their account, you enter the new IBAN here. Open orders and invoice drafts then show a “Take over customer’s IBAN” button – click it before the SEPA export.
BIC
Bank identifier for the IBAN. Usually optional for German accounts, required for foreign accounts.
Found on the bank card or in the customer’s online banking.
Subscribe / unsubscribe newsletter
Shows whether the customer receives newsletters and lets you subscribe or unsubscribe them. A subscription by you must be confirmed by the customer by email (note “not yet verified”); an unsubscription takes effect immediately and the customer receives a confirmation email.
Below the tick you see who last changed the setting. For bulk emails to all newsletter recipients, use the button “Email to all newsletter recipients” in the customer list; you see the status under Communication → Bulk Email History.
Privacy policy accepted
Tick = the customer has accepted the privacy policy (automatic in the portal, to be confirmed by you for phone registrations).
Without consent you may not write to the customer – clarify this when creating.
save
Saves all changes in both tabs. Afterwards “Customer saved” appears. New orders and invoices use the new data from now on.
Required fields are outlined in red as long as they are empty. With a duplicate email, saving is rejected with a message.
cancel
Discards unsaved changes and returns to the customer list.
If you came from an order, you go back there.
Customer Data tab
Master data, contact, login name, newsletter and bank details of the customer.
Here you change everything concerning the customer and billing address.
Orders tab
All orders of the customer – and the place to create a new order for them.
With courses, amounts, invoices and the actions as in the order list.
Courses tab
All courses in which the customer or their participants take part – the course history.
Helpful for follow-up courses and queries such as “What have I already taken?”.
Documents tab
Uploaded files for the customer (PDF, JPG, PNG): registrations, contracts, evidence.
Visible to all colleagues, not to the customer.
Downloads tab
The download articles the customer has bought: status, when approved, how often downloaded. Here you resend the link, reset the counter or block a download.
The purchases of this record are shown. A new link invalidates the previous one. The tab only appears for customers who have bought a download.
E-Learning tab
The online trainings of this record with their status. The tab only appears if e-learning is switched on and the customer has booked or been invited to a training.
The participations of this record are shown – also those that another customer booked for them. You manage access and invitations in the course under “Learning content” → “Participations”.
Memberships tab
The memberships of this record and its participants with status, fee and membership application. Here you add a membership or end it. The tab only appears if the Memberships module is switched on.
The record itself or one of its participants (e.g. a child) can be a member – the invoice then goes to the customer record. You see all members of a membership in the main menu under Membership Contracts → “Members” tab.
History tab
What has happened with this customer: emails sent, newsletter changes, orders – logged automatically – plus your own notes on phone calls.
Look here before you call a customer: you immediately see what happened most recently.
Participants tab
The people who take part in courses via this customer (children, partner, employees). Create them here before you record an order for them.
The customer themselves can also be a participant and does not have to be created separately for it.
Invoice Recipients tab
Alternative invoice addresses of this customer, e.g. employer or grandparents. For an order, you then choose who the invoice goes to.
Without an entry, the invoice always goes to the customer themselves.
Tag tab
Click tags on and off to mark the customer (e.g. “Member”, “Corporate customer”). You can filter the customer list by tags and send bulk emails.
Only visible if tags are switched on for your tenant.
Customer’s participants
Customer’s participants
The people who take part in courses via this customer – children, partner, employees. Via “Add” you create a person; afterwards you can choose them as a participant in orders.
When do I need an entry? Whenever someone other than the customer themselves takes part in the course. The customer themselves automatically counts as a possible participant.
A grey star before the name shows an entry in the “Note” field, the orange badge with a star at the name a current membership. Pencil = edit; you delete marked people with “Delete” at the bottom – only possible if they appear in no invoice.
search
Searches the names of this customer’s participants. Enter a term and click “search”.
Helpful with many participants (corporate customers).
Add
Opens the window “Create new family member”: name (required), date of birth, contact, remark. After saving, the person is available as a participant in orders.
Address and email can remain empty – then the customer’s data applies. For age-restricted courses, be sure to enter the date of birth.
Delete
Permanently deletes the ticked participants – after confirmation. People who appear in invoices cannot be deleted; a message then appears.
For former participants it is usually enough to no longer book them; deleting is meant for mistakes.
Merge participants
Tick exactly two participants who are the same person (e.g. duplicated after a customer merge) and click “merge”. On the next page you choose which record is kept.
All bookings, attendance, invoice and shopping cart entries, e-learning participations, memberships and tags of the other record move to the one kept. Empty details such as the date of birth are filled in from the other. The other record is deactivated and disappears from this list.
Only for administration and admins. The process cannot be undone.
Additional details
Your tenant’s custom fields for this participant – e.g. swimming badge, allergies, photo permission. Fill in, “save”, done; empty fields simply stay empty.
You open the window with next to the pencil in the list of participants. An admin defines which fields exist under Administration → Participant Custom Fields; the button only appears with the tenant variable TEILNEHMER_ZUSATZ_FELDER = 1. If something is already filled in, the button is yellow, otherwise blue.
The details belong to the participant’s record and are available in the statistics builder (row type “Participation”). When two records are merged, they move along.
Tags
Coloured markers of the person, independent of the customer’s tags.
Name of the tag when hovering with the mouse.
Salutation
Mr, Ms or Diverse – for letters, lists and certificates. Can remain empty for children.
Sortable via the heading.
Name
First and last name of the person as they appear on participant lists and certificates. A star before it = entry in the “Note” field.
Sortable via the heading.
Address
The person’s own street and house number, if different from the customer. Empty = lives with the customer.
Normally empty for children.
City
Postcode and city of the person, if different from the customer.
Empty = same as the customer.
Phone
The person’s own phone number; otherwise the customer’s applies.
In participant lists, depending on the setting, this or the customer’s number is shown.
Mobile
The person’s own mobile number, e.g. for teenagers who can be reached themselves.
Optional.
The person’s own email address. If entered, bulk emails and certificates go to the person, otherwise to the customer.
Leave empty for children.
Date of birth
Date or year of birth of the person – for age-restricted courses and certificates. Whether only the year or the full date is recorded is defined by your tenant.
If the age is outside a course’s target group, the name is marked red in participant lists.
Comment
Internal note on the person – e.g. allergies, people authorized to collect, special features for the course leader. Appears in the participant lists.
Only enter as much as is needed for the course.
Merge participants
Merge participants
Two records of the same customer become one. Check both sides: is it really the same person? A yellow warning appears if name or date of birth do not match.
The counts show what the records are attached to (course participations, attendance …). After merging, everything is attached to the record you keep.
Which record stays?
Choose the record that is kept. The one with more course participations is suggested. Its details remain, only empty fields are filled in from the other.
The other record is deactivated and detached from the customer; its comment states which record it was merged into.
Customer history
Customer history
The log for this customer: automatically entered events (emails sent, newsletter subscriptions and unsubscriptions, orders) and your own notes on phone calls or agreements. New note: enter text, “save”.
Look here before a call: what was most recently sent to the customer, what was agreed? For email entries, the icon on the right opens the sent email.
search
Searches subject and content of the history entries. Enter a term and click “search”.
An empty field and “search” shows everything again.
History entry
Your own note on the customer, e.g. “Call 12 March: wants instalments, 3 instalments agreed”. After “save”, it appears in the history with date and your name.
Write so that a colleague a year from now still understands what was agreed.
Date
When the entry was created. Clicking the heading sorts.
For emails, the time of dispatch.
Subject
For emails the email subject, for notes the beginning of your text.
Sortable via the heading.
Content
The text of the entry or a summary of the email.
You open the complete email via the icon on the right in the row.
Function
Which function created the entry – e.g. email dispatch, newsletter or a manual note.
This way you recognize automatic entries at a glance.
Trigger
Who triggered the entry: an administration user or the customer themselves (e.g. newsletter subscription in the portal).
For your own notes, your name is shown here.
Customer’s invoice recipients
Customer’s invoice recipients
Addresses to which this customer’s invoices can go instead of to them – employer, grandparents, youth welfare office. Record them via “Create New Invoice Recipient”; for an order you then choose the recipient.
The invoice carries the address of the chosen recipient and goes to their email address (if entered). Reminders are then also sent there.
Pencil = edit; you delete marked entries with “Delete” at the bottom – not possible if they appear in invoices.
Company
Company name of the invoice recipient – appears on the invoice above the name.
Empty for private individuals as recipients.
Name
First and last name of the contact person at the invoice recipient.
For companies, e.g. the contact person in accounting.
Address
Street and house number to which the invoice is addressed.
Required for a proper invoice.
City
Postcode and city of the billing address.
Required for a proper invoice.
Comment
Internal note, e.g. cost centre or “invoice by post only”. Does not appear on the invoice.
What should go on the invoice belongs in the item description or the invoice comments.
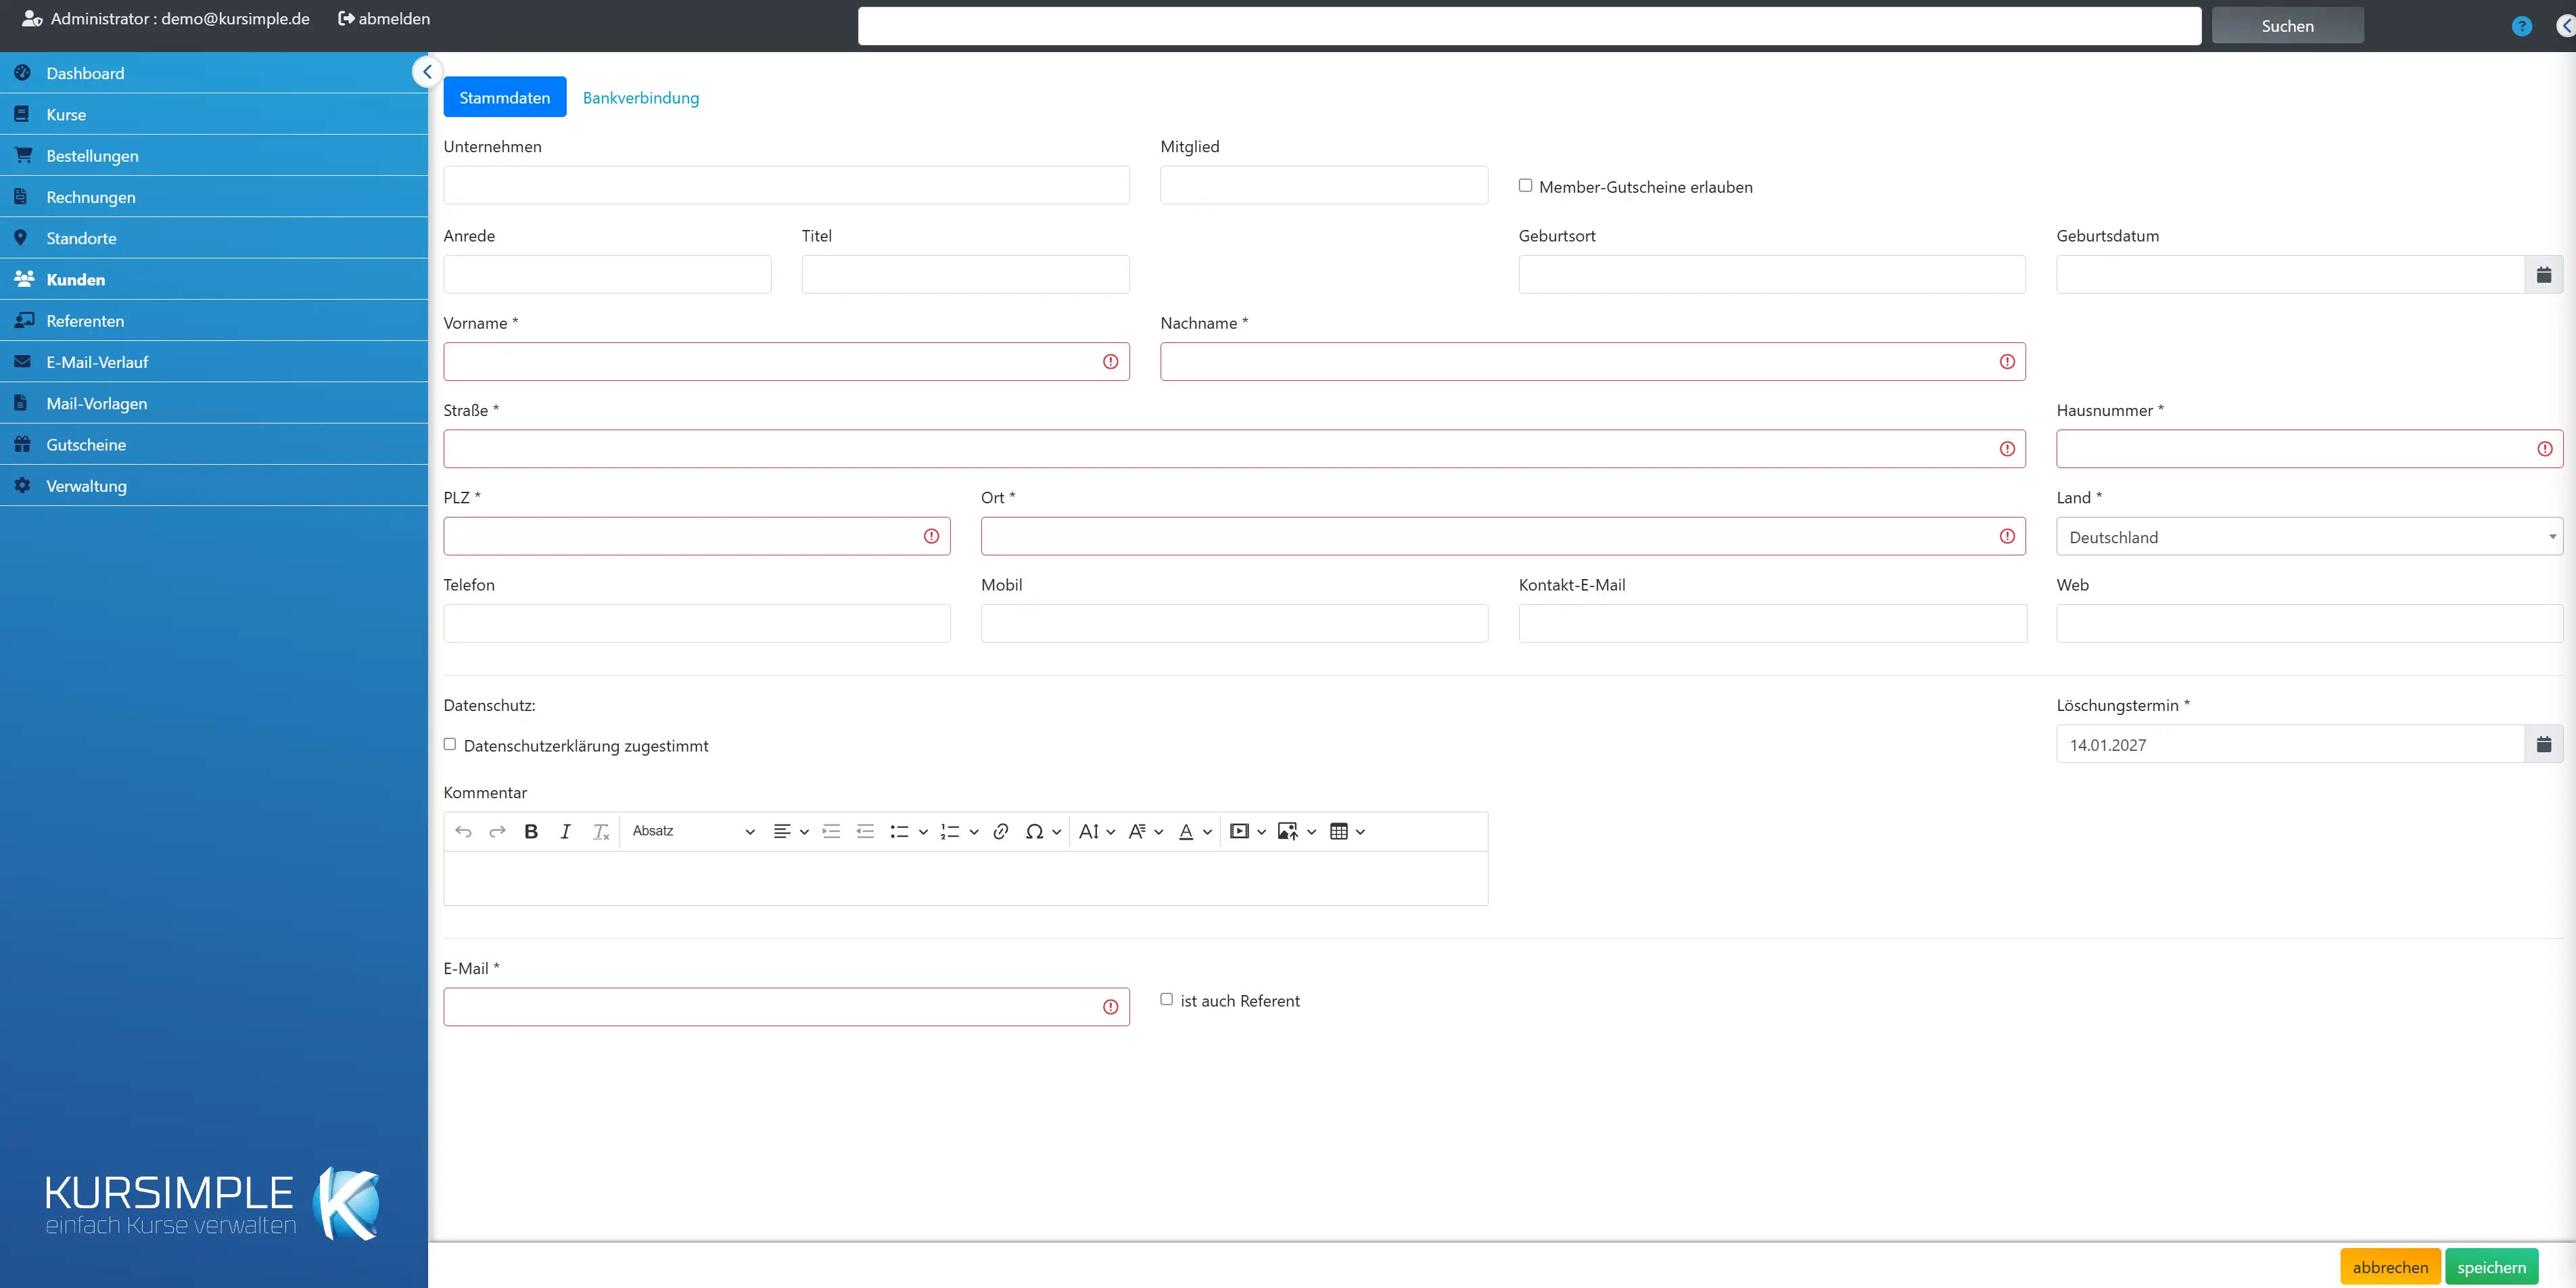
Create a customer
Gender
Male, female or diverse – optional. Independent of the salutation; the information is mainly needed for statistics (e.g. participants by gender for funding applications).
The field only appears with the tenant variable GESCHLECHT = 1. In the statistics builder it is then available for the row types “Participation” and “Order” (customer) as well as “Member”. If you create a new customer, their participant entry takes over the gender.
Salutation
Mr, Ms or Diverse – emails, invoices and certificates form the salutation from it.
For companies as customers, the salutation of the contact person.
Title
Academic title such as Dr. or Prof., optional.
Appears in salutation and address.
First name
Required field. As it should appear on the invoice and certificate.
For company customers, the first name of the contact person.
Last name
Required field. The customer list is sorted by last name.
Check in the customer list beforehand whether the person already exists.
Company
Company name if the customer books for a company. Appears on invoices above the name. Leave empty for private customers.
For a different invoice company, create an invoice recipient later.
“Contact email” for confirmations and invoices, “Email” as the login name for the portal – normally the same address. If the address already has a Kursimple account (e.g. customer with another provider), it is taken over.
Depending on your tenant’s setting, the new customer automatically receives an activation email after saving, with which they set their password for the portal.
A login applies to all providers: if the address is already known to Kursimple, the customer gets their own record with you and logs in with their existing password – instead of the activation email they receive a notice. You do not see data from the other provider. If a record with you already has this address, an error message appears – then edit the existing one.
Customers without an email address: if the tenant variable EMAIL_IST_PFLICHT is 0, the field is optional. Without an address, only the record is created – without a login and without an email to the customer; they can then only book via you. If you enter an address later when editing, they get their login. The default is 1 (required field).
Phone 1
Main number for queries and short-notice cancellations.
The label of the field differs depending on the tenant.
Phone 2
Second number, usually mobile.
Optional.
Street
Street of the billing address; house number in the field next to it.
Required if there is an asterisk on the field.
House number
House number, with a suffix if needed (12a).
Required if there is an asterisk on the field.
Postcode
Postcode of the billing address.
Required if there is an asterisk on the field.
City
Home or company city.
Required if there is an asterisk on the field.
Country
Country of the address; selection according to Administration → Countries.
Germany is usually preselected.
Date and place of birth
Date of birth for age-restricted courses and evidence; place of birth only if certificates or authorities require it.
Whether it is required is shown by the asterisk.
Comment, web, deletion date, instructor
“Comment” = internal note. “Web” = homepage. “Deletion date” = prefilled automatically after the retention period. “is also instructor” = additionally creates an instructor profile.
The comment is meant for colleagues; the customer does not see it.
Tags
You assign tags after creating, in the customer record in the “Tag” tab.
Only visible if tags are switched on.
Note, member vouchers and direct debit
“Note” = free text, e.g. club or old membership number; “Allow member vouchers” enables member vouchers. In the Bank Details tab: “Direct debit” (direct debit allowed), “Invoice by email”, “Direct debit consent” (origin of the permission).
For direct debit you need IBAN plus the tick “Direct debit” – otherwise the payment method cannot be chosen in orders.
IBAN
Account number for direct debits, without spaces. Only needed if the customer is to pay by direct debit.
Also tick “Direct debit”.
BIC
Bank identifier for the IBAN; required for foreign accounts, otherwise optional.
From the customer’s online banking.
Newsletter
The newsletter setting only appears after creating, in the customer record; a subscription must be confirmed by the customer by email.
Do not send a newsletter without consent.
Privacy policy accepted
Tick if the customer has accepted the privacy policy – for phone registrations, please ask actively.
In the portal this happens automatically upon registration.
save
Creates the customer (“Customer created”). Afterwards: add participants and invoice recipients in the record, then the first order in the “Orders” tab.
With a duplicate email, saving is rejected – the customer then already exists. Depending on the tenant setting, an activation email goes to the customer.
cancel
Discards all input; no customer is created.
Back to the customer list.
Customer active
New customers are active and can log in to the portal. Administrators can deactivate them later in the record.
The switch only appears when editing.
Customer tags
Customer tags
At the top the tags the customer has – a click removes a tag. Below the available tags – a click adds it. Every change is saved immediately (“Tag transferred”).
Tags are your own markers (e.g. “Member 2027”, “Corporate customer”, “Interested in yoga”). You define which exist under Administration → Tags. In the customer list you filter by them and send bulk emails to all customers with a tag.
Assigned tags
The tags this customer already has. Clicking a tag removes it immediately.
The colour corresponds to the colour in the customer list; the tag name appears as a description when hovering with the mouse.
Available tags
All tags the customer does not have yet. Clicking assigns the tag immediately; any number is possible.
If a suitable tag is missing, you create it under Administration → Tags.
Edit participants
Gender
Male, female or diverse – optional. Independent of the salutation; the information is mainly needed for statistics (e.g. participants by gender).
The field only appears with the tenant variable GESCHLECHT = 1. In the statistics builder you choose it for the row type “Participation” under “Participant”. If you merge duplicate participants, a missing gender is filled in.
Salutation
Mr, Ms or Diverse – for letters, lists and certificates. Can remain empty for children.
Optional.
Title
Academic title, optional.
Appears on certificates before the name.
Note
Free field (formerly “Member”), e.g. club or old membership number. An entry shows a star in lists and is a prerequisite for member vouchers.
You manage real memberships with fees and membership number in the Memberships module (“Memberships” tab of the record).
Allow member vouchers
Tick so that the person can redeem vouchers that apply only to members. Only works together with an entry in the “Member” field.
Without the tick, the system rejects member vouchers for this person.
First name
Required field – this is how the name appears on participant lists and certificates.
Please no pet names.
Last name
Required field – even if it differs from the customer’s.
Searching and sorting is done by last name.
Street
Only fill in if the person lives somewhere other than the customer. Empty = the customer’s address.
Normally empty for children.
House number
For the differing address; otherwise empty.
Optional.
Postcode
For the differing address; otherwise empty.
Optional.
City
For the differing address; otherwise empty.
Optional.
Country
For the differing address; otherwise empty.
Optional.
Phone
The person’s own landline number, if they should be reachable themselves. Otherwise the customer’s number applies.
Optional.
Mobile
Own mobile number, e.g. for teenagers.
Optional.
Contact email
The person’s own email address. If entered, bulk emails and certificates go directly to the person instead of to the customer.
Leave empty for children.
Web
The person’s homepage, optional – handy for participants who are providers themselves.
Can remain empty.
Comment
Internal note for the course leader: allergies, people authorized to collect, special features. Appears in the participant lists.
Only enter what is really needed for the course.
Date of birth
For age-restricted courses and certificates. Depending on the tenant setting, only the year or the full date.
If the age is outside a course’s target group, the name is marked red in participant lists – you spot wrong bookings immediately.
Place of birth
Only needed if certificates or authorities (e.g. funding evidence) require it.
Optional.
Deletion date
Date from which the record is due for GDPR deletion. Prefilled after the retention period; extend it as long as the person takes part actively.
The date does not delete anything immediately – it marks the record for data cleanup.
Privacy policy accepted
Tick if consent to the privacy policy exists – for minors given by the parents (the customer).
In the portal, consent is recorded automatically.
cancel
Closes the window without saving.
Input is lost.
save
Saves the changes and closes the window. Participant lists and future orders use the new data.
First and last name are required.
Create a person
Company
Company name, if the person represents a company. Leave empty for family members.
Optional.
Gender
Male, female or diverse – optional. Independent of the salutation; the information is mainly needed for statistics (e.g. participants by gender).
The field only appears with the tenant variable GESCHLECHT = 1. In the statistics builder you choose it for the row type “Participation” under “Participant”. If you merge duplicate participants, a missing gender is filled in.
Salutation
Mr, Ms or Diverse – for letters, lists and certificates. Can remain empty for children.
Optional.
Title
Academic title, optional.
Appears on certificates before the name.
Note
Free field (formerly “Member”), e.g. club or old membership number. An entry is a prerequisite for member vouchers.
You manage real memberships with fees in the Memberships module.
Allow member vouchers
Tick so that the person can redeem vouchers that apply only to members. Only works together with the “Member” field.
Without the tick, the system rejects member vouchers.
First name
Required field – this is how the name appears on participant lists and certificates.
Please no pet names.
Last name
Required field – even if it differs from the customer’s.
Searching and sorting is done by last name.
Street
Only fill in if the person lives somewhere other than the customer. Empty = the customer’s address.
Normally empty for children.
House number
For the differing address; otherwise empty.
Optional.
Postcode
For the differing address; otherwise empty.
Optional.
City
For the differing address; otherwise empty.
Optional.
Country
For the differing address; otherwise empty.
Optional.
Phone
The person’s own landline number; otherwise the customer’s applies.
Optional.
Mobile
Own mobile number, e.g. for teenagers.
Optional.
Contact email
The person’s own email address. If entered, bulk emails and certificates go directly to the person instead of to the customer.
Leave empty for children.
Web
The person’s homepage, optional.
Can remain empty.
Comment
Internal note for the course leader: allergies, people authorized to collect, special features. Appears in the participant lists.
Only enter what is needed for the course.
Date of birth
For age-restricted courses and certificates – be sure to enter it for children’s courses. Depending on the tenant setting, only the year or the full date.
If the age is outside a course’s target group, the name is marked red in participant lists.
Place of birth
Only needed if certificates or authorities require it.
Optional.
Deletion date
Date from which the record is due for GDPR deletion. Prefilled after your tenant’s retention period.
Does not delete anything immediately – marks the record for data cleanup.
Privacy policy accepted
Tick if consent exists – for minors given by the parents (the customer).
In the portal, consent is recorded automatically.
cancel
Closes the window without creating the person.
Input is lost.
save
Creates the person (“The family member was created successfully”). Afterwards you can choose them as a participant in an order.
First and last name are required.
Create an invoice recipient
Company
Company name that appears on the invoice above the name – for employers, clubs, authorities. Leave empty for private individuals as recipients.
For a proper invoice, either company or name must be filled in.
Salutation
Salutation of the contact person at the invoice recipient – for the cover letter to the invoice.
Optional.
Title
Academic title of the contact person, optional.
Appears in the address.
Note
Free field (formerly “Member”); normally empty for invoice recipients.
Optional.
Allow member vouchers
Normally irrelevant for invoice recipients – vouchers are redeemed by the customer.
Can remain empty.
First name
First name of the contact person (e.g. in accounting). For companies without a fixed contact person, a placeholder such as “Accounting” in the last name is enough.
Appears in the billing address.
Last name
Last name of the contact person – appears in the billing address.
Required field.
Street
Street of the billing address – required for a proper invoice.
House number in the field next to it.
House number
House number of the billing address.
With a suffix if needed.
Postcode
Postcode of the billing address.
Required for a proper invoice.
City
City of the billing address.
Required for a proper invoice.
Country
Country of the billing address – important for tax with foreign invoices.
Selection according to Administration → Countries.
Phone
Number for queries about the invoice, e.g. of accounting.
Optional.
Mobile
Mobile number of the contact person, optional.
Can remain empty.
Contact email
The address to which invoices for this recipient are emailed – e.g. invoices@company.com. If it is missing, the customer receives the invoice.
Reminders also go to this address.
Web
Homepage, optional.
Can remain empty.
Comment
Internal note on invoicing, e.g. cost centre, the employer’s order number or “by post only”. Does not appear on the invoice.
What should go on the invoice belongs in the item description.
Date of birth
Usually not needed for invoice recipients.
Can remain empty.
Place of birth
Usually not needed for invoice recipients.
Can remain empty.
Deletion date
Date from which the record is due for GDPR deletion. Prefilled after the retention period.
Note that invoice data must be retained for a long time for tax purposes.
Privacy policy accepted
Tick if consent exists – for companies usually via the contract with the customer.
Optional.
cancel
Closes the window without creating or changing the invoice recipient.
Input is lost.
save
Saves the invoice recipient. Afterwards they are available under “Invoice recipient” in this customer’s orders.
Existing invoices do not change.
Tabs of the customer record
Contact persons tab
The actual customers: they have an account, place orders and receive the invoice. You create new customers here; participants and invoice recipients always belong to a contact person.
Family example: the mother is the contact person, the children are participants. Company example: the HR department is the contact person, the employees are participants, and the company itself can be an invoice recipient.
Participants tab
All people who take part in courses – even without an account of their own, e.g. children or employees. Each belongs to a contact person through whom order and invoice run.
Search here if you only know the participant’s name (e.g. the child’s) – you would not find them in the list of contact persons.
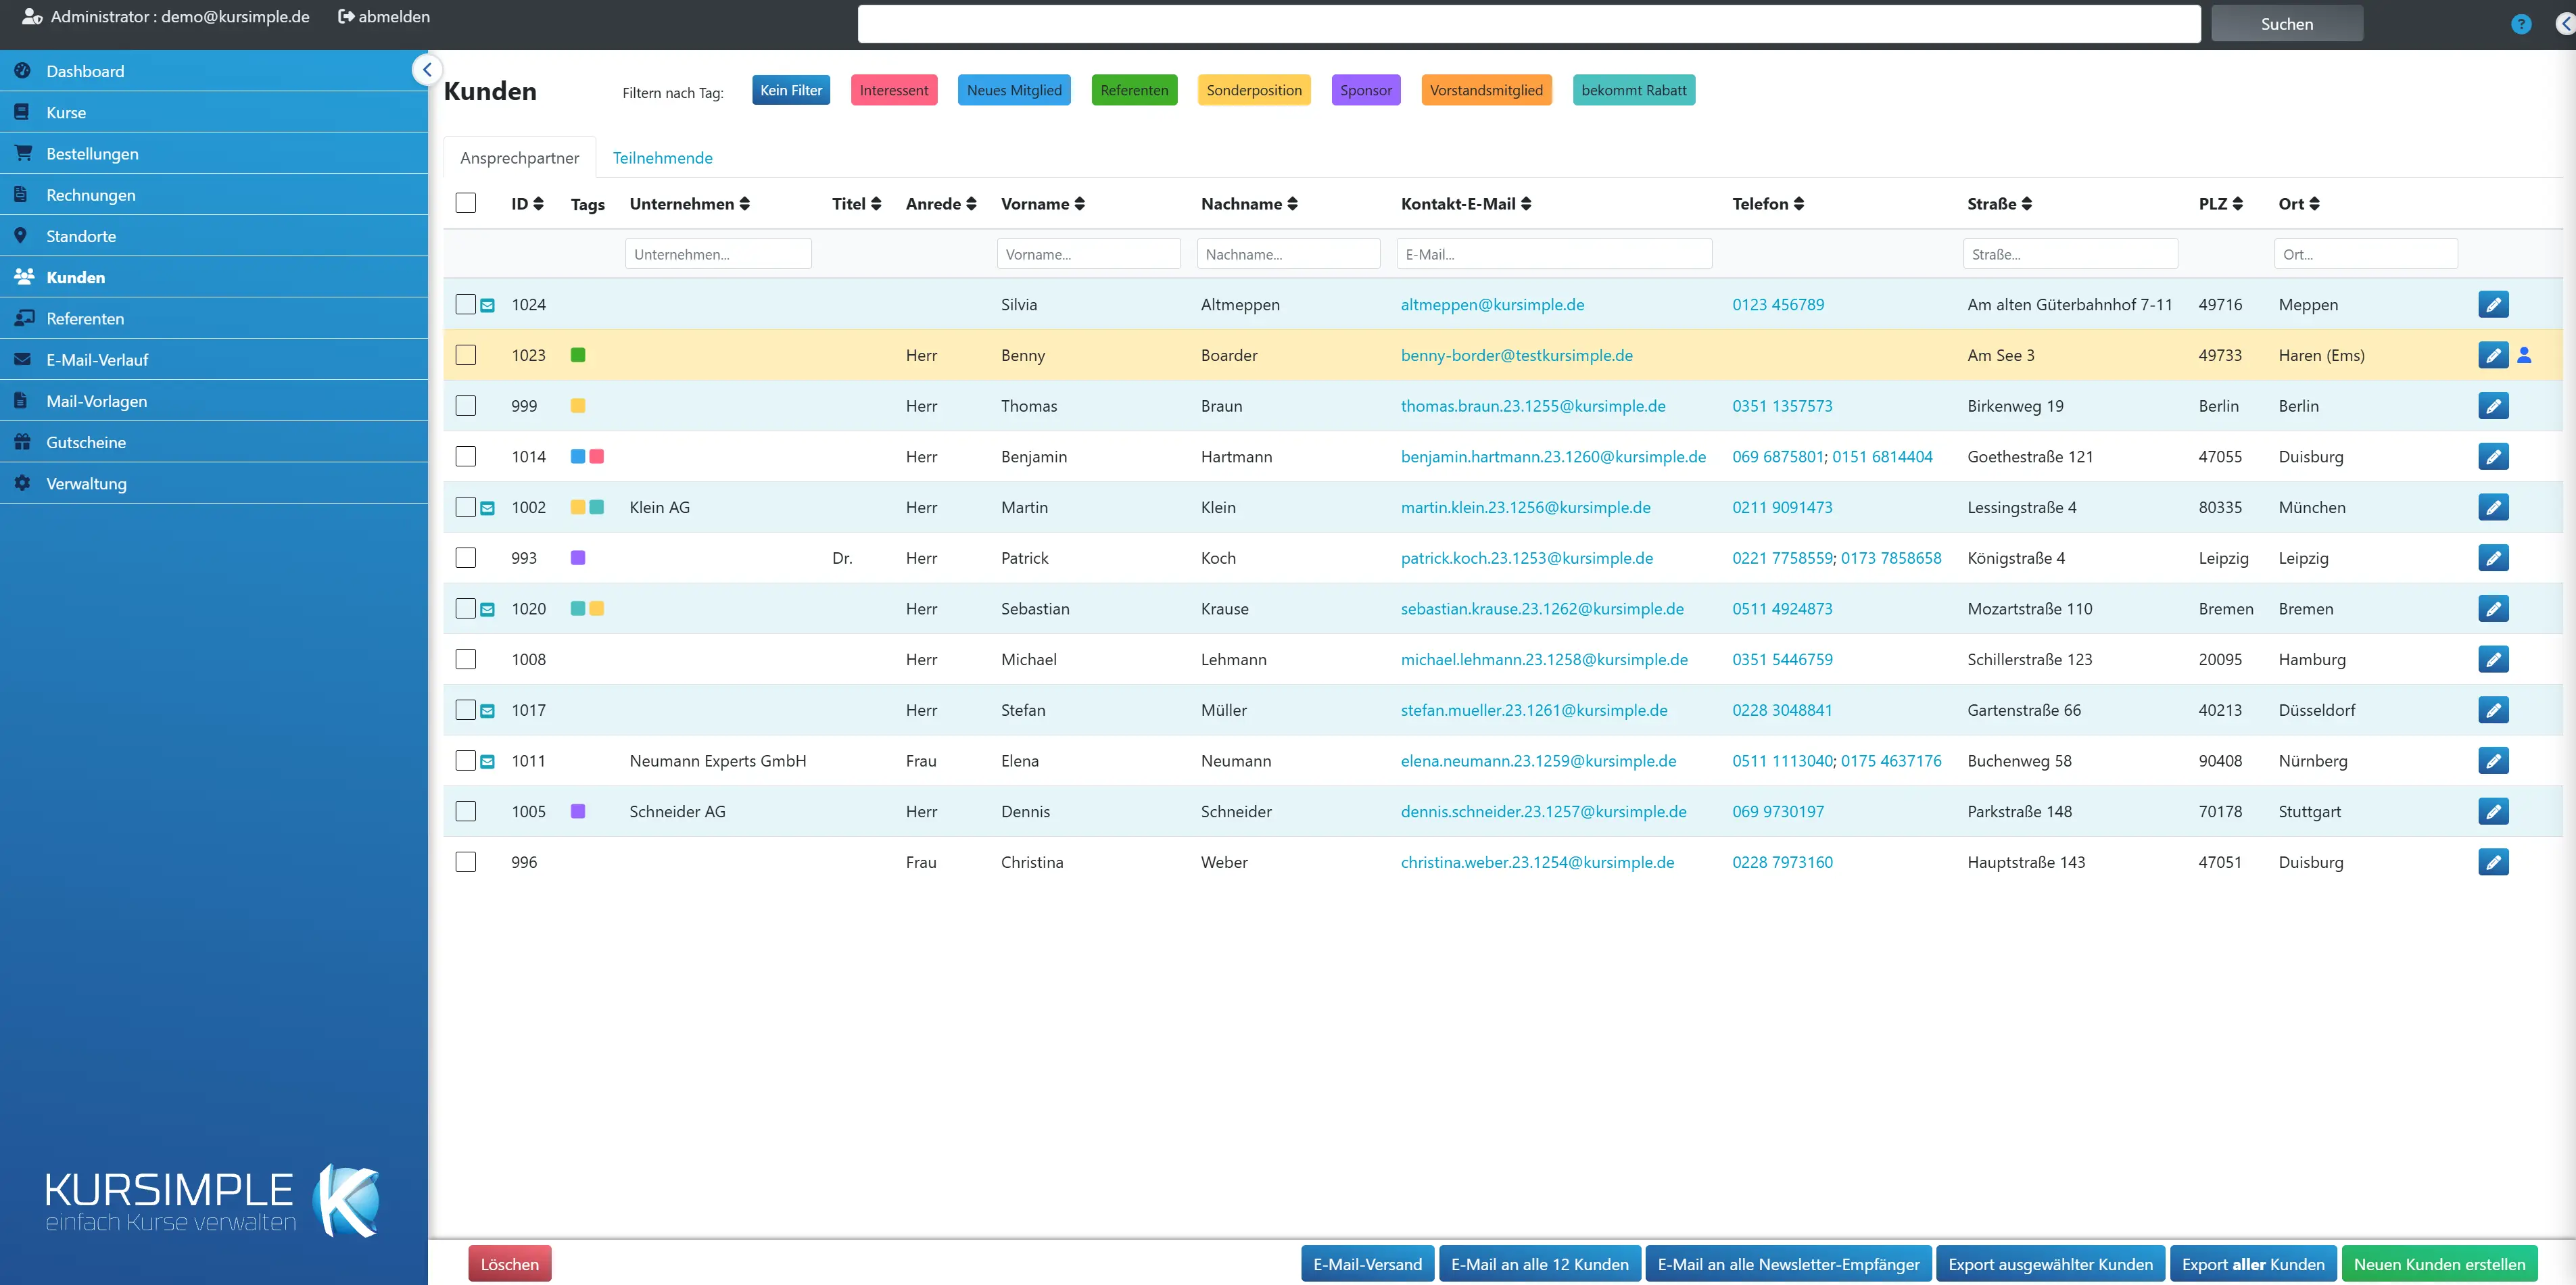
Customers
Customers
All contact persons of your tenant. Here you search for customers, open their record (orders, invoices, participants), create new customers, write bulk emails and export addresses.
Finding customers: type into the filter fields below the column headings (name, email, phone, city) – the list filters as you type. You sort via the column headings. If tags are switched on, the colored buttons above the table filter.
Opening a customer: pencil in the row → the customer record with the tabs Customer data, Courses, Orders, History, Tags, Documents, Participants and Invoice recipients.
Row colors: red = deactivated customer (visible to administrators only), yellow = the customer is also a speaker. Icons next to the ID: envelope = may receive the newsletter, star = member, “D” = possible duplicate.
New order for a customer: open the record → “Orders” tab → “New order”.
Filter by tag
Clicking a colored tag button shows only customers with that tag, e.g. all “Corporate customers”. “No filter” cancels the selection.
The tag filter also applies to “Export all customers” – so you can export e.g. only club members. You assign tags in the customer record in the “Tag” tab; which tags exist, you define under Administration → Tags. The function only appears if tags are switched on for your tenant.
Check duplicates
For managers and admins: marks customers that might have been created twice (same name or same email) with a yellow “D”. Clicking the D shows the possible duplicates and offers merging.
When merging, orders, invoices, participants and history of one customer are transferred to the other; beforehand a preview shows what will happen. If the same participant exists for both customers, the preview suggests merging them as well. The process cannot be undone – check both records beforehand.
“Hide duplicate check” switches the marking off again.
Duplicate participants
Participants that exist for both customers: same first and last name, date of birth identical or given for only one. Ticked pairs are merged as well.
Example: customer A has participants A.1 and A.2, customer B has B.1 and B.3, and B.1 is the same person as A.1. If B is merged into A, B.1 is absorbed into A.1 – with all bookings, attendances and other links. B.3 moves to A unchanged. Afterwards A has the participants A.1, A.2 and B.3.
The participant of the main record is always kept; empty details such as the date of birth are filled in from the other. Remove the tick if two people with the same name are different. Pairs that are not suggested you merge later in the customer’s “Participants” tab.
Members only
Shows only customers with a membership running today (Memberships module). Bulk email and export take over the filter.
The orange badge with a star next to the name shows a running membership (the tooltip names it), an outlined “from …” a future one. You see the same badge everywhere the customer appears – in orders, invoices and course bookings. The gray star in the Tags column still stands for an entry in the “Additional info” field.
Selection
Checkbox for marking customers for the buttons below: bulk email, export, delete (= deactivate). The checkbox in the header row selects all customers on the current page.
For actions across all customers (not just the page) use “Export all customers” or a bulk email with a tag filter.
ID
Internal number of the customer. Together with the prefix from the application data it forms the customer number on invoices. Icons next to it: envelope = newsletter allowed, star = member, “D” = possible duplicate.
If a customer names their customer number from the invoice, remove the prefix (Administration → Variables, KUNDENNUMMER_ZUSATZ) to get the ID – or simply search for the name.
Tags
Colored markers of the customer. The tag name appears when hovering with the mouse. Tags are assigned in the customer record in the “Tag” tab.
Tags are suited to anything you want to filter by later or send bulk emails to: membership status, corporate customer, interests.
Company
Company name, if the customer books for a company. Appears on invoices above the name.
If the invoice is to go to a different company than the customer, use an invoice recipient in the record instead.
Title
Academic title (Dr., Prof.) used in salutation and address.
Sortable via the column heading.
Salutation
Mr, Ms or Diverse – the basis for the salutation in emails, invoices and certificates.
If the salutation is missing, templates use a neutral wording.
First name
First name of the customer. Via the pencil in the row you open the customer record.
Sortable via the column heading.
Last name
Last name of the customer – the list is sorted by it. Clicking the heading reverses the order.
For double names or a name change, searching by email or phone helps.
Contact email
The address for confirmations, invoices and newsletters – at the same time the login name in the booking portal. Must be unique.
Two customers with the same email are not possible; when creating, a message appears that the email already exists. This is usually a hint of a duplicate.
Phone
The customer’s phone number as a call link. Your tenant can adjust the column label (e.g. “Landline”).
For queries about bookings and short-notice cancellations.
Street
Street and house number – part of the billing address.
Changes affect new invoices; existing ones keep their address.
Postcode
Postcode – part of the billing address. Sortable, e.g. for regional evaluations.
In the filter the beginning is enough, e.g. “10” for all Berlin districts.
City
Place of residence – part of the billing address.
Sortable via the column heading.
Actions
Pencil = open customer record. Letter icon to its left = write a letter to this customer (if letters are switched on). Person icon next to it = the customer is also a speaker (clicking opens the speaker profile). For inactive customers “Reactivate customer” appears.
The customer record is the central page per customer: customer data, courses, orders (where you can also create new ones), history, tags, documents, participants, invoice recipients.
Reset all filters
Clears all filter fields at once. Appears only when a filter is active. If you are missing a customer, click here first.
You clear individual filters with the X next to the field.
Filter by company
Searches the company name – a part is enough.
Shows all contact persons of a company.
Filter by first name
Searches the first name – a part is enough, case does not matter.
Combine with the last name if the name is common.
Filter by last name
Searches the last name – a part is enough.
Participant names (e.g. children) are not found here – use the “Participants” tab for that.
Filter by email
Searches the contact email. A part such as “@company.com” also makes sense for finding all customers of a company.
Handy when a customer writes and you only see the sender address.
Filter by phone
Searches phone and mobile number. Enter a digit sequence without spaces, e.g. the last digits from the display.
A part of the number is enough.
Filter by street
Searches the street – a part is enough.
E.g. to find all customers at a shared address (dormitory, company).
Filter by postcode
Searches the postcode. The beginning such as “10” also works.
Can be combined with the tag filter and bulk email for regional campaigns.
Filter by city
Searches the place of residence – a part is enough.
E.g. all customers from “Newtown”.
Export DATEV customer master data
Downloads the marked customers in the DATEV debtor format so that accounting can reconcile the customer master data. Only visible if DATEV is switched on for your installation.
Tick customers beforehand. The customer number in the file is the ID plus the prefix from the application data – the same as on the invoices.
Export selected customers
Downloads name, address and contact data of the ticked customers as a file, e.g. for mail merges or labels.
The file can be opened in Excel. For all customers at once use “Export all customers”.
Export all customers
Address list of all customers – regardless of selection and page. If a tag filter is set above, only customers with that tag are exported.
Mind data protection: exported files contain personal data and do not belong on unsecured computers or in emails to third parties.
Create new customer
Creates a new contact person. Name and a unique email address are required. You add participants (e.g. children) and invoice recipients afterwards in the customer record.
Before creating, use the email filter to check whether the customer already exists – the same email cannot be assigned twice. Depending on your tenant’s settings, the new customer automatically receives an activation email for their portal account.
Import customers
Takes over many customers at once from a CSV file, e.g. from an old program or an Excel list. Admins only.
You upload the file, map the columns to the customer fields and see in the trial run which customers are new, which already exist and where entries are faulty. Only the selected new customers are created – each immediately with a first participant with their data. No login is created and no email is sent.
Participants
Participants
All people who take part in courses, with their contact person. Here you find e.g. a child by their name and get to the parents’ record. With the checkboxes you select people for bulk emails or exports.
Participants have no account of their own; orders and invoices always run through the contact person (column on the right). You create new participants in the contact person’s customer record in the “Participants” tab.
Filter via the fields below the headings, sort via the headings.
Selection
Checkbox for marking for bulk email or export. Bulk emails go to the person’s email, otherwise to the contact person.
The checkbox in the header row selects all people on the current page.
ID
Internal number of the person, assigned by the system.
Not the customer number – that belongs to the contact person.
Tags
Colored markers of the person (not of the contact person). Name when hovering with the mouse.
Tags on participants are suited e.g. for skill levels or group membership.
Salutation
Mr, Ms or Diverse – for letters, participant lists and certificates.
For children the salutation can stay empty.
First name
First name of the person. Clicking opens the edit window.
Sortable via the heading.
Last name
Last name – default sorting of the list.
You find children with a different last name than their parents here, not in the customer list.
Year of birth
The person’s year of birth – important for age-restricted courses. The funnel in the heading opens a from–to filter, e.g. all birth years 2015 to 2017.
The column only appears if dates of birth of participants are recorded for your tenant (Administration → Variables, PARTICIPANTS_DATEOFBIRTH).
Note
Internal note on the person, e.g. allergies, authorized pick-up persons or special features for the instructor.
Also appears in the participant lists of the courses. Only enter confidential health data if it is necessary for running the course.
Contact email
The person’s own email address, if available. If it is missing, emails go to the contact person.
Usually empty for children.
Phone
The person’s own phone number; otherwise you use the contact person’s.
Stored as a call link.
Contact person
The customer the person belongs to – order and invoice run through them. Clicking opens the customer record.
For a new booking of this person: contact person’s record → “Orders” tab → “New order” → choose the person as participant.
Actions
Pencil = edit the person in the dialog (name, date of birth, contact, note).
To delete or reassign to another contact person, use the “Participants” tab in the customer record.
Reset all filters
Clears all filter fields at once. Appears only when a filter is active.
You clear individual filters with the X next to the field.
Filter by first name
Searches the person’s first name – a part is enough.
Takes effect as you type.
Filter by last name
Searches the person’s last name – a part is enough.
Takes effect as you type.
Filter by year of birth
Enter a four-digit year, e.g. 2016. For a range (2015 to 2017) use the funnel in the column heading.
Only visible if dates of birth are recorded.
Filter by note
Searches the internal note, e.g. “allergy”.
A part of the text is enough.
Filter by email
Searches the person’s own email – not the contact person’s.
A part is enough.
Filter by phone
Searches the person’s phone number. Enter a digit sequence.
A part is enough.
Filter by contact person
Searches the name of the associated customer – shows all participants of a family or company.
A part of the name is enough.
Export selected
Downloads name and address of the ticked participants as a file, e.g. for name tags or mail merges.
Tick people beforehand. The file can be opened in Excel.
Create new customer
Creates a new contact person – not a participant. You create participants without an account of their own in the contact person’s customer record in the “Participants” tab.
If the contact person already exists (e.g. the parents), open their record via the customer list.
Invoice recipients
Invoice recipients
All people and companies to whom invoices can be addressed differently from the customer – e.g. employer, grandparents, youth welfare office. They are created in the customer record; here you see them tenant-wide with their contact person.
An invoice recipient is selected in an order or in an invoice draft; the invoice then carries their address. The recipient still has to pay – so send reminders there.
Selection
Checkbox for marking for bulk email or export. The checkbox in the header row selects all.
E.g. to inform all company invoice recipients about a price change.
ID
Internal number of the invoice recipient, assigned by the system.
Relevant for internal use only.
First name
First name of the invoice recipient. Clicking opens the edit window.
For companies the company name is in the edit window under “Company”.
Last name
Last name – default sorting of the list.
Sortable via the heading.
Note
Internal note, e.g. “Always invoice with cost center 4711” or “by post only”.
Does not appear on the invoice.
Contact email
The address to which invoices for this recipient are emailed. If it is missing, the contact person gets the invoice.
For companies e.g. the accounting address.
Phone
Phone number of the invoice recipient for queries about the invoice.
Stored as a call link.
Contact person
The customer the invoice recipient belongs to. Clicking opens the customer record.
An invoice recipient only applies to the orders of this customer.
Actions
Pencil = edit the invoice recipient in the dialog (company, name, address, email).
Changes affect new invoices; existing ones keep their address.
Export list
Downloads name and address of the ticked invoice recipients as a file.
Tick entries beforehand.
Create new customer
Creates a new contact person – not an invoice recipient. You create invoice recipients in the customer’s record in the “Invoice recipients” tab.
An invoice recipient always needs a customer they belong to.
Orders of the customer
Orders of the customer
All orders of this customer with courses, amount and invoices. Here you create a booking for the customer via “New order” – the regular way for registrations by phone or in writing.
Recording a new booking: first check in the “Participants” tab whether the participating person has been created (necessary for children; the customer themselves also counts as a participant). Then “New order” → choose course date and participant → save → in the order “Send confirmation” and “Create invoice”.
The columns correspond to the order list; the eye in the row opens the order.
search
Searches order number and course title of this customer’s orders. Enter a term and click “search”.
An empty field and “search” show all orders again.
New order
Opens the order form for this customer: course date, participant, quantity, price, payment method. Saving reserves the places; you send a confirmation afterwards from within the order.
If the customer has no participants, the form points this out and offers “Create participant”. For direct debit, IBAN and bank collection must be stored in the customer data.
Order number
Number of the order as the customer knows it. Clicking opens the order with items, invoices and status.
Sortable via the heading.
An orange star after the number marks a membership application: the order collects the contribution invoices of a member. Hover over it with the mouse to see the membership.
Course title
The booked courses with date and below them the participants per item.
Clicking the course or date opens it.
Date
The order date – the withdrawal period runs from here. Sortable.
The newest orders are at the top.
Amount
The final amount of the order (gross, after vouchers).
Whether it has been paid you see from the invoices in the next column.
Invoices
The invoices for the order with payment status. Clicking opens the invoice. Empty = no invoice created yet – you do that in the order.
With several invoices (partial invoices, credit notes) all are listed.
Contact email
The email address at the time of the order. Clicking opens the send dialog with this order as the reference.
If the customer has a new address in the meantime, the old one is still shown here – sending uses the current address from the customer data.
Phone
Phone number at the time of the order, as a call link.
The current number is in the “Customer data” tab.
Actions
Eye = open order, pencil = edit (only while “On hold”), paper plane = send order confirmation to the customer.
Exactly as in the order list.
Courses of the customer
Courses of the customer
All courses in which the customer or their participants take part – across all orders, with speaker, category, start and the participants. Clicking the course opens it.
Useful for the question “What has this customer already done with us?” – e.g. for advanced courses or loyalty discounts. The bookings themselves (amounts, invoices) are in the “Orders” tab.
Course title
The booked course; clicking opens the course data. Sortable.
A course appears once per booked date.
Speaker
Who leads the booked date – from the date data.
Sortable via the heading.
Category
The topic of the course from the course data.
Sortable – so you see e.g. all of the customer’s language courses together.
Start date
Start of the booked date. Sortable – future courses first or last.
For times and course days, open the date in the course.
Course cost
The price of the date (gross, without vouchers). What was actually charged is in the order.
Sortable via the heading.
Participants
Which of the customer’s people take part in this date – the customer themselves or their participants.
You make changes to participants in the order.
Course number
The course number from the course data (your own identifier, e.g. from the program booklet).
Empty if no number is entered in the course.
Custom fields for customers/participants
Custom fields for customers/participants
Here you create fields that you can fill in for participants, customers or both: text field, radio buttons (single choice) or checkboxes (multiple choice or a single tick).
You fill in participant fields in the “Participants” tab of a customer record via , and customer fields in “Edit customer” via “Additional details”. You can choose active fields in the statistics builder: participant fields for the row type “Participation” (group “Participant custom fields”), customer fields for “Participation” and “Order” (group “Customer custom fields”).
A field you no longer need can be set to “not active”: it disappears from the dialog and from the statistics, but the data is kept. Deleting removes the field together with all its data.
The feature is switched on with the tenant variable TEILNEHMER_ZUSATZ_FELDER = 1.
Order
Use the arrows to move a field up or down – the fields appear in the participants dialog in this order.
In the statistics you choose the fields one by one; you define their order there in the template.
Create or edit a custom field
Create or edit a custom field
Label (shown in the dialog and in the statistics), type and, for radio buttons or checkboxes, the options, one per line.
- Text field: free text, e.g. “Allergies”.
- Radio buttons: exactly one choice from at least two options, e.g. “Seahorse / Bronze / Silver / Gold”.
- Checkboxes: several options can be ticked, e.g. “vegetarian / lactose-free / gluten-free”. Without options a single tick, e.g. “Photo permission” – yes/no in the statistics.
If you rename an option, answers that are already saved keep the old spelling and continue to appear in the dialog and in the statistics.
Where the field appears
Define whether the field applies to participants, customers or both, and whether customers fill it in themselves at checkout and in “My account” – optionally or as a required field.
- Applies to: you fill in participant fields in the “Participants” tab, customer fields in “Edit customer”.
- At checkout: “optional” or “required field” asks for the field when booking – customer fields with the address, participant fields per participant. If the same person is in several courses, checkout asks them only once. Logged-in customers see their saved details pre-filled; after the order the details are stored on the record (also for guest orders), and fields left empty delete nothing.
- Categories: only ask for courses of these categories, e.g. “Swimming badge” only for swimming courses. Empty means: for every course.
- Note for customers: appears below the field at checkout and in “My account”.
- Participant list: shows a participant field in the participant list of the course (below the name) and on the attached page “Further details on the participants” of the printed list. Details such as allergies are health data – only those who may see the participants of the session can see them.
create / save
Saves the field. A new field goes to the end of the list; you change the order in the list with the arrows.
Only active fields appear in the participants dialog and in the statistics builder.
Further details
Further details
Here you see and change the details the provider would like to know in addition – for yourself or a person you book for.
A field you empty is deleted. The provider only asks for required details when you book – here you can leave any field empty.
save
Applies your details. They take effect immediately and are pre-filled the next time you book.
“cancel” takes you back without changes.
Import customers
Import customers
Take over many customers at once from a CSV file: upload, map columns, check the trial run, import the selected customers.
Every customer created immediately gets a first participant with their data (as with “New customer”). No login is created and no email is sent – you enter the login email later in the customer record if needed.
The import recognizes customers that already exist by first name, last name and email address (case-insensitive) and does not create them twice. At the bottom of the customer record it says “Captured by import on …”.
The import always goes into the provider you are currently logged in to.
CSV file
A text file with one row per customer, e.g. from Excel via “Save as → CSV (delimiter-separated)”.
Umlauts may be encoded in UTF-8 or in the Windows character set (Excel); both are recognized. Fields containing delimiters or line breaks must be in quotation marks – Excel does this by itself.
The file stays on the server for one day at most and is deleted after the import.
Delimiter
What the columns are separated by: semicolon (German Excel), comma or tab. “detect automatically” is almost always enough.
If in the next step all information is in a single column, the delimiter was wrong – then upload the file again with the correct delimiter.
Saved mappings
Mappings you saved under a name when mapping. They fit any file with the same column names.
They are applied in the “Map fields” step. Deleting removes only the saved mapping, no customers.
Map fields
Map fields
For each customer field, choose the column of the file it comes from. First name and last name are required, fields without a column stay empty.
Matching column names (e.g. “First name”, “Postcode”, “Email”) are already suggested – check them anyway. Below you see the first records of the file for checking.
Apply saved mapping
Sets all fields the way you saved them earlier under this name.
If a column of the saved mapping is missing in this file, a note appears and the field stays unmapped.
Column from the file
Behind each column name is a sample value from the first record. “— do not import —” leaves the field empty.
- Street and house number (in one column): splits e.g. “Am Markt 12a” into street and house number.
- Date of birth: e.g. 17.05.1980 or 1980-05-17.
- Country: a code such as DE or the name such as “Germany”.
- Gender (only with gender switched on): male/female/diverse or m/f/d.
- IBAN: is checked for validity; this does not create a direct debit mandate.
Save mapping as
With a name, the mapping is saved when you click “Start trial run” and is available for selection at the next import. An existing name is overwritten.
Leave empty if you only need the mapping for this file.
Start trial run
Checks all records with this mapping – nothing is saved yet.
“cancel” deletes the uploaded file, “other file” takes you back to uploading.
Trial run
Trial run
This is what the import would look like. Nothing is saved yet: check errors and notes and choose which new customers are created.
You correct faulty records in the file and upload it again – or you leave them out. Via “Change mapping” you return to the mapping.
Status
new = will be created; existing = a customer with the same first name, last name and email already exists, it stays unchanged; error = cannot be created as is.
Notes (e.g. “Address incomplete”, “No email address”) do not stop the import. For an order, however, the customer later needs a complete address.
Errors are e.g. a missing first or last name, an invalid email address, IBAN or an unreadable date of birth, entries that are too long, or the same customer twice in the file.
Selection
Every new customer is ticked. Remove the tick for all that should not be created.
“select all” and “select none” set all ticks at once.
Import customers
Creates the ticked new customers, each with a first participant. Afterwards the uploaded file is deleted.
Immediately beforehand a check is done once more: if a customer already exists in the meantime, they are skipped. The import cannot be undone in one step – you delete created customers as usual in the customer list.
Import completed
Import completed
The list shows the created customers with a link to the customer record. At the bottom it says “Captured by import on …”.
You create a login for the booking portal if needed in the customer record by entering the login email.
Data Protection
Data Protection
This lists all customers, participants or instructors whose deletion date is today or earlier. You can anonymize them or postpone their deletion date.
Kursimple sets a record’s deletion date when it is created, based on the period from Administration → Application Data; you change it in the record.
Inactive (deleted) records also appear here, because their data is still stored. Anonymized records no longer appear.
Each button first leads to a page that lists the planned operation in full. Only there do you confirm it.
Selection
Tick the people you want to act on. The checkbox at the top selects everyone on this page.
One page shows 100 people. You work through larger quantities page by page.
Deletion date
From this day the record is to be deleted or anonymized.
If it is today or earlier, the person appears in this list.
anonymize
Clears name, address (postcode and city remain), date of birth, contact and bank details of the selected records. Orders and invoices remain unchanged.
A customer takes their participants and invoice recipients with them, an instructor their customer record including participants.
This also removes customer history, documents, tags, additional details, custom form answers, newsletter subscriptions, e-learning certificates, instructor images and texts, as well as emails not related to an order or invoice. The login is detached from your provider; if it belongs nowhere else, the login and Keycloak account are deleted.
A person is blocked if they have a current or future booking, an open invoice, a current membership or current subscription, a future session as an instructor, or enabled e-learning – then they remain unchanged together with their associated records.
Extend dates by 1 year
Sets the deletion date of the selected people one year later. If it is still in the past then, today in one year applies.
A customer’s participants are not changed along with it; they have their own list.
Set date after last order
Sets the deletion date to the period from Administration → Application Data after the last order.
Customer: their last order. Participants: the last order in which they are booked. Instructor: the end of their last session or their last own order, whichever is later.
People without an order remain unchanged. If the new date is still in the past, the person stays in the list.
Will be anonymized
Will be anonymized
For each selected person, the records that are anonymized with them and what happens to the login.
Participants and invoice recipients of a customer are shown indented.
Blocked
These people remain unchanged – with the reason. If an associated record is blocked, the whole group remains.
Reasons: current or future booking, open invoice, current membership or current subscription, future session as an instructor, enabled e-learning or your own record.
Confirmation
Without this checkbox, nothing is anonymized.
For you, anonymizing cannot be undone.
Postpone deletion dates
Postpone deletion dates
The table shows the previous and the new deletion date for each person. “Apply deletion dates” saves the new ones.
People without a new date (e.g. without an order) remain unchanged.
Backup
Backup
Restoring is possible until this day. After that, the daily run permanently deletes the backup; the operation remains as proof without data.
The run is the command app:datenschutz:sicherungen --apply.
Anonymization
Anonymization
The records of this operation with their role and what happened to their login. You restore individual records via “restore”.
Names are shown here as long as the backup exists.
Login
“deleted”: the login and Keycloak account were deleted. “detached from tenant”: the login still belongs to another provider or cannot be deleted.
On restoring, a deleted login is recreated without a password; the person sets it via “Forgot password”.
Restore entire operation
Restores all records of this operation that have not yet been restored.
Shared emails of a customer and their participants also come back completely this way.
Confirm restore
Confirm restore
These records get their data back from the backup. Afterwards they appear in the data protection list again with their old deletion date.
If the email of a deleted login has meanwhile been assigned elsewhere, the record comes back without a login – the message afterwards says so.
Rather see it than read about it?
In 30 minutes we will show you Kursimple with your own course programme. Or set up your own test system in 30 seconds – both free and without obligation.
Questions? +49 5931 990 99 10 · Mon–Thu 8:30–17:30, Fri 8:00–14:00 (CET)