
Courses & dates
Creating courses, planning dates, participants, bookings, reservations and attendance per course – plus products with downloads. These texts sit right next to the fields inside Kursimple – here they are to read through.
Edit a course
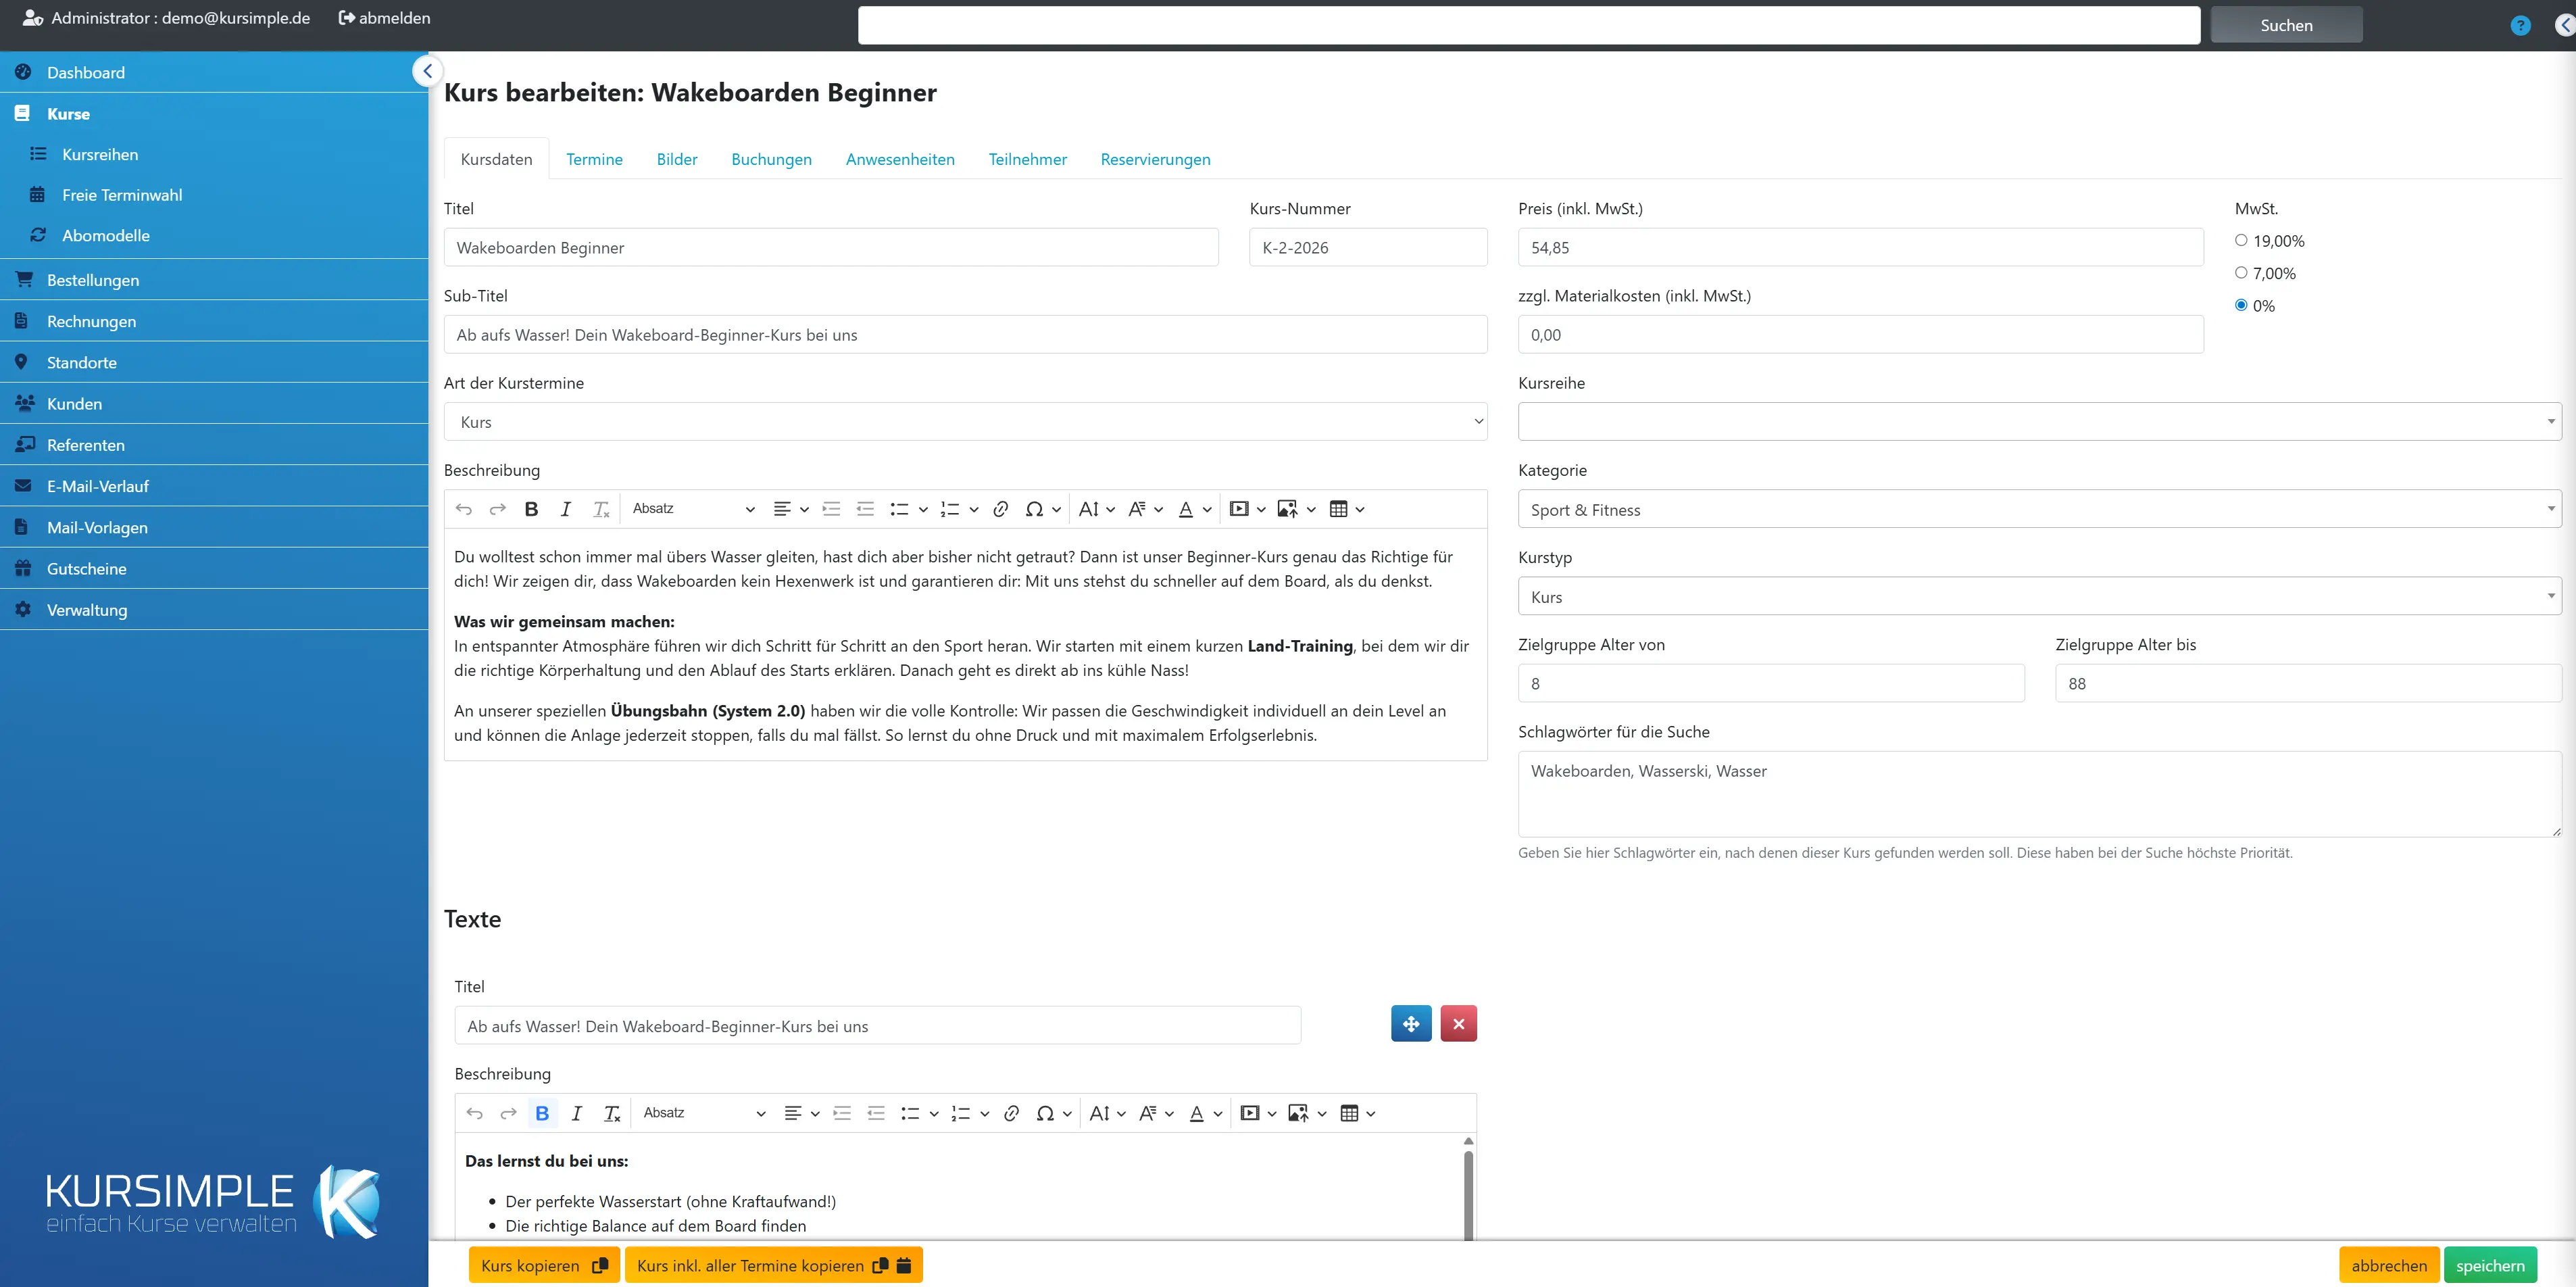
Title
The name of the course as customers read it in the booking portal, in the confirmation and on the invoice. Required field – short, clear and without internal abbreviations.
Good titles say what you learn or do (“Yoga for Beginners”, “First Aid for Children”). Place, date and time do not belong in the title – they come from the sessions and would be wrong with every new session.
The title is taken over as the line item description when the order is saved; if you change it later, this only affects new bookings.
Course number
Your own identifier for the course, e.g. from the programme brochure (“A-104”). Optional; helps with finding it again and appears at the course in the frontend.
The number is not assigned automatically and does not have to be unique. If your sessions need their own numbers (e.g. per semester), there is the “Course number” field on the session – provided it is switched on for your tenant.
Subtitle
A second line below the title, e.g. the target group or an addition such as “with certificate”. Optional; appears in the course list and frontend.
Use the subtitle for what distinguishes the course from similar courses. Long explanations belong in the description.
Type of course sessions
Determines how this course is booked. “Course” is the normal case: fixed sessions that customers book. The other types only appear if they are enabled for your tenant.
- Course – you create one or more fixed sessions under “Sessions” (each with course days, place, places). Customers book a session.
- Flexible date selection – the course offers a grid of time slots (e.g. trial lessons) from which the customer picks one. The places apply per time slot.
- Subscription – ongoing course with regular billing according to a subscription model (field below).
- Article – not a course but a product (textbook, voucher) without a session.
- Course without session – bookable, but without a fixed time, e.g. self-study offers.
- E-learning – online course with learning content, exam and certificate; after booking, customers learn in their “My Trainings” area.
Choose the type carefully when creating: it determines which fields and tabs the course has later. If the types you want cannot be chosen, they must be enabled under Administration → Variables (TERMINWAHLMENUE, ABOMENUE, ARTIKEL, ELEARNING).
Subscription model
Only for subscription courses: which subscription model (term, notice period, billing rhythm) applies to this course. You create models under “Subscription Models”.
The subscription model controls how often and from when participants are billed and how long the notice period is. For normal courses, leave the field empty.
Description
The detailed text for customers in the booking portal: content, schedule, prerequisites, what to bring. Formatting via the editor toolbar.
Write for people who do not know the course yet: what happens in the course? Who is it for? What do I need? What do I get at the end?
For longer content with subheadings, the “Texts” sections further down are better suited – they are displayed in the frontend as separate blocks.
Course fee (incl. VAT)
The price per participant and session, including VAT – as it appears on the invoice. Serves as the default for all sessions; an individual session can deviate from it.
When creating a session, this price is taken over. If you change it here later, the new value only applies to new sessions – existing sessions keep their price (marked red in the session list if it differs).
For courses with flexible date selection, depending on the setting, the field is called “Base fee” and is charged once per booking (see the tick “Quantity only for material costs per participant”).
plus material costs
An additional amount per participant that appears on the invoice as its own line – e.g. for script, catering or materials. Leave empty if there is none.
Material costs are automatically included in every order as a separate “Material costs” line item and taxed like the course fee. You can adjust the name of this line under Administration → Variables (e.g. “Catering”).
Here too: the value is the default for new sessions; a session can have its own material costs.
VAT
The VAT rate for course fee and material costs. It is shown on the invoice. When in doubt, ask accounting – many educational offers are tax-exempt (0 %).
The standard rate, the reduced rate and 0 % are available. Which rates these are is stored in the application data. The rate is taken over when a session is created.
Course series
Assigns the course to a course series, e.g. “Spring Programme 2027” or “Yoga Series”. The series only structures the administration; it does not appear in the booking portal. You create series under “Course Series”; sessions that can only be booked together belong in a course bundle.
A course series is only a grouping – it changes nothing about prices or booking. Leave the field empty if you do not use series.
Category
The topic of the course (e.g. “Languages”, “Health”). Customers filter by category in the frontend. You maintain categories under Administration → Categories.
Each course has at most one category. If the right one is missing, create it in the administration first. Categories can also control which email template is used for the order confirmation.
Course type
The form of the offer (e.g. “Workshop”, “Seminar”, “Online”). Second filter attribute in the frontend next to the category. You maintain types under Administration → Course Types.
Category = topic, course type = format. Both are optional.
Target group age from
The minimum age of participants, if the course is age-restricted (e.g. children’s courses). Shown in the frontend and compared with the participant’s date of birth when booking.
Leave empty if the course is open to all age groups. Participants outside the range are marked red in the participant list.
Target group age to
The maximum age of participants, if age-restricted. Together with “Age from” this gives the target group, e.g. 6 to 10 years.
Leave empty if there is no upper limit.
Keywords for search
Terms under which customers should find the course in the frontend, even if they are not in the title – e.g. “back pain, office, relaxation”. Separate with commas.
Think of synonyms and spellings your customers use (“Excel” and “spreadsheet”). The keywords are invisible to customers.
Texts
Additional text sections with their own heading for the course page in the frontend, e.g. “Contents”, “Prerequisites”, “Who is it for?”. With “further text line” you add a section.
Each section consists of a title and description and is displayed in the frontend as its own block below the course description. You change the order by dragging the cross-arrow icon; the red X removes a section.
This keeps the main description short and customers find details faster.
Custom fields
Your own fields that have been created for your tenant under MANAGE → Custom Fields (e.g. “Course leader”, “Funding number”). What you enter here appears at the course in the frontend.
The section is only visible if custom fields are defined. Which fields exist and whether they expect a number or text is defined under MANAGE → Custom Fields – here you only fill in the values for this course.
Invoice comments
Texts that are printed only on invoices for this course – e.g. a note about funding or course material. Leave empty, then the general texts from the application data apply.
The three fields override the default invoice texts only for this course. Typical use: “This measure is funded by …” or “Please bring the invoice to the first course day”.
Invoice comment above item list
Text that appears on the invoice above the line items – e.g. a salutation or a note about funding.
Only for invoices with items of this course. Without an entry, the general text from the application data applies.
Invoice comment below item list (standard)
Text below the line items when paying by bank transfer, cash or PayPal – e.g. payment deadline or a thank-you text.
For direct-debit invoices there is the separate field below, because the note about the collection belongs there.
Invoice comment below item list (direct debit)
Text below the line items when the customer pays by direct debit – e.g. “The amount will be collected from your account on …”.
Leave empty, then the general direct-debit text from the application data is used.
Copy course
Creates a new course with all course data, texts and images – but without sessions. The new course is called “… (Copy)” and is opened for editing immediately.
The quickest way if a similar course with a different title or price is to be created. Adjust title and details in the new course and then create the sessions under “Sessions”.
Unsaved changes to this course are not taken over when copying – save first, then copy.
Copy course incl. all sessions
Like “Copy course”, but the sessions (with course days, place, places and instructors) are copied as well. Bookings are not copied.
Handy if the same course runs again next semester: copy, open the sessions in the new course and shift the dates. Afterwards check whether the copied sessions should be published.
save
Saves the course data. When saving a new course for the first time, you go straight on to the “Add session” form, because a course without a session cannot be booked.
Required fields are outlined in red as long as they are empty. After saving, “Course saved” or “Course created” appears.
Important: a course without a published session counts as archived and is only visible in the course list via “Show archived courses”. So create a session right away and publish it.
cancel
Discards unsaved changes and returns to the course list.
Sessions, images or bookings already saved are not affected.
Title
The heading of this text section on the course page, e.g. “Contents” or “Prerequisites”.
Keep it short – the heading is for orientation. The sections can be dragged into the desired order via the cross-arrow.
Description
The content of the section. Formatting (lists, bold) via the editor toolbar.
One section per topic; several short sections read better than one long text.
Quantity only for material costs per participant
Only with flexible date selection: tick if the course fee is charged once per booking and only the material costs per participant are counted – e.g. family ticket plus material per child.
Without the tick, the course fee is charged per participant (normal case). With the tick, the customer pays the fee once, no matter how many participants they enter; only the material costs are multiplied by the number of participants.
Additional form after booking
A form that the customer must fill in per participant after booking – e.g. health questionnaire or consent declaration. You create forms under Administration → Additional Forms.
If a form is chosen, the customer receives an email after the order with a link per participant. In the order list you see from the badge whether the form has been filled in yet, and you can send the email again. The answers are in the order.
“No additional form” is the normal case.
Custom field
The value of this custom field for the course. What the field means is defined under MANAGE → Custom Fields.
The value appears at the course in the frontend and can be used on certificates. Leave empty if the field does not apply to this course.
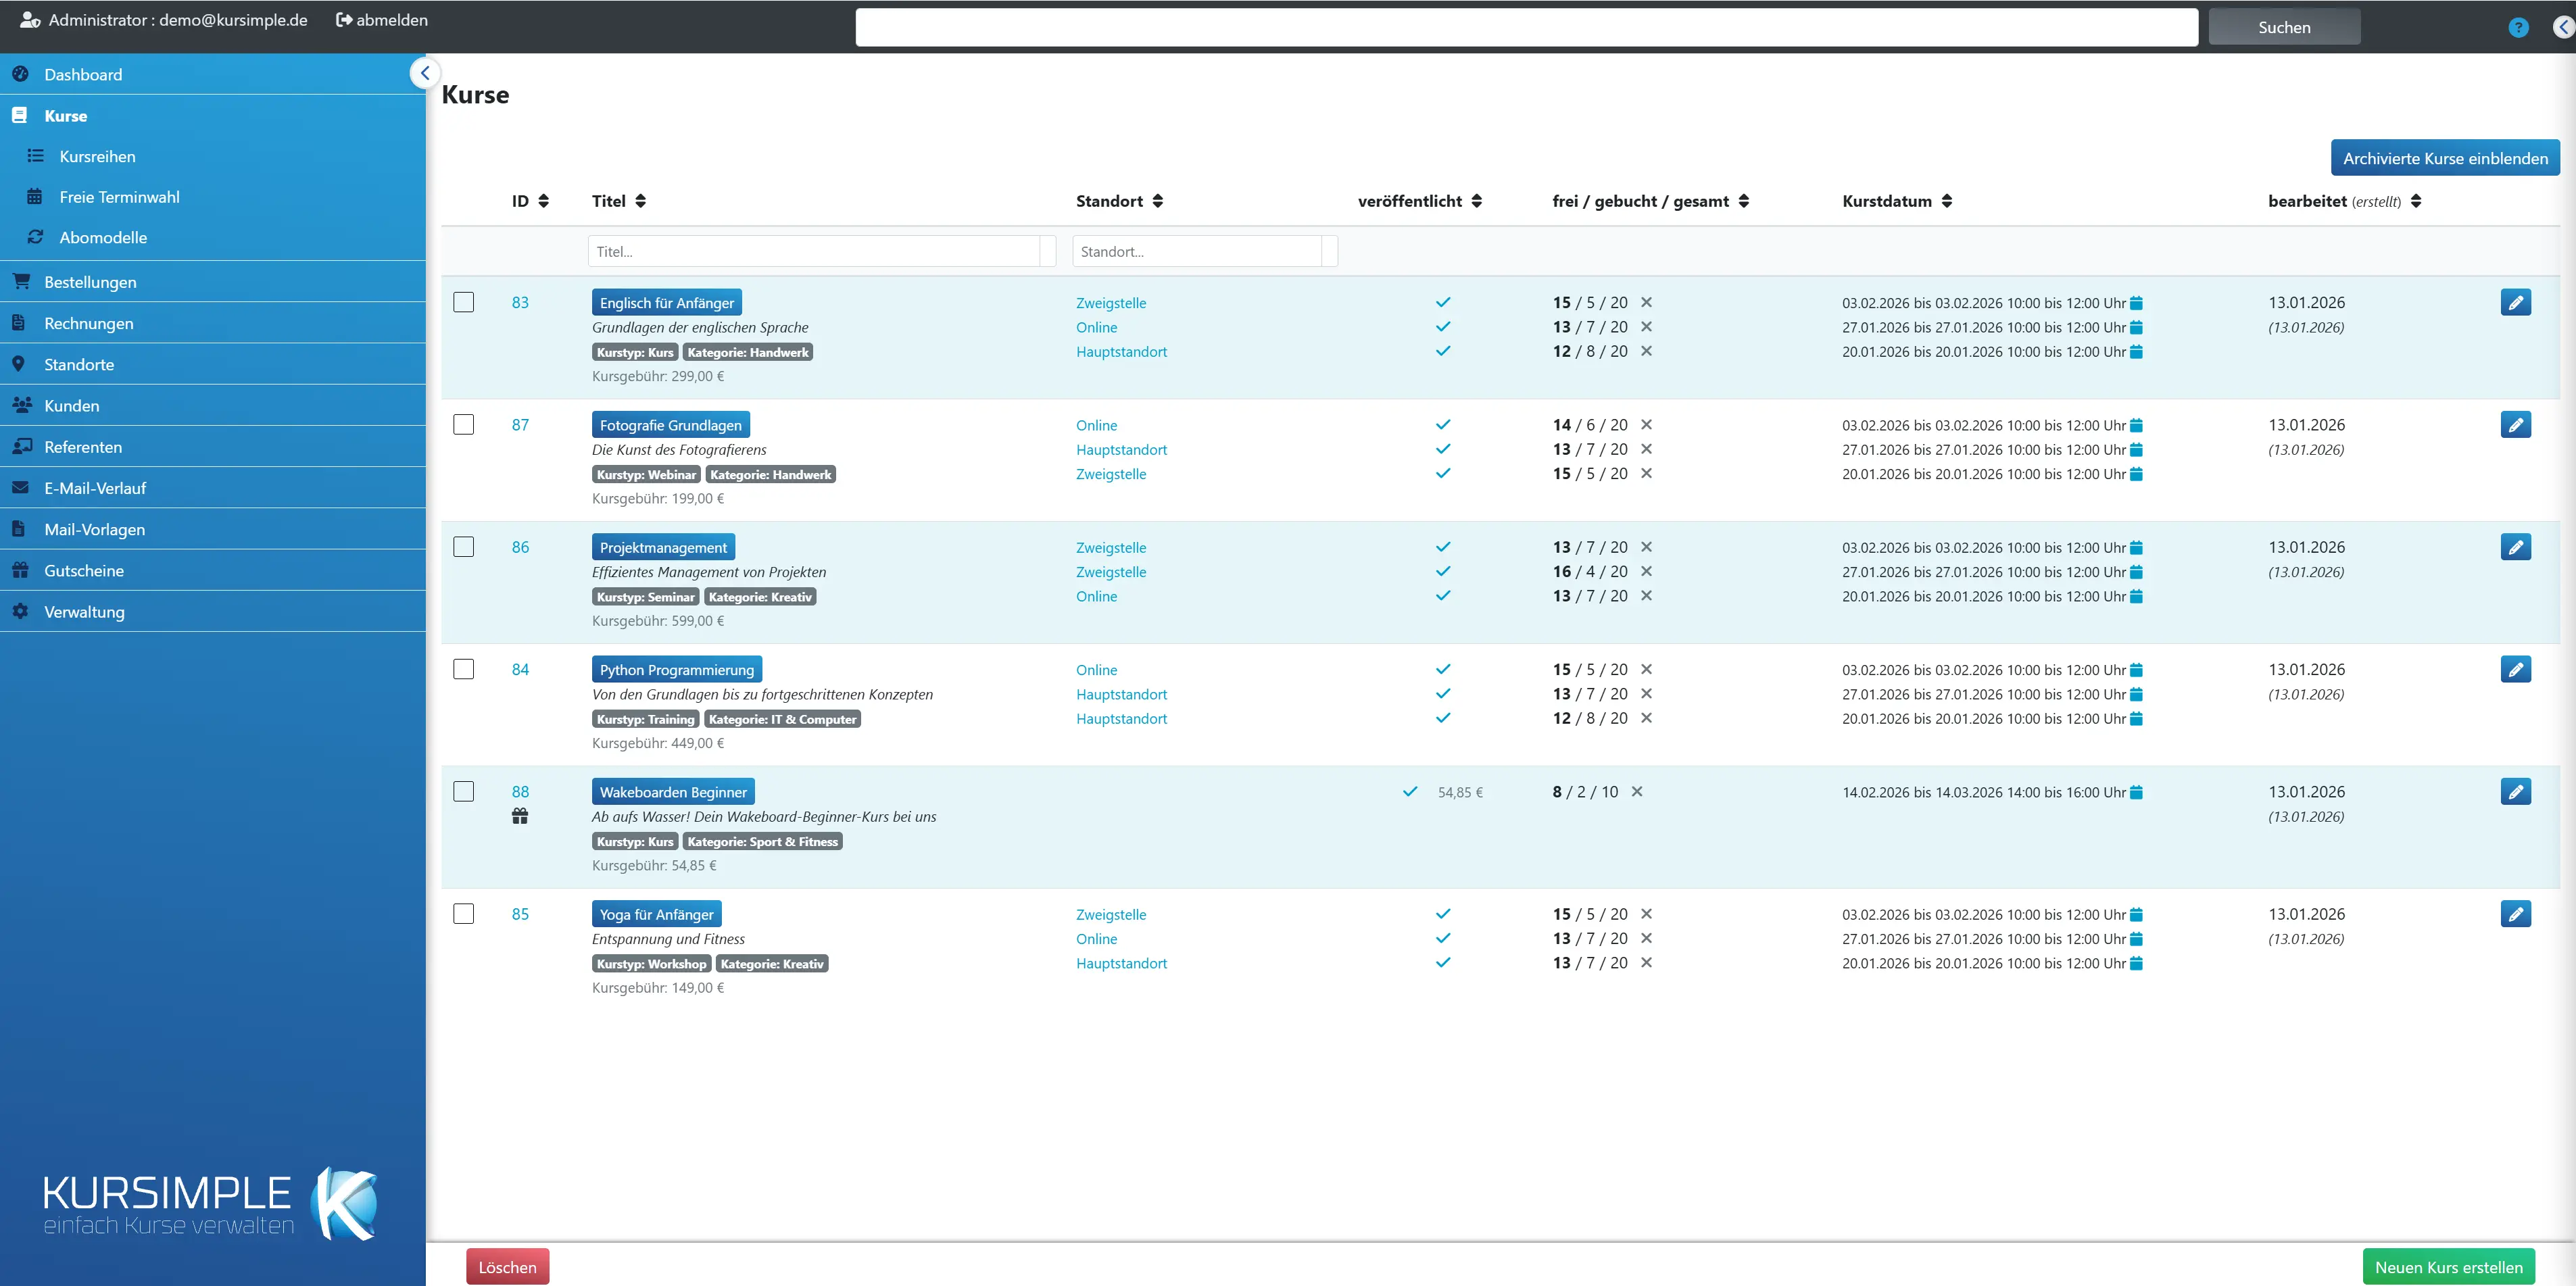
Courses
Courses
All current courses with their sessions: place, publication, free places and period at a glance. From here you create new courses and open existing ones for editing.
Each row is a course; below it are its sessions with place, publication tick, occupancy and date. Clicking the course title or the pencil opens the course data with the tabs Sessions, Images, Bookings, Participants etc.
Typical tasks:
- Create a new course: “Create New Course” at the bottom right, fill in the course data, save, then create and publish the first session.
- Put a course online / hide it: click the tick or the cross in the “published” column – takes effect immediately in the frontend.
- Check utilization: the “Places” column shows free / booked / total per session.
- Find past courses: “Show archived courses” at the top right.
Sort by clicking the column heading, filter via the fields “Title…” and “Location…”.
Show / hide archived courses
Additionally shows the courses whose sessions are already long past – and courses that do not yet have a published session. If you miss a course, click here first.
A course automatically counts as archived if all its published sessions are further in the past than the configured number of days – or if it has no published session at all. So there is no “Archive” button; a course moves into the archive by itself and comes back as soon as it gets a future, published session.
In the archive view, the “archived” column appears with an “A” for the courses concerned. You set the number of days under Administration → Variables.
The switch stays on until you flip it again or log out: if you open a course, its tabs (Participants, Bookings, Attendance) also show the expired sessions.
Delete
Deletes the courses you marked with the checkboxes in the first column – including sessions, waiting lists and shopping cart entries. Courses with active bookings cannot be deleted. Cannot be undone.
Before deleting, the system checks whether a session still has orders that have not been cancelled. If so, a red message appears with the orders concerned, and nothing is deleted. Cancel these orders first or simply let the course move into the archive.
Recommendation: do not delete courses that have taken place – invoices and statistics need them. Deleting is meant for mistakes and test courses.
Create New Course
Opens the empty course form. After saving the course data, you automatically continue to the first session.
Have title, description, price and tax rate ready. A similar course exists? Then “Copy course” in its course data is quicker.
archived
Only visible in the archive view: an “A” marks courses that count as archived (all sessions past or no published session).
Courses without an “A” are the normal, current courses in this view.
Title
Course title and subtitle; clicking opens the course data. The badges below show type (flexible date selection, article, subscription), course series, course type, category, provider and whether an additional form is required.
Clicking the column heading sorts alphabetically. If “Price in overview” is switched on for your tenant, the course fee is also shown here.
Location
The event location per session; clicking opens the location. Depending on the setting, the session’s instructors also follow.
If the location is missing, “No event location” was chosen for the session – fine for online courses, otherwise add it in the session.
published
Per session: green tick = visible and bookable in the booking portal, grey cross = hidden. One click switches immediately – without saving.
Use this to take a session off the portal at short notice (e.g. due to illness) or to release a prepared session. Existing bookings are kept.
If the session price differs from the course fee, it is shown next to it in red (only if the price display is switched on).
Places
Per session: free / booked / total. Bold = places still free. The icon next to it shows whether customers may join the waiting list when the session is fully booked (click switches); the number after it is the people waiting.
For courses with flexible date selection, the total counts across all time slots (places × time slots).
If the numbers do not match the actual bookings, Orders → Occupancy Reconciliation helps.
Date
Per session the period from the first to the last course day. Red = the session is already over.
Times and individual course days are shown in the session itself (“Sessions” tab → pencil).
Last change
When someone last saved the course data. “not edited so far” means: unchanged since creation.
Changes to sessions or bookings do not count here – only the course data itself.
Actions
Pencil = open course data. From there you reach everything else via the tabs: sessions, images, bookings, participants, reservations.
Deleting is not done here but via the checkboxes in the first column and the “Delete” button at the bottom.
Filter by title
Type part of the course title – the list filters as you type. The X next to the field clears the filter.
The subtitle is not searched. If you cannot find the course, check whether it is in the archive (“Show archived courses”).
Filter by location
Shows only courses with a session at this location – e.g. to see all courses at one branch.
Part of the location name is enough.
My Courses
For instructors: the courses whose sessions you are entered in as an instructor, each with the next session. Clicking leads to attendance recording.
Only users with the instructor role see this view. If a course is missing, the instructor is not entered in the session – the administration does that in the session under “Instructors”.
Duplicate a date
Assign waiting list to new sessions
This session has people waiting. With the tick, the waiting list places are transferred to the new (topmost) session – so the people waiting get the additional session you are creating right now.
This is the typical reason for copying a session: the first session is full, you create a second one and the waiting list moves over. The people waiting are not yet firmly booked – you do that afterwards in the course’s “Reservations” tab via “Enable participation” and inform the customers.
Without the tick, the waiting list stays at the original session.
Start
The date on which the copied session is to begin. All course days from the list on the left are shifted to this date with their intervals.
Example: the original session has course days on 3, 10 and 17 March. If you choose 7 April as the start, course days are created on 7, 14 and 21 April. Times, place, places, price and instructors are taken over.
After “save”, “Course session copied” appears and the new session is in the session list – check publication and details there.
Assign waiting list to new sessions
Transfers people waiting for this session to the new session. If the session has no waiting list, the tick does nothing.
Useful if you create an additional session because of overbooking. Afterwards, in the “Reservations” tab, firmly book the people waiting and notify them.
Selection
Tick the course days that are to be taken over into the new session. Days that are not ticked are left out.
This way you copy, for example, only the first three of five course days.
Start
Start (time) of the respective course day in the original session. Is taken over for the new session.
You change times after copying in the new session.
End
End (time) of the respective course day in the original session. Is taken over.
Can be adjusted in the new session after copying.
Edit a date
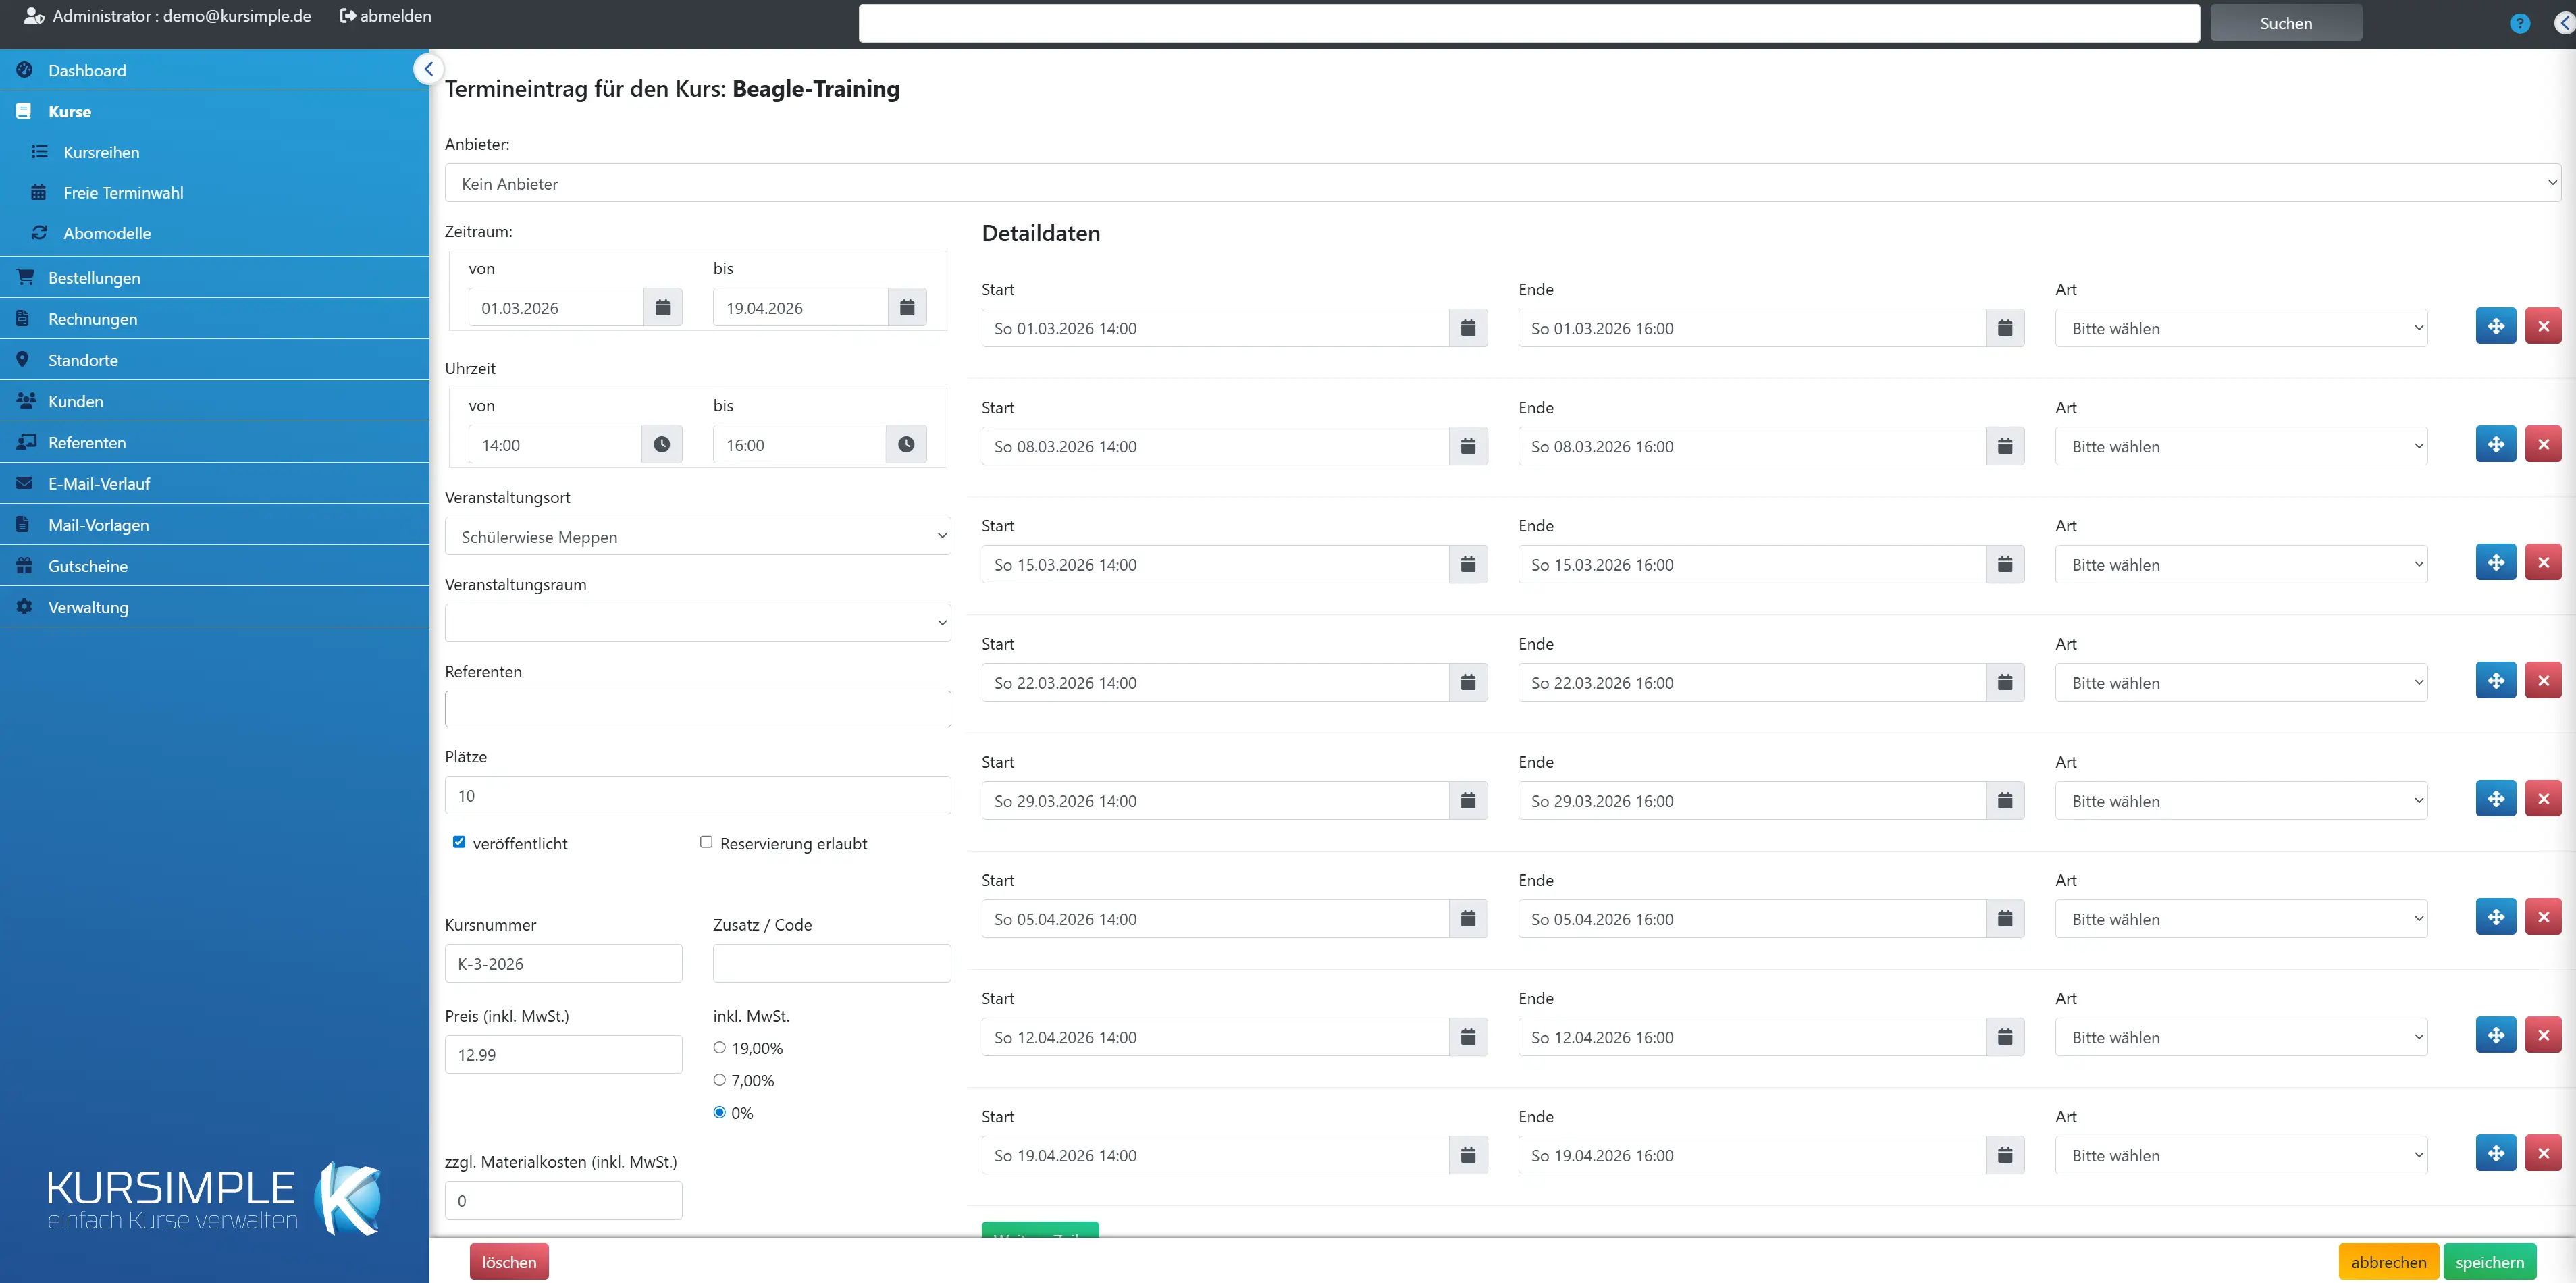
Event location
Where the session takes place. You maintain the locations under “Locations”. “No event location” for online courses.
The location appears in the frontend, in the order confirmation and in the course list. If it is missing from the selection, create it under “Locations” first.
Event room
A specific room of the chosen location. Only visible if rooms have been created at the location.
Useful for room planning (Locations → Calendar) and the notice to participants.
Instructors
Who leads the session – one or more instructors. They appear in the frontend at the session, and instructors with a login see the course under “My Courses”.
You maintain instructors under “Instructors”. Multiple selection with the Ctrl key held down or by tapping.
Places
How many participants can book at most. When the number is reached, the frontend shows “fully booked” – customers can then only join the waiting list if “Reservation allowed” is set.
For courses with flexible date selection, the number applies per time slot.
You can also increase the places afterwards to let people on the waiting list move up. You see the current occupancy in the session list; discrepancies are resolved by Orders → Occupancy Reconciliation.
published
Only with the tick is the session visible and bookable in the booking portal. Without the tick it remains an internal draft – and a course without a published session counts as archived.
You can switch the tick at any time, also in the course list or session list, by clicking. Existing bookings are kept when hiding.
Reservation allowed
With the tick, customers can join the waiting list when the session is fully booked. Without the tick, the session is simply no longer bookable in the frontend when full.
You see people waiting in the course’s “Reservations” tab and in the “Waiting List” menu. When a place becomes free, let them move up there.
Course number
Your own number for this session (e.g. semester identifier) that replaces the course number for this session. Only visible if switched on for your tenant.
Leave empty, then the course number from the course data applies.
Suffix / code
Free identifier for this session. With a Zoom integration, you enter the Zoom meeting ID here so that participants can be registered with a click.
The field is only visible if it is switched on for your tenant. Without Zoom you can use it for internal abbreviations.
Course fee (incl. VAT)
The price for this session. Prefilled with the course fee from the course data – only change it if this session should differ (e.g. early bird, weekend intensive course).
A note below the field shows if the value differs from the course fee; in the session list the differing price is shown in red. Bookings always take over the price of the session.
The price fields on the session are only visible if they are switched on for your tenant; otherwise the course price applies automatically.
incl. VAT
The tax rate for this session, prefilled from the course data. Only change it if your accounting explicitly requires it.
The rate is shown on the invoices for this session.
plus material costs
Material costs for this session, prefilled from the course data. Only change it if this session needs different material.
A note shows deviations from the course value. The material costs appear as a separate invoice line per participant.
Plan course days
Here you define on which days and at what time the course takes place. The list below shows all course days immediately – when saving, exactly these are created.
The start and end of the session result from the first and last course day; you no longer enter them separately. They apply in the booking portal, in lists, on invoices and for the archive.
The planner exists as long as a session has no course days yet (for a subscription course always, because of the recurring session); afterwards you change the course days in the list below. An older session without course days opens the planner with its previous start and times – it can only be saved with at least one course day, for which “Once” is enough.
Recurring session
Only for subscription courses: a recurring session repeats according to a rule, e.g. every Monday 9–10 a.m. from 2 Nov – without end or until a date. The course days are created from it automatically.
When saving, Kursimple creates the course days for the next 12 months and extends them daily afterwards. The list in the planner is then a preview; “skip” enters the day as a skipped period.
If the rule changes, future course days that no longer fit are dropped – unless something is already attached to them, such as an attendance or a note. Past course days always remain.
If the course already has a recurring session, a new one takes over its billing (price, rhythm, timing, payment method); you can change it in the “Subscription” tab.
How often
Once, daily, weekly on the chosen weekdays or monthly – on the same day or on a weekday such as “2nd Tuesday” or “last Friday”. With “every” you set the interval, e.g. every 2 weeks.
Weeks are counted from the week of the first course day; days before it are dropped. If the day does not exist in the month (e.g. the 31st), the last of the month applies.
For the recurring session there is no “Once” and “Daily”, and “monthly” means every month.
End of the series
“after count”: as many course days as you enter. “on date”: all course days up to and including this day. “without end” exists only for the recurring session.
Skipped days and skipped periods do not count towards “after count” – the series becomes correspondingly longer so that the chosen number is kept.
Skipped periods
Holidays and public holidays on which no course day is created. One period from–to per row; for a single day, “from” is enough.
For the recurring session they are saved with the rule and also apply to future course days. For a normal session they only take effect when planning.
List of course days
Each row is a course day. You change time and type per row, “skip” strikes the day, “Add single day” adds a day outside the rhythm.
Rows changed by hand are marked “adjusted” and are kept if you change the rule afterwards. The type (in person, online, hybrid) is optional.
Bookable
For articles, courses without a session and e-learning there are no course days: here you enter from when until when the session appears in the booking portal and can be booked.
After the end, the session disappears from the booking portal and counts as past for the archive.
Course days
The individual course days of the session with start, end and type. The start and end of the session follow the first and last course day when saving.
You add or remove course days directly in the list. A course day to which attendances or notes are already attached is better left in place.
cancel
Back to the session list without saving. Unsaved input and generated course days are lost.
Sessions already saved remain unchanged.
save
Saves the session with all course days. For a new session you return to the session list (“Course session created”); when editing you stay on the page (“Course session changed”).
If start or end is missing, an error message appears. For new sessions, empty price and tax fields are filled automatically from the course data.
Afterwards: check the “published” tick, otherwise the session is invisible to customers.
delete
Deletes this session including course days and attendance data – after confirmation and cannot be undone. Sessions with bookings cannot be deleted.
If orders or invoices still exist for the session, an error message appears. Cancel the bookings beforehand or simply take the session off the portal (remove the “published” tick).
Start
Date and time when this course day begins. Can be changed individually per course day.
After saving, the first course day appears as the “Start” of the session in lists and frontend.
End
Date and time when this course day ends. Must be after the start.
The last course day determines the “End” of the session.
Type
Free label for the course day, e.g. “Theory”, “Practice” or “Exam”. Optional; appears in session lists and in the attendance.
Helps participants and instructors prepare for the day.
Sessions
Sessions
All sessions of this course. A session is what customers book: a period with course days, place, places and price. Create new sessions via “Add session”, edit existing ones via the pencil.
For each row you see place, start, end, publication, places, participants, people waiting, number of course days and price. Red prices differ from the course fee.
Recurring course? Use the copy icon in the row: the session is transferred with all course days to a new start date.
Session full? The orange copy icon shows a waiting list – when copying, you can transfer the people waiting straight to the additional session.
No.
Internal number of the session, assigned by the system. Useful when you talk about a specific session internally.
You assign your own course number per session in the session itself (if enabled).
Event location
Where this session takes place. For provider sessions, the provider follows as a badge.
Change via the pencil in the row.
Start
Date and time of the first course day. “-” means: no course days created yet – the session is then not bookable.
You create course days in the session with the course day planner.
End
Date and time of the last course day.
After this date the session counts as expired and is only shown in the Participants/Bookings tabs with “show expired sessions”.
published
Tick = visible and bookable in the booking portal, cross = hidden. Clicking switches immediately.
A course without a published session counts as archived and disappears from the normal course list.
Places
free / booked / total. The icon next to it shows whether the waiting list is open when fully booked (click switches).
You change the total in the session (“Places”). If “booked” differs from the actual bookings, Orders → Occupancy Reconciliation helps.
Participants
How many people are firmly booked for this session. Names and details in the “Participants” tab.
Cancelled participations do not count.
Waiting
How many people are on this session’s waiting list. Let them move up in the “Reservations” tab.
If the number is greater than zero, an additional session is worthwhile – via the copy icon with “Assign waiting list to new sessions”.
Course days
Number of course days of this session. 1 = one day; 8 = e.g. eight weekly evenings.
You edit the course days with times in the session under “Course days”.
Price
Course fee and, if applicable, material costs of this session. Red = differs from the course data.
Bookings always take over the price of the session, not that of the course. So red is not an error, but a notice you should be aware of.
Actions
Copy icon = duplicate the session to a new date (orange if a waiting list exists). Pencil = edit session.
Deleting individual sessions is done in the session itself (“delete” button) or via the checkboxes and “Delete” at the bottom.
Delete
Deletes the ticked sessions including course days, attendance, waiting lists and shopping cart entries. Sessions with bookings are protected. Cannot be undone.
For past sessions, deleting is unnecessary – they disappear from the current views by themselves. Only delete mistakes.
Add session
Creates a further session for this course. Price, tax rate and material costs are prefilled from the course data.
For a session that resembles an existing one, the copy icon in the row is quicker.
Tabs of the course page
Course data tab
Everything that describes the course: title, description, prices, category, texts and invoice comments. Here you change what customers read in the portal and what appears on the invoice.
Changes to prices only affect new sessions; existing sessions keep their price (“Sessions” tab).
Sessions tab
The bookable sessions of the course with course days, place, places, speakers and price. Without a published session the course is invisible to customers.
Here you create new sessions, copy existing ones to a new date and switch publication with a click.
Pictures tab
Pictures for the course page in the portal. The first picture is the preview image in lists and tiles.
Use landscape format with good resolution; pictures are cropped on upload.
Downloads tab
Articles only: files to download (e.g. an audio play as MP3) that buyers receive by link after payment – with a limit per file, a preview clip and a buyer list.
Release after payment: PayPal immediately, online payment (pmPayment) with the confirmation from GovConnect, invoice and cash payment as soon as the invoice is paid, direct debit with the SEPA export. In the order you can release by hand at any time.
Learning content tab
E-learning courses only: the content learners work through online – sections, steps, texts, pictures, videos, slides and questions, plus flow, preview and publication.
On first opening, Kursimple creates the learning content with a first section and step. Assigned speakers can edit it too; only administration can publish.
Bookings tab
All orders for the sessions with invoice status. Here you create and send invoices for many bookings at once and generate SEPA files for the course.
The tab is meant for billing: tick bookings → “Prepare invoices” → check → “Send invoices”. Individual participations can also be cancelled here.
Additional form tab
Only for courses with an additional form: who has completed the form and who has not, the answers per customer and all results as a PDF.
You create the form itself under Administration → Additional forms and assign it in the course.
Attendance tab
Record per course day who was there and who was absent (with reason). Basis for attendance lists and certificates. Only visible if attendance management is switched on.
Speakers with a login can also record the attendance of their courses here.
Participants tab
Who takes part per session, with contact details and remarks. From here you print participant lists, send certificates, email participants and export addresses.
The most important tab for everyday course work: who is coming, whom do I need to inform, who gets a certificate.
Reservations tab
The waiting list per session. When a place becomes free, select people waiting and book them in firmly with “Enable participation”.
People waiting arise when customers book a fully booked session and “Reservation allowed” is set.
Subscription
Subscription courses only: billing of the subscription, ongoing session and the participants – active, future and ended – with start and end.
See the help on the page itself.
Participants
Participants
Per session the firmly booked participants with customer, phone and remark. With the checkboxes you select participants and write to them together (email sending), export addresses or send certificates.
The sessions are listed one below the other, each with a header row (date, course days) and the list buttons for this session. Expired sessions are hidden – show them at the top right if you need lists or certificates afterwards.
Common tasks:
- Inform participants (room change, cancellation): tick checkboxes → “Send email” below → write text or choose a template.
- Print a list for the course room: “Participant list PDF” in the header row of the session.
- Certificates: after the end of the course “Send all certificates” or per participant via the icons in the row.
The filter fields below the column headings narrow the display as you type. Red names point to special cases (e.g. age outside the target group, deactivated customer).
show / hide expired sessions
Also shows sessions that are already over – e.g. to send certificates or print a list afterwards.
Expired sessions appear with a red header row. The switch applies to all course tabs and the course list (“Archived courses”) and stays on until you switch it again or log out.
Selection
Checkbox for marking. Header row at the very top = all participants of all sessions, checkbox in a session row = all participants of this session. The selection applies to email sending, export and certificates.
Mark only the people you really mean – when sending email, every marked participant (or their customer) receives the email.
Tag
Coloured markers of the customer from the customer record (e.g. “Corporate customer”, “VIP”). Name of the tag when hovering with the mouse.
You assign tags in the customer record; here they serve only for orientation.
Customer
Who booked and receives the invoice. A click opens the customer record. For children this is usually a parent.
“Customer not active” means the customer was deactivated; the booking remains visible.
Participant
The person taking part in the course. A click opens the customer's participant management; the letter icon next to it opens the send dialog if the participant has their own email address.
Date of birth when hovering with the mouse (if the display is switched on). If attendance management is active, a summary of the attendance with a link to the details appears below the name.
Custom fields for which “show in participant list” is ticked under Administration → Custom fields customers/participants appear with their entry below the name – only for sessions whose participants you may see. The printed participant list (PDF) gets the page “Further details on the participants” at the end for this.
Phone
Phone number of the participant, alternatively of the customer – for short-notice cancellations.
Which number is preferably displayed you set in the application data.
Year of birth
Year of birth of the participant – helpful for age-restricted courses and grouping.
You see the full date of birth in the customer's participant management.
Termination
Subscription courses only: the entered termination date. From this day the participant is no longer billed.
Enter or change via the icon in the “Actions” column.
Remark
What the customer wrote about the participant when booking – e.g. allergies, prior knowledge, persons authorised to pick up. Read it once before the course starts.
The customer's order comment and the comment from the participant record are shown, shortened; you see the full text when hovering or in the order.
Actions
Icons per participant: pencil = edit data, PDF = download certificate, envelope = email certificate, termination (subscription), arrow = copy to further sessions, camera = add to Zoom.
- Pencil – opens the participant data (name, date of birth, contact).
- Create and download certificate – creates the certificate with your tenant's template as a PDF.
- Create and send certificate – sends it by email to the customer.
- Enter termination date (subscription courses only) – ends the participation on the chosen date.
- Copy to further sessions – books the participant additionally into other sessions of this course, without a new order by the customer.
- Add to Zoom – registers the participant for the Zoom meeting of the session (only with Zoom integration).
The certificate icons appear only if certificates are switched on for your tenant.
Participant attendance list
Downloads a table with the recorded attendance per participant and course day – e.g. as proof for funding bodies. Only visible if attendance management is switched on.
A prerequisite is that attendance has been recorded in the tab of the same name.
Course + participant list
CSV file with the course data (title, session, place) in the header and all participants below. Can be opened in Excel.
Good for speakers or cooperation partners who also need the framework data of the course.
complete participant list
CSV file with the participant rows only, without a course header – for further processing in other programs (mail merge, name badges).
Open the file in Excel or LibreOffice; the columns are separated by semicolons.
Send certificates
Creates one certificate for each ticked participant and emails it to the customer. Select participants first; without a selection a warning appears.
Your tenant's certificate template (application data) is used. With many participants, sending takes a moment; at the end you see how many certificates were sent.
Send all certificates
Like “Send certificates”, but for all participants of this session without a prior selection.
Typical after the last course day. Check the attendance beforehand if your certificates require a minimum attendance.
All certificates in one PDF
Combines the certificates of all participants of the session in one file – for printing and handing out on the last course day. Nothing is sent.
Each participant gets their own page.
Add all to Zoom
Registers all participants of the session for the linked Zoom meeting; they receive the invitation from Zoom. Caution: if you click again they may receive another email.
Prerequisite: Zoom integration in the tenant variables and the meeting ID in the “Additional info / code” field of the session. The process can take longer with many participants – please click only once.
ESF list PDF
Participant list in the format for ESF-funded measures with the details needed for funding proof. Appears instead of the normal participant list if the list type ESF is set.
You set the list type under Administration → Variables.
Participant list PDF
Print-ready list of all participants of this session – for the course room, for speakers or as a signature list.
Which columns are included (phone, date of birth, price, email) you define in the application data.
Export participants
Downloads names and addresses of the ticked participants as a file, e.g. for mail merges or name badges. Select participants first.
For all participants of a session, “Course + participant list” in the header row is quicker.
Copy participant to further sessions
Books this participant additionally into the chosen sessions of the course – as new items in the existing order, without the customer having to order again.
Typical case: the customer wants to book the follow-up course straight away, or you place a participant in a parallel group. The new items appear in the order and can be invoiced there. If a chosen session is full, the participant ends up on its waiting list.
Choose sessions
One or more sessions of this course into which the participant is additionally booked. Typing narrows the list.
Sessions in which the participant is already booked are not offered.
Enter termination date
Ends participation in a subscription course on the chosen date. From then on the participant is no longer billed; an already entered date is overwritten.
The date is pre-filled with the end of the notice period of the subscription model. If all participants of an item are terminated, the item is cancelled; if all items of the order are cancelled, the whole order is.
Termination as of
The last day of participation. Pre-filled according to the notice period of the subscription model – as a goodwill gesture you can choose an earlier date.
After saving, “Termination date entered” appears and the date is shown in the “Termination” column.
Filter by customer
Type part of the customer's name – the list hides all other rows.
The filter only affects the display. Hidden participants lose their tick and are not included in “Send certificates” or “Send email” – not even via “select all”.
The × in the field clears it, the × at the start of the filter row resets all filters at once.
Filter by participant
Searches the participant's name, e.g. to find a particular child.
Works as you type on all sessions of the page.
Filter by phone
Searches the phone number – handy when someone calls and you only see the number.
Part of the number is enough.
Filter by remark
Searches the remarks, e.g. for “allergy” or “pick-up”.
Works as you type.
Bookings
Bookings
All orders for the sessions of this course with payment method and invoice status. The place for batch billing: tick bookings → “Prepare invoices” → “Send invoices”.
This is how you bill a session:
- Tick the checkbox in the session row – this selects all not yet invoiced bookings of the session.
- “Prepare invoices”: an invoice draft is created per booking. If needed, open and adjust individual drafts via the invoice number.
- Tick the drafts again and “Send invoices”: the invoices are closed and sent by email.
- For direct debit customers, then create “SEPA XML …” for the bank.
Red buttons next to participants or rows cancel individual participations – with a credit note if an invoice already exists. You show expired sessions at the top right, e.g. for subsequent billing.
show / hide expired sessions
Also shows sessions that are already over – for subsequent billing or checking.
Expired sessions appear with a red header row. The switch applies to all course tabs and the course list (“Archived courses”) and stays on until you switch it again or log out.
Selection
Checkbox for marking the bookings for the buttons below. Header row at the very top = all, session row = all bookings of the session. Already invoiced bookings have no checkbox for “prepare”.
For “Send invoices” and “Create PDF” you mark the rows with an existing draft or invoice.
Tag
Coloured markers of the customer from the customer record; name when hovering with the mouse.
For orientation only, e.g. to recognise corporate customers with a collective invoice.
Customer
The orderer and invoice recipient. A click opens the customer record.
A different invoice recipient (e.g. employer) is stored in the order and used on the invoice.
Participant
The booked people of this order at the session. The red button next to a name cancels only this participation – after confirmation, with a credit note if already invoiced.
If the item has several participants, the others remain booked. The freed place is immediately bookable again. Remarks by the customer about the participant are shown below.
Order number
The order behind the booking; a click opens it. Notes such as “booked after course start” or “Also in the order: …” show special cases.
If the order contains further courses, you see this here – the invoice from “Prepare invoices” contains only the item of this session.
Payment method
How the customer pays: invoice, direct debit, PayPal or cash. Only direct debit bookings go into the SEPA files. “exported” means: the invoice of this row is already in a SEPA file.
The addition “exported” appears only if there is an invoice number in the row and exactly this invoice is already in a SEPA direct debit file – regardless of whether the file was created here, in the invoice list or at the single invoice. If you hover over it, you see when the file was created.
The DATEV export (“export new invoices [Datev]”) does not count. Another invoice of the same order (e.g. for a different course) does not either.
Bookings with “exported” are not taken along again by the two SEPA buttons below, so that nothing is collected twice.
Invoice number
The invoices for this booking; a click opens them. The letter icon shows that the invoice was sent by email. Empty = no invoice yet, so “Prepare invoices”.
Drafts already have a number too – whether an invoice is still a draft you see on opening (“(Draft)” in the heading) or in the invoice list with the filter “Type”.
Generate additional invoice
For subscription courses: tick to prepare a further invoice for an already invoiced booking, e.g. for the next billing period.
After ticking, click “Prepare invoices”; the new invoice is created as a draft.
Payment status
Per invoice: open, partly paid, paid or cancelled. A red due date means overdue – then send a reminder in the invoice.
You record payments in the invoice (click on the invoice number) or in the invoice list by clicking “open”.
Column filter
The fields below the column headers filter the list as you type: customer, participant, order number, payment method, invoice number or payment status (e.g. “shortfall” or “paid”). Several fields apply together.
Only the display is filtered. Hidden bookings lose their tick and are never included in “Prepare invoices”, “send”, “Create PDF” and “Create SEPA XML only for selected” – not even via “select all”. “Create SEPA XML for all” continues to act on all bookings of the course.
Sessions without a matching booking are hidden too. The × in the field clears it, the × at the start of the filter row resets all filters at once.
Participant list PDF
Print-ready participant list of this session – the same as in the “Participants” tab.
Column selection in the application data.
Prepare invoices
Creates an invoice draft with the item of this session for each ticked booking. Nothing is sent yet – you can check and adjust the drafts.
At the end you see “n invoices created”; warnings (e.g. missing IBAN for direct debit) appear below. The drafts then appear in the “Invoice number” column and in the invoice list (filter “Draft”).
Bookings that already have an invoice are not invoiced twice.
Send invoices
Closes the ticked invoice drafts and emails them as PDF to the customers. Afterwards the invoices can no longer be changed and the orders are set to “done”.
Invoices in the selection that are already closed are simply sent again. For direct debit customers the email serves as the announcement of the collection; the invoice changes to “Direct debit pending” until it has been in a SEPA file.
Without a selection “No invoices selected” appears.
Create PDF
Bundles the invoices of the ticked bookings in one PDF file – for printing or filing. Nothing is sent and nothing is closed.
Handy for postal dispatch or for filing in the course folder.
SEPA XML for selected invoices
Creates the direct debit file for the ticked bookings (only their direct debit invoices). If one of them is already in a SEPA file, a window asks which invoices should be included anyway. You upload the file in online banking; the invoices are then closed and show “exported”.
Per booking only the invoice shown in the “Invoice number” column counts, and only with the payment method direct debit. Cancelled invoices and cancellation invoices stay out.
Already exported: If one of the invoices is already in a SEPA file (“exported”), “Create SEPA file again?” opens. At the top are those already exported with the date of their last file, below them, separated, those that are included for the first time – all ticked. Untick what should not go in and click “Create SEPA file”. Afterwards give the bank only one file with the same invoice, otherwise it is collected twice. “cancel” creates nothing.
Invoices for €0 or credit notes are closed without direct debit (nothing to collect). If the invoice lacks the IBAN, it comes from the customer record; if it is missing there too, the invoice stays out with an error message. If a payment term lies in the past, a warning appears – then check the due date in the file.
If “SEPA export paid” is switched on (tenant variable SEPAEXPORT_PAYED), exactly the invoices in the file are booked as paid and marked as exported for DATEV.
Prerequisites: creditor ID and bank details of the tenant in the application data, IBAN and direct debit authorisation at the customer.
SEPA XML for all invoices
Like “for selected”, but for all bookings of the course at once – regardless of the selection. Only direct debit invoices of this course are included; already exported ones only if you leave them ticked in the “create again?” window. The usual way after “Send invoices”.
If invoices are already in a SEPA file, the window “Create SEPA file again?” asks – as with “for selected”. Invoices of other payment methods (invoice, PayPal, cash) and invoices of other courses of the same order remain untouched.
Customers whose direct debit mandate is used for the first time are noted as a new mandate. If “SEPA export paid” is switched on, exactly the invoices in the file are booked as paid and marked as exported for DATEV.
Reservations
Reservations
The waiting list per session. The session row shows how many places are currently free. When a place becomes free: tick people waiting → “Enable participation” → inform customers.
Someone gets onto the waiting list if they book a fully booked session (only if “Reservation allowed” is set on the session) or if administration books more places for them than are free. The order results from the order date – the oldest reservations should move up first.
More people waiting than places? In the “Sessions” tab, create an additional session via the copy icon and transfer the waiting list there.
The red button next to a name removes the reservation (e.g. on cancellation).
Tag
Coloured markers of the customer from the customer record.
Name of the tag when hovering with the mouse.
Customer
The orderer whom you contact when a place is free. A click opens the customer record.
After “Enable participation” this customer receives the invoice.
Participant
The person waiting. The red button next to it removes them from the waiting list after confirmation – cannot be undone.
Remove reservations if the customer is no longer interested or has booked elsewhere.
Year of birth
Year of birth of the person waiting – for age-restricted offerings.
The full date is in the customer's participant management.
Phone
Number for notification when a place becomes free. Participant, alternatively customer.
For written notification you use the email address in the customer record or the menu item “Waiting list”.
Order
Number and date of the order with which the reservation was made. A click opens the order. The date determines the order on the waiting list.
In the order you see the same places under “Reservations”.
Export addresses
Downloads the addresses of all people waiting for this session as a file, e.g. for a mail merge with an alternative offer.
For all sessions of the course there is the button at the bottom.
Enable participation
Books the ticked people waiting in firmly: the reservation becomes a normal order item, the places are taken and can be invoiced. Do not select more people than there are free places.
After the click you see “n waiting-list places moved”. The customers are not informed automatically – send them a confirmation (open order → “Send confirmation”) and create the invoice.
If a place cannot be rebooked (participant no longer exists), a warning appears; then check the order.
Move to another waiting list
Puts the ticked people waiting onto the waiting list of another session – in this or another course. They remain waiting and do not occupy a place there yet.
In the window the course of this page is preselected. Below it you choose one of its current or future sessions; for a different course you change the course at the top. Courses with course days are available, i.e. no articles, e-learning courses, courses without session or flexible date selection.
The people waiting keep their order and then appear on the “Reservations” page of the target course. When a place becomes free there, you book them in with “Enable participation” – then price and material of the target course apply. The customers are not notified; write to them if needed via “Send email”.
Export waiting-list addresses of all sessions
Address list of all people waiting across all sessions of the course – e.g. to offer everyone an additional session.
As a file for further processing.
Attendance
Attendance
Record per session and course day who was there. Expand the session, then mark each participant and day as present or, in case of absence, choose a reason. Basis for attendance lists and certificates.
Entries are saved immediately – there is no save button. A wrong entry can be deleted again via the red bin.
You maintain absence reasons (sick, excused, unexcused …) under Administration → Absence reasons. Speakers with a login can record the attendance of their courses themselves.
The summary per participant also appears in the “Participants” tab below the name.
Notes on the course session
Like a class register: with “+ Notes on the course session” you write things worth recording about this course day, e.g. topic, special features, failure of a device. Each click creates another entry.
Each entry shows who wrote it and when; it stays as it is (no editing). The speaker of the session as well as administration and admins may write.
The notes belong to the individual course day. If you delete the course day when editing the session, its notes go with it. They do not appear in the statistics.
show / hide expired sessions
Also shows ended sessions – for catching up on entries or checking.
Expired sessions appear with a red header row. The switch applies to all course tabs and the course list (“Archived courses”) and stays on until you switch it again or log out.
Date
The course day the entry refers to. There is at most one entry per course day and participant.
Course days without an entry count as not recorded – not as absent.
Status
Present or absent, as recorded.
To change, delete the entry and set it again.
Reason
In case of absence the reason chosen from the list of absence reasons.
The last absence reason is also shown in the “Participants” tab.
Leaving
With “Leaving” in a person's row you record that they leave the course early: leaving date (the last course day, pre-filled with the course day of the row) and reason. On later course days they are no longer available for selection here.
The leaving day itself still counts. If attendance has already been recorded for a later course day, the row stays there so that you can correct or delete the entry.
Booking, invoice and places remain untouched – leaving is not a cancellation. With “Leaving” and “Undo leaving” you take it back; you change a wrong date in the same window.
Admins maintain the reasons under Administration → Leaving reasons. The speaker of the session as well as administration and admins may enter them. The feature is switched on with the tenant variable AUSTRITTSDATUM = 1.
Pictures
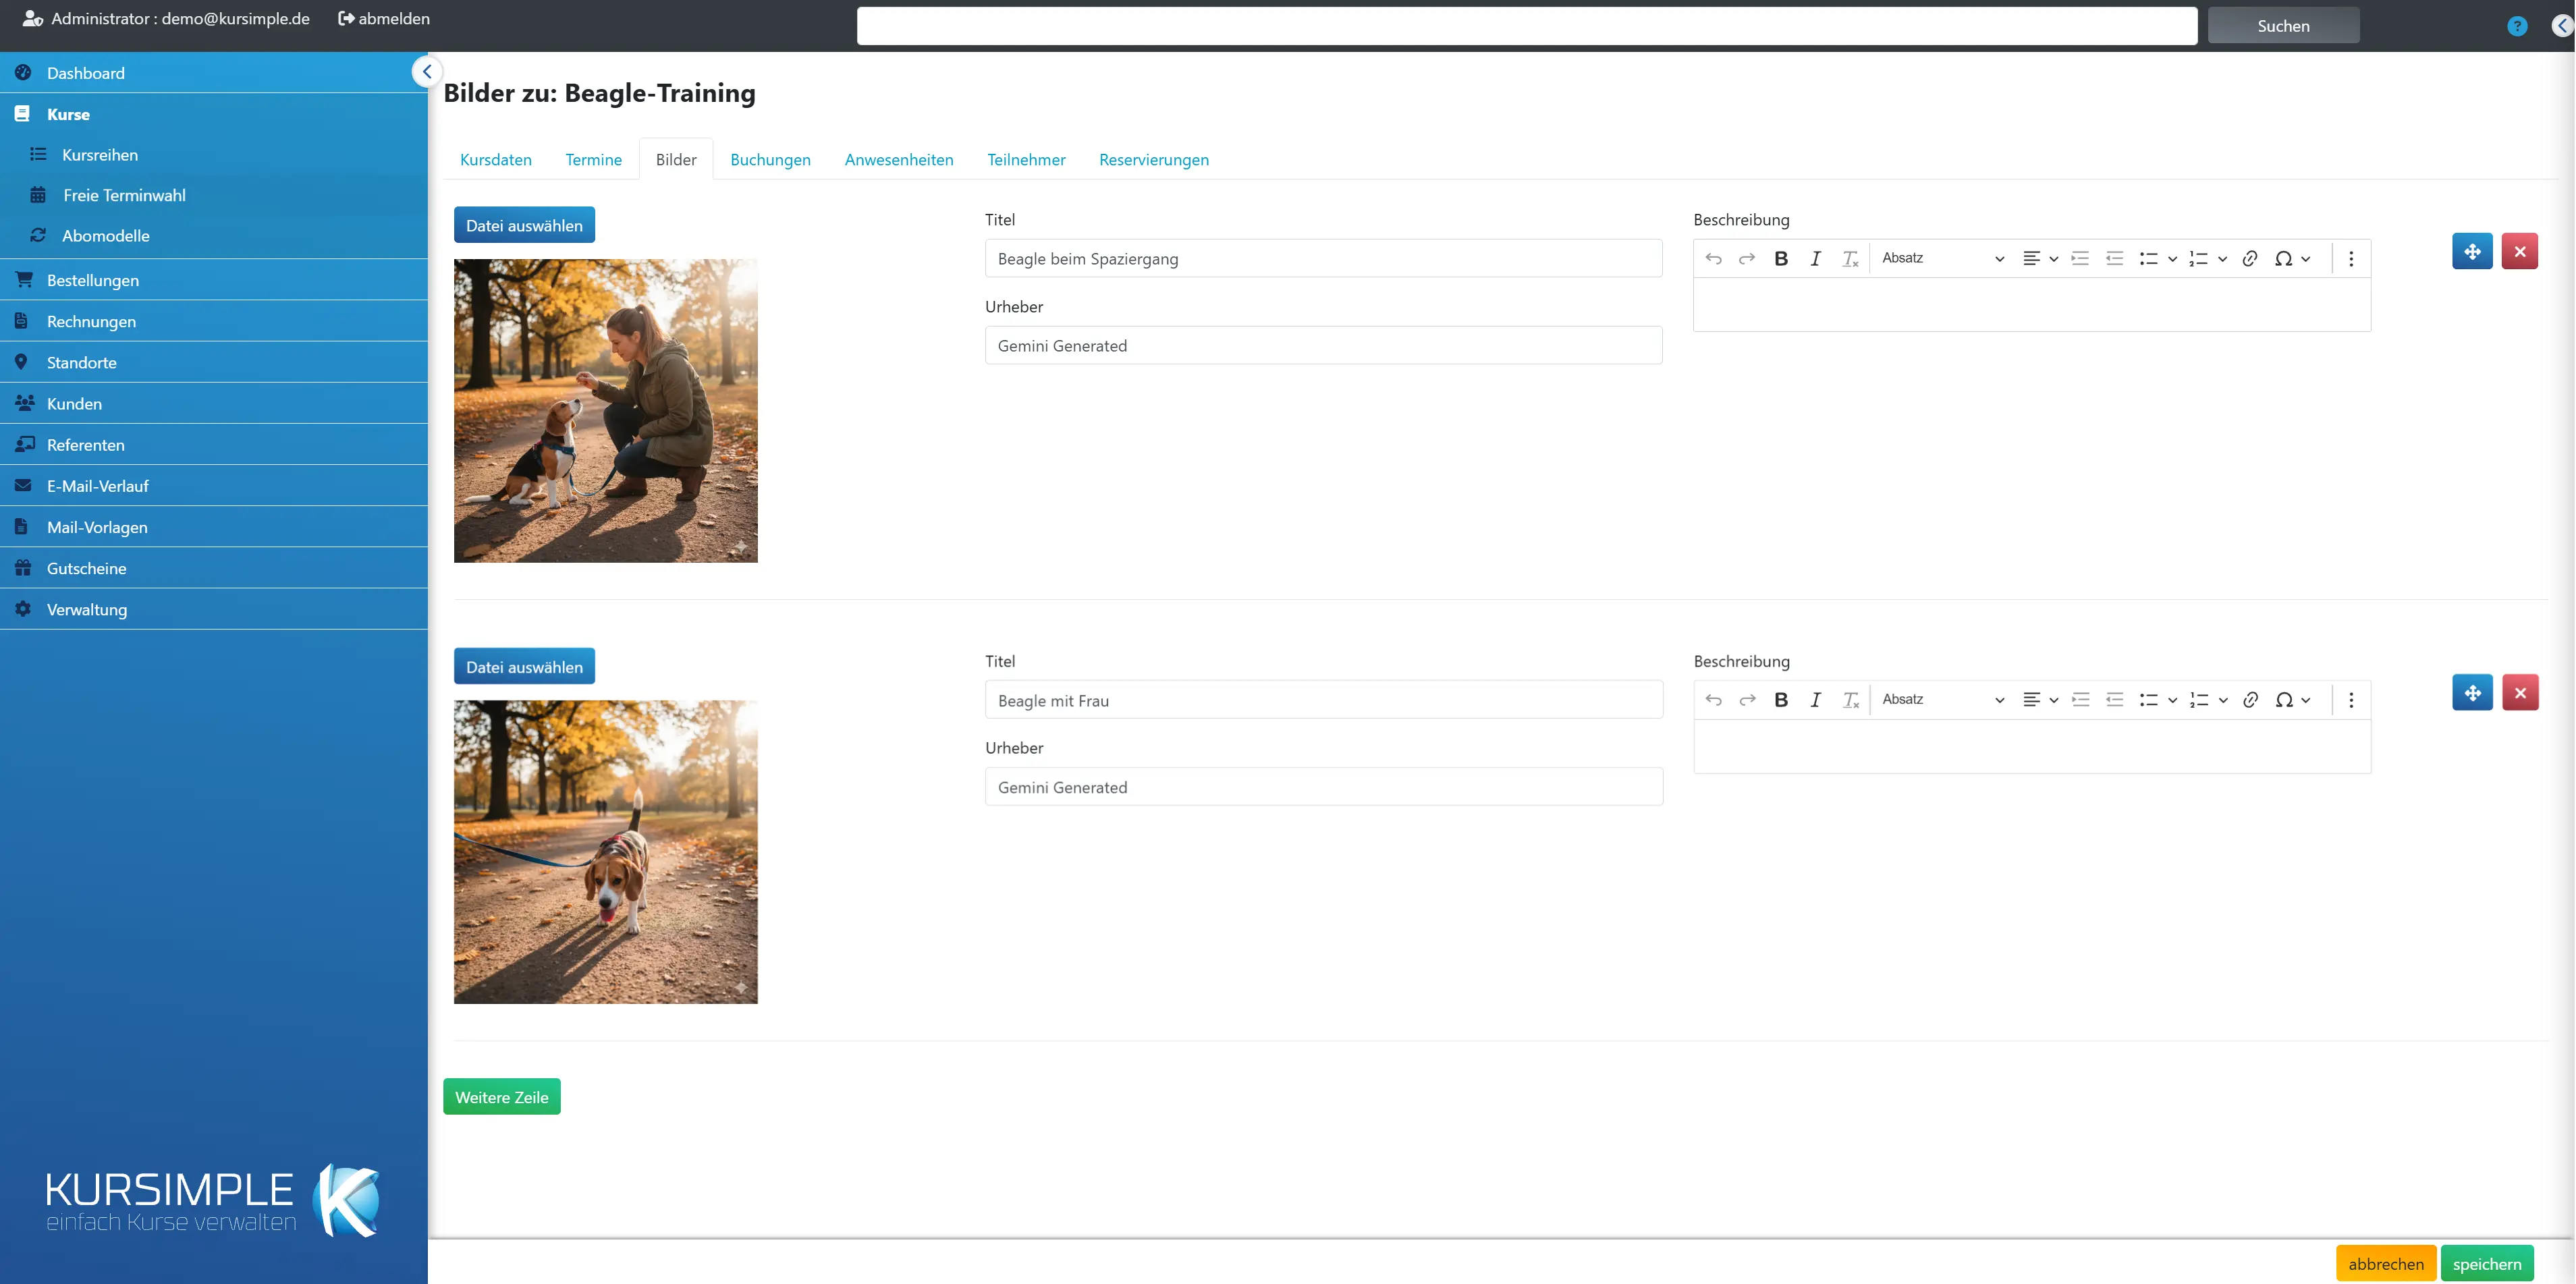
Pictures
Pictures for the course page in the booking portal: upload, crop, label, sort. JPEG, PNG, GIF, WebP and SVG are allowed. The first picture is the preview image in course lists and tiles. Only “save” makes the changes visible.
Use landscape format with sufficient resolution; on upload you crop the picture to the right format. SVG graphics pass through without cropping and are freed of scripts on saving. For each picture you can state title, author and description – the author is legally important for photos by others.
Without a picture the portal shows a placeholder; a good picture noticeably increases bookings.
save
Applies uploaded, changed and removed pictures. Afterwards “Course pictures saved” appears and the portal shows the new state.
If you leave the page without saving, new uploads are lost.
cancel
Back to the course data without saving the picture changes.
Pictures that are already saved are kept.
Title
Short picture title – appears in the gallery and serves as alternative text for people who cannot see the picture.
Describe what can be seen (“Participants doing pottery”), not the course.
Author
Photographer or rights holder of the picture. Is output as picture credit – for purchased or third-party photos usually required by the licence.
For your own photos your name or that of your organisation is enough.
Description
Optional text about the picture, e.g. a caption for the gallery.
Can stay empty.
Downloads of the article
Downloads of the article
Here you turn an article into a download – e.g. a radio play that customers download after paying. Set the type and limit, upload files, track purchases.
After approval, buyers receive an email with a personal link. The files are stored protected and can only be reached via this link (or “My Downloads” in the customer account).
Type and limit
“digital only”: quantity fixed at 1, no place limit. “Bonus”: e.g. CD + download – quantity and places as before, the download is added. “Downloads per file”: how often each file may be downloaded, 0 = unlimited.
The limit applies to purchases from the moment you save; earlier purchases keep theirs. With “no download”, new buyers do not receive a link.
Files
The files that buyers receive. Drag them by the handle into the order you want and give them a clear name. The arrow downloads the file for you – this does not count for the customer.
If you delete a file, buyers can no longer download it. To replace a file, upload the new one first, then delete the old one.
Upload file
Choose a file and click “upload” – several at once is possible. Large files are sent in chunks, and the bar shows the progress. With “as public audio sample”, a short audio file can be played on the article page.
Allowed are audio (MP3, M4A, M4B, AAC, OGG, OPUS, WAV, FLAC), ZIP, PDF, EPUB and images up to 1 GB per file. There is one audio sample per article; a new one replaces the old one.
Purchases
All purchases of this article with status, approval and number of downloads. The buttons work as in the order: approve, send link, reset counter, block.
“Link not yet delivered” means: approved, but the email did not go out – then try “Send link” again.
Customer’s e-learning
Customer’s e-learning
The online trainings of this record with status, progress, exam attempts and best result. Via “Results” you see every answer.
The tab only appears for customers with online trainings. The figures for all participants of a course are in the course under “Learning content” → “Results”.
Customer’s downloads
Customer’s downloads
The download articles of this record with approval and number of downloads. From here you send a new link, reset the counter or block a download.
A new link goes to the email address of the order and invalidates the previous one.
Rather see it than read about it?
In 30 minutes we will show you Kursimple with your own course programme. Or set up your own test system in 30 seconds – both free and without obligation.
Questions? +49 5931 990 99 10 · Mon–Thu 8:30–17:30, Fri 8:00–14:00 (CET)