
Administration, application data & wording
The data of your tenant, the application data with number ranges and invoice settings, the country list and wording, texts and languages. These texts sit right next to the fields inside Kursimple – here they are to read through.
Administration – tenant data
Administration – tenant data
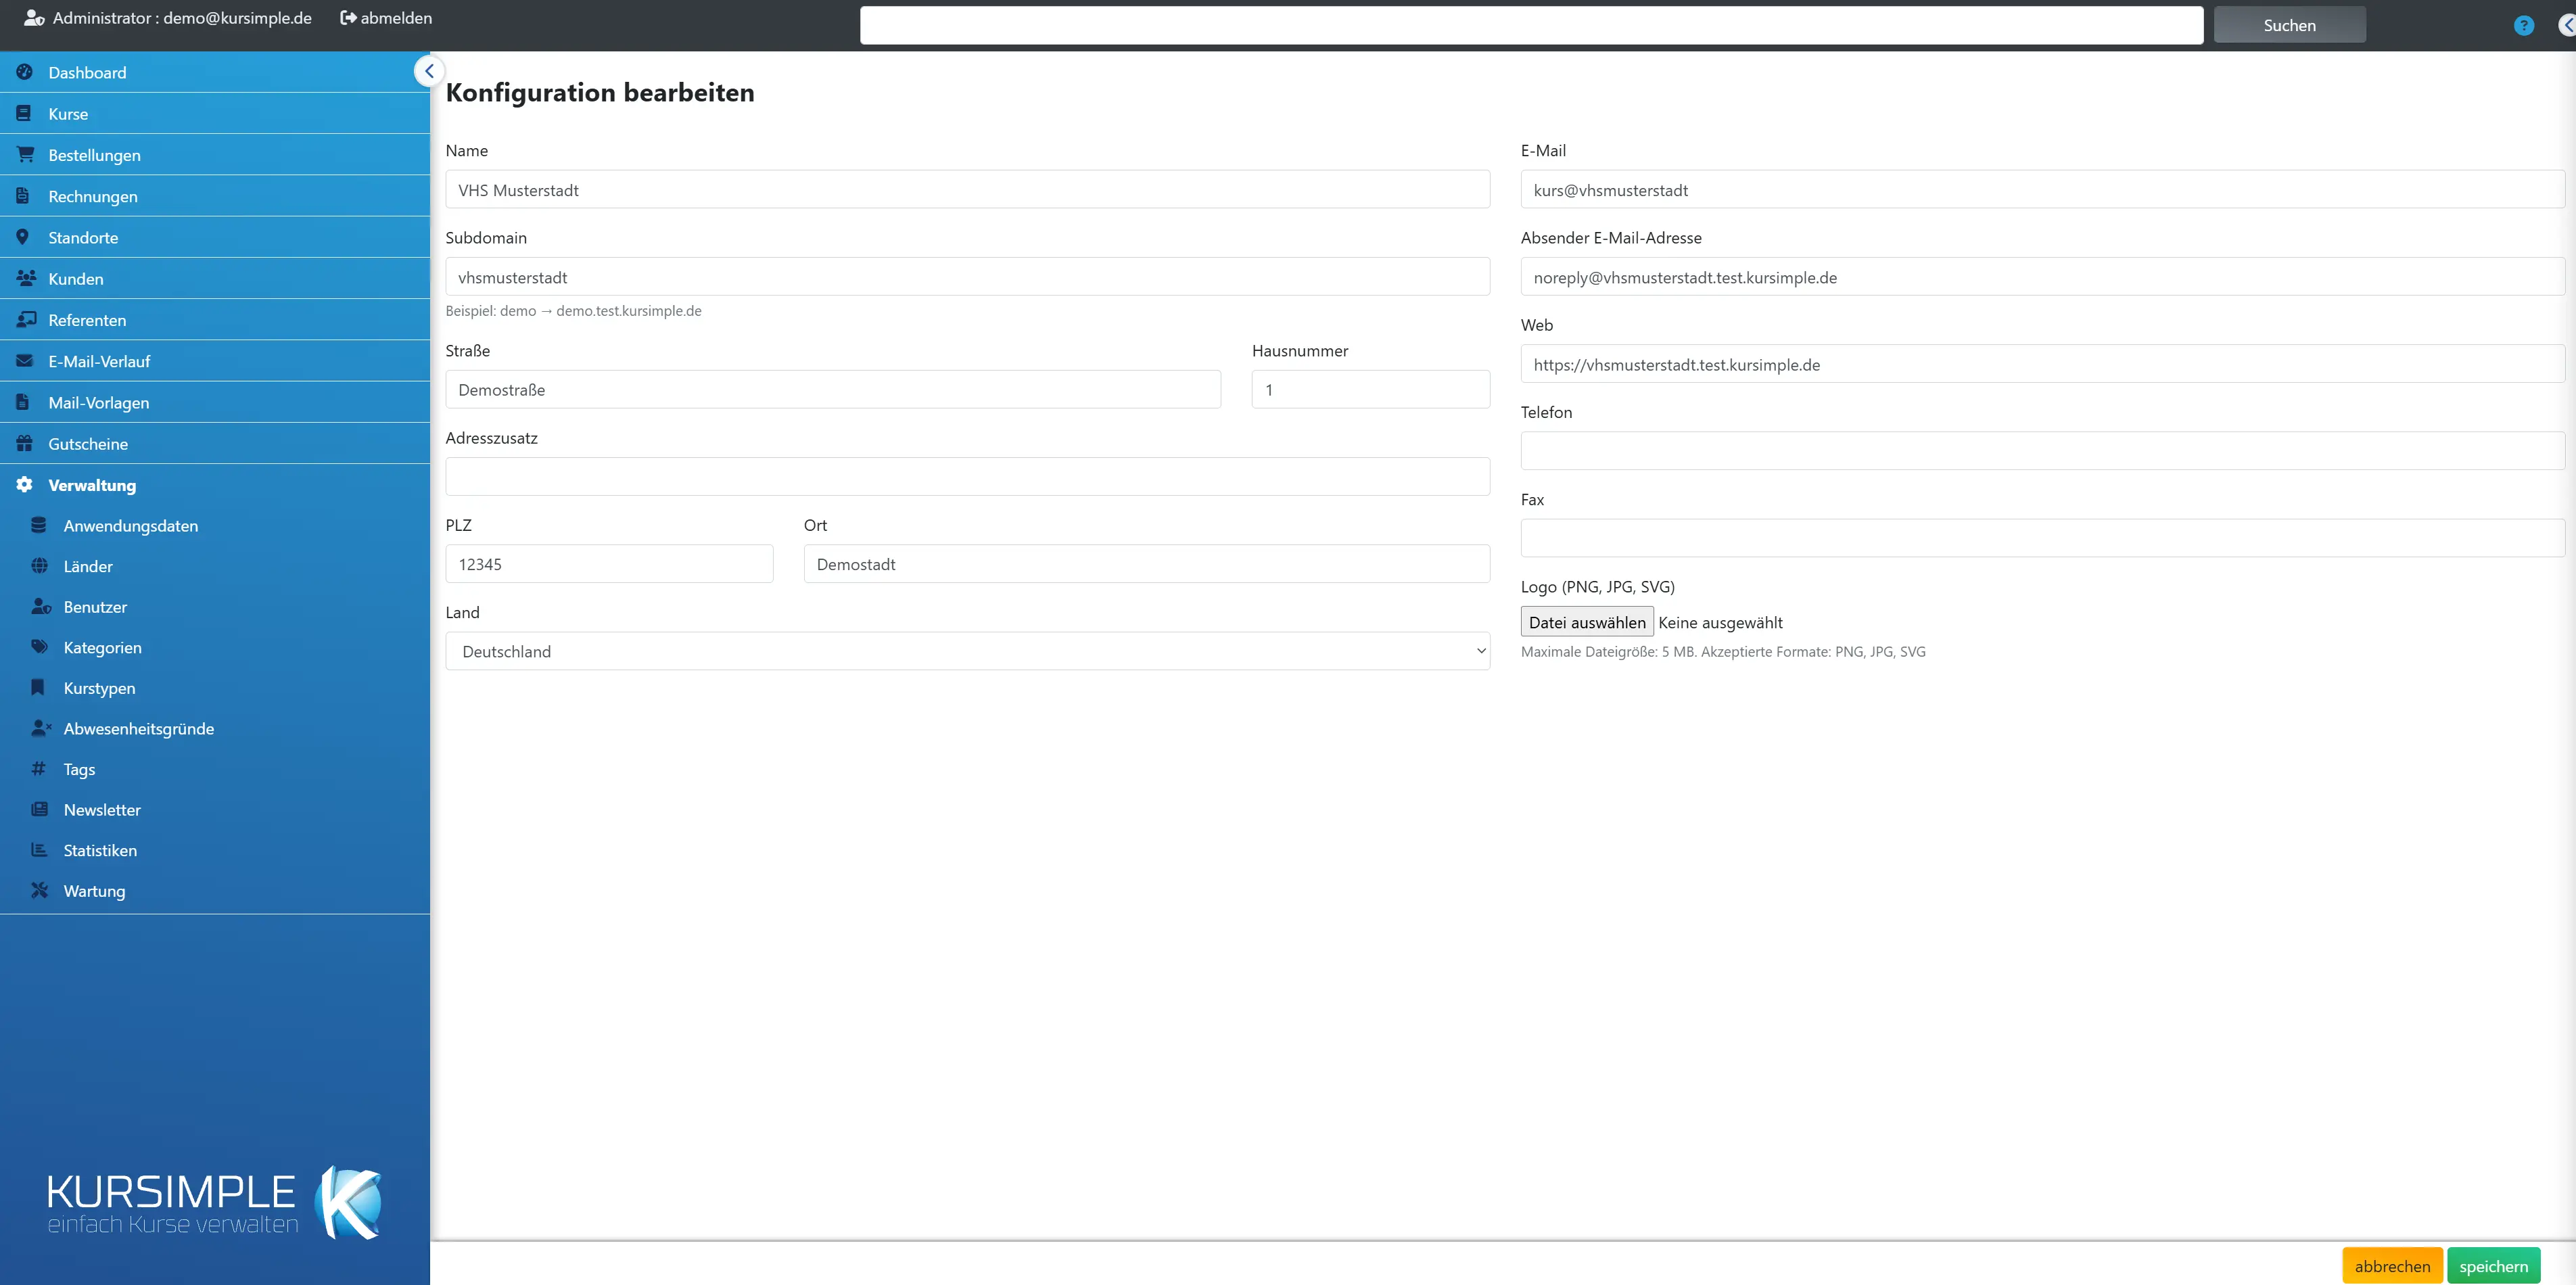
The master data of your provider: name, address, contact details, sender address, website address and logo. These details appear on invoices, in emails and in the booking portal. Subdomain and own domain determine at which address your portal is reachable.
Check this page first when you set up kursimple: a wrong address or email ends up on every invoice and in every confirmation.
Changes to name, subdomain or domain are passed on automatically to the login server so that logging in works at the new address. Change these three fields only in consultation with support.
Name
Required field. The name of your provider as it appears on invoices, in the portal and in the sender of emails – e.g. “Adult Education Centre Musterstadt”.
Also state the legal form (registered association, GmbH) if it must appear on the invoice.
Subdomain
The part before the platform domain at which your portal is reachable: “demo” gives https://demo.kursimple.de. Lowercase letters a–z, digits and hyphens only (not at the start or end); must be unique. Other characters are rejected on saving with a note.
A change changes the address of all links in emails already sent – please only after consultation with support and with an announcement to your customers.
Own domain
Optional: your own address for the portal, e.g. “courses.mycompany.com” – hostname only, without https:// and without a path. The domain must point to the platform via DNS; you arrange the setup with support.
If an own domain is entered, it takes precedence over the subdomain: links in emails and the withdrawal form then use this address.
Street
Street of your business address – appears on invoices and in the withdrawal notice.
House number goes in the field next to it.
House number
House number of the business address.
Part of the provider address on invoices.
Address addition
Optional: building, floor or P.O. box.
Appears as its own line in the address.
Postcode
Postcode of the business address.
Part of the provider address on invoices.
City
City of the business address.
Part of the provider address on invoices.
Country
Country of your provider – for the address format and invoicing.
Which countries your customers may choose you set under Administration → Countries.
Your contact address for customers. It appears in the portal and in legal texts, and internal notifications (e.g. about new withdrawals) go to this address – so it must be read regularly.
Not to be confused with the sender address below.
Sender email address
The address from which all automatic emails (confirmations, invoices, reminders) are sent. It must belong to your domain and be authorised for sending with the mail provider (SPF/DKIM), otherwise emails end up in spam.
Customers' replies go to this address. Use a mailbox that someone reads – not a “noreply” address if you want queries. Whether your mail provider has authorised the address you clarify with support.
Web
Address of your website – appears on invoices and in the portal.
Enter with “https://”.
Phone
Phone number for customers – appears on invoices and in the withdrawal notice.
With area code.
Fax
Fax number, optional – appears on invoices if given.
Can stay empty.
Logo (PNG, JPG, SVG)
Your logo for portal and emails, maximum 5 MB. Landscape format with a transparent background (PNG or SVG) looks best. Invoices use the letterhead from the application data instead.
After uploading and saving, a preview appears. A new logo replaces the old one.
Favicon (PNG, JPG, WebP)
The small icon in the browser tab of your portal. Upload a square picture, maximum 2 MB; other formats are cropped square from the centre.
The picture is brought to 256 × 256 pixels and saved as PNG. Without its own favicon the browser shows the icon of your theme. A new favicon replaces the old one; browsers often show the new icon only after clearing the cache.
save
Applies the tenant data. A changed name, subdomain or domain is passed on to the login server.
If a warning about the login server appears, logging in at the new address may not work – inform support.
cancel
Discards the changes and leads back to the dashboard.
Saved data remains unchanged.
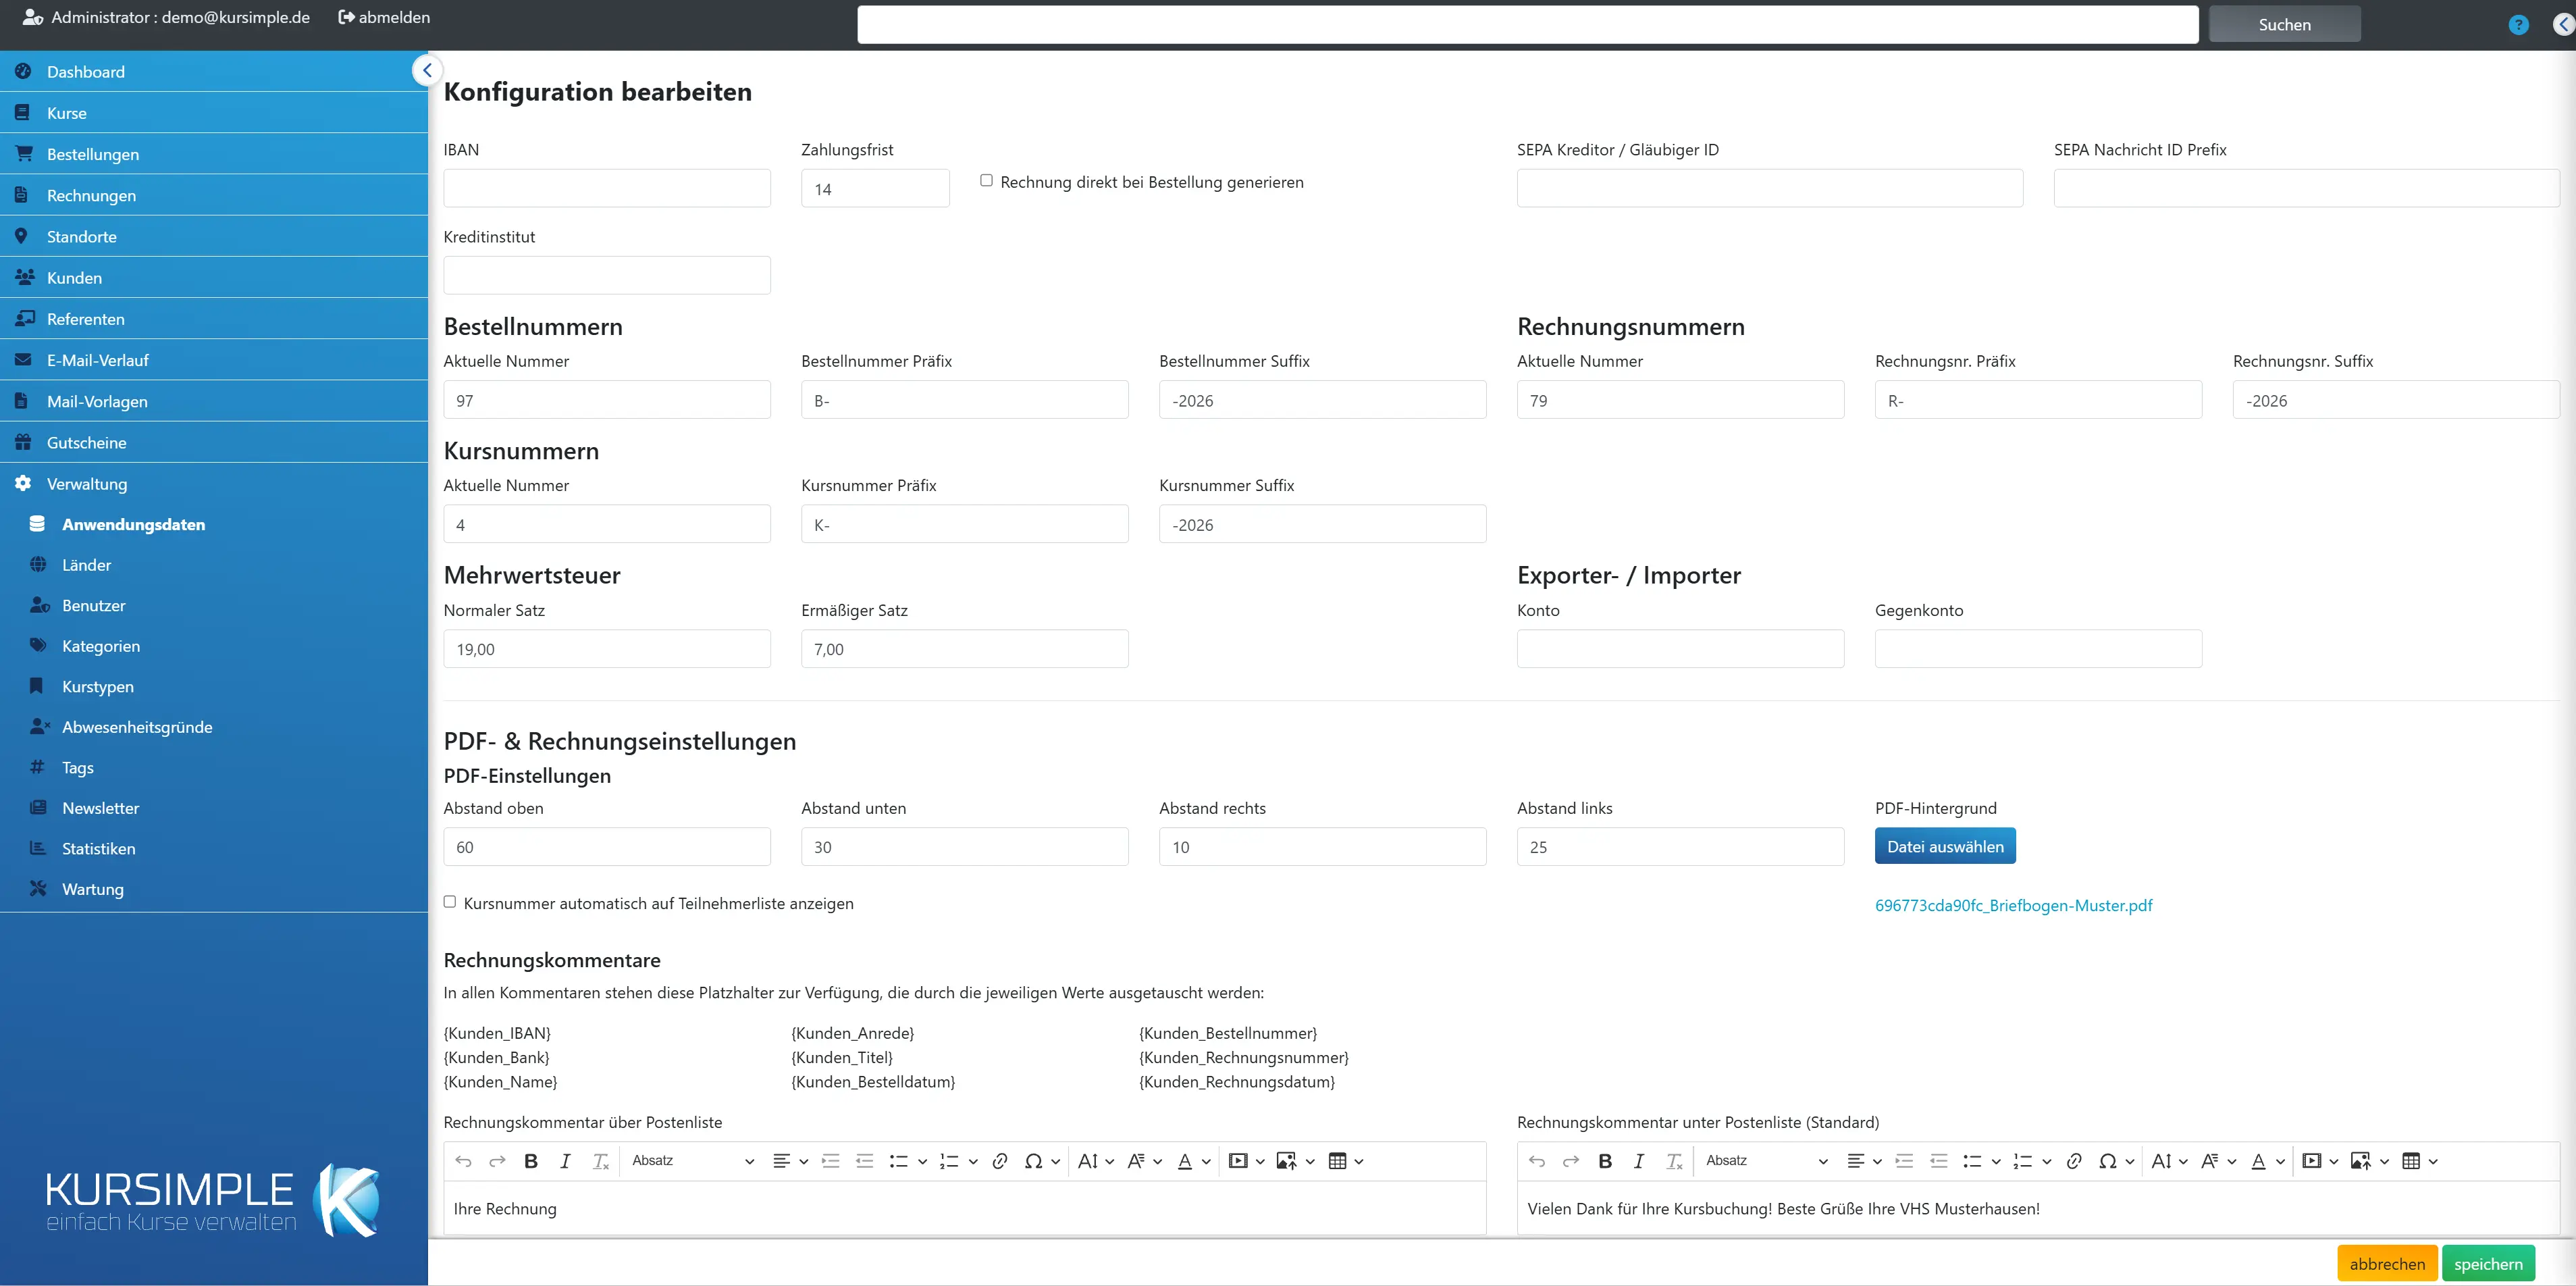
IBAN
IBAN
Your bank details to which customers transfer. Appears on every invoice and is used as your creditor account for SEPA direct debit collection.
Enter without spaces. For direct debits also fill in creditor ID and bank.
Payment period
Days until new invoices fall due (default 14). Invoice date plus period gives the payment term; after that the invoice counts as overdue and can be reminded.
Applies to new invoices; existing ones keep their payment term.
Generate invoice directly on order
With the tick, a finished invoice is created immediately for every order in the portal and sent along to the customer. Without the tick you check orders first and create the invoice by hand.
Recommendation: start without the tick until prices, tax rates and invoice texts have been checked – an invoice sent automatically can only be corrected by cancellation.
Send reminder automatically
With the tick, the system automatically reminds overdue invoices by email using the reminder template further below. Check payment period and reminder text beforehand – and record payments received promptly, otherwise customers who have already paid get reminded.
Without the tick you create reminders by hand in the invoice.
SEPA creditor / creditor ID
Your creditor identification number (from the Bundesbank, format DE98ZZZ…). Required if you collect direct debits – without it no SEPA file can be created.
Apply for the ID at the Deutsche Bundesbank; your bank helps with this.
SEPA message ID prefix
A short text prepended to every SEPA file as an identifier – helps to tell the files apart in online banking.
Optional, e.g. your abbreviation.
Bank
Name of your bank – appears on the invoice next to the IBAN.
E.g. “Sparkasse Musterstadt”.
Order numbers
The number sequence for orders: current (last assigned) number plus prefix and suffix. The next order gets the number plus one.
Example: prefix “B-”, current number 1000 → next order “B-1001”.
Current number (orders)
The last assigned order number. When switching from another system, enter the last old number here so that it continues seamlessly. Never set it lower than existing orders have.
The next order receives this value plus one.
Order number prefix
Text before the number, e.g. “B-” or “2027-”. Optional.
Appears in confirmation and invoice.
Order number suffix
Text after the number, e.g. “/27”. Optional.
Appears in confirmation and invoice.
Invoice numbers
The number sequence for invoices – must be consecutive (tax office). The number is already assigned when a draft is created; deleted drafts leave gaps.
Change the current number only at the turn of the year or when switching systems and only ever upwards – otherwise numbers are assigned twice.
Current number (invoices)
The last assigned invoice number; the next invoice receives it plus one. Change only upwards.
When switching, enter the last number of your old system.
Invoice no. prefix
Text before the number, e.g. “RE-”. Optional.
Changes apply only to new invoices.
Invoice no. suffix
Text after the number, e.g. “/2027”. Optional; adjust at the turn of the year if you carry the year in the number.
Changes apply only to new invoices.
Course numbers
Number sequence for courses: when creating a course the next number is suggested; it can be overwritten in the course.
Handy for programme brochures with their own numbering.
Current number (courses)
The last assigned course number; the next course gets it plus one.
Can be adjusted at any time.
Course number prefix
Text before the course number, e.g. “K-”. Optional.
Appears in the portal with the course.
Course number suffix
Text after the course number. Optional.
Appears in the portal with the course.
VAT
The two tax rates that are available for selection for courses and items. All prices in kursimple are gross prices; the tax is shown on the invoice.
If your services are tax-exempt (many educational offerings), you enter 0 for the reduced rate and choose it in the courses. If in doubt, ask the tax adviser.
Standard rate
The standard tax rate in percent, e.g. 19 – default for new courses.
Enter without the % sign.
Reduced rate
The second rate in percent, e.g. 7 – or 0 for tax-exempt educational services. Chosen per course in the “VAT” field.
Enter without the % sign.
Tax details for the e-invoice
Mandatory details of an e-invoice according to ZUGFeRD: tax number or VAT ID and, if you charge items at 0 %, the reason for the tax exemption.
The details appear in the XML of every e-invoice. Without them the e-invoice (tenant variable ZUGFERD) cannot be switched on – the check then names every missing detail.
Tax number
The tax number of your tax office, e.g. 12/345/67890. Tax number or VAT ID is required for the e-invoice.
9 to 13 digits are allowed, separated by “/” or spaces. If you have neither a VAT ID nor a register entry, it also serves as the provider's identifier on the e-invoice.
VAT ID
Your VAT identification number with country code, e.g. DE123456789. Spaces and lowercase are cleaned up on saving.
Small businesses and many tax-exempt education providers do not have one – then the tax number is enough.
Register court and register number
Only if you are entered in the commercial or association register, e.g. District Court Bremen, VR 1234. Appears on the e-invoice as the register entry.
Both fields are optional.
Reason for tax exemption
Why items with 0 % VAT are tax-exempt, e.g. “§ 4 No. 21 UStG” for educational services. Required for the e-invoice as soon as you charge items at 0 %.
The text appears in the e-invoice for every tax-exempt amount. If none of the suggestions fits (e.g. under Austrian law), choose “Own text” and enter the reason next to it. If in doubt, clarify the right reason with your tax adviser.
Exporter / importer
Accounts for the DATEV export: revenue account and offset account are written into every booking line. You get the values from your bookkeeping.
Relevant only if DATEV is switched on for your installation.
Account
The revenue account from your chart of accounts (e.g. SKR03/SKR04) to which course revenue is booked.
Agree with bookkeeping.
Offset account
The offset account (usually collective debtor account) for the DATEV export.
Agree with bookkeeping.
PDF & invoice settings
What invoices and lists look like as PDF: page margins, your letterhead as a background and the texts above and below the item list.
Margins and letterhead belong together: the top margin keeps room for your letterhead, the bottom one for the footer. After changes open an invoice as a PDF and check it.
Margin top
Top page margin in millimetres – this much room is left for the letterhead of your stationery.
Typically 40 to 60 mm for stationery with a header.
Margin bottom
Bottom page margin in millimetres – room for the footer of the stationery (bank details, legal notice).
Typically 20 to 40 mm.
Margin right
Right page margin in millimetres.
For alignment with the stationery.
Margin left
Left page margin in millimetres.
For alignment with the stationery, e.g. for window envelopes.
Show course number automatically on participant list
With the tick, the course number appears in the header of every participant list – handy if lists must be unambiguously assigned to a course (funding).
Without the tick only the course title.
PDF background
Your stationery as a one-page PDF file (A4) that is placed behind every invoice and list page. Upload, save, then check an invoice as a PDF. “Delete image” removes the background.
Use PDF version 1.4 (Acrobat 5) at most – the system cannot embed newer versions; a note then appears. In your PDF program choose the compatibility accordingly when saving.
Invoice comments
The default texts above and below the item list of every invoice. A course can have its own texts (course data → invoice comments) that replace these here.
Placeholders such as {Rechnungs_Nummer} or {Faelligkeitsdatum} are replaced when the PDF is generated; the list is in the expandable box above.
Invoice comment above item list
The introductory text of the invoice, e.g. “Thank you for your booking. We charge you for the following services:”.
Keep it short – space on the first page is limited.
Invoice comment below item list (default)
The closing text for payment by bank transfer, cash or PayPal – typically: payment term, bank details, thanks. E.g. “Please transfer the amount by {Faelligkeitsdatum} to the account named below.”
For direct debit there is the separate field below.
Invoice comment below item list (direct debit)
The closing text for direct debit invoices. This is where the legally required pre-notification of the collection belongs, e.g. “We will collect the amount on {Faelligkeitsdatum} from your account {Kunden_IBAN_kodiert}.”
{Kunden_IBAN_kodiert} shows the IBAN partly masked.
Email text templates
Subject and text of the automatic emails: invoice, invoice for direct debit, order confirmation and reminder. Placeholders are filled with the customer's data on sending; the list is in the expandable box below the field.
Write as you would word a letter: salutation with placeholder, a sentence about the occasion, what the customer should do, closing greeting. Test the templates with an order of your own.
Invoice email subject
Subject of the email with which invoices are sent, e.g. “Your invoice from Musterstadt-Kurse”. The invoice number is appended if the variable MAILBETREFF_MIT_NUMMER is switched on.
Placeholders are allowed.
Invoice email message
Text of the invoice email; the invoice is attached as a PDF. State amount, payment term and bank details so that the customer knows what to do even without opening the attachment.
Placeholders from the invoice context, e.g. {Rechnungs_Betrag} and {Faelligkeitsdatum}.
SEPA invoice email subject
Subject for invoices with payment method direct debit – used instead of the normal subject.
E.g. “Your invoice – the amount will be debited”.
SEPA invoice email message
Text of the invoice email for direct debit. Announce the collection with date and masked IBAN – this is the pre-notification you are obliged to give.
Placeholders from the invoice context.
Credit note email subject
Subject of the email with which a credit note is sent (“Close and send credit note”). If empty it stays “Gutschrift {Rechnungs_Nummer}”.
{Rechnungs_Nummer} here is the number of the credit note. Placeholders from the invoice context.
Credit note email message
Text of the email for a credit note. If empty a default text applies: credit note with number, amount and order number, “You do not have to pay anything.”, greeting with your name.
{Gesamt_Betrag} is the credited amount, {Rechnungs_Nummer} the number of the credit note. The credit note PDF is attached automatically.
Order confirmation email subject
Subject of the confirmation after an order, e.g. “Your booking {Bestell_Nummer} with Musterstadt-Kurse”.
Placeholders from the order context.
Order confirmation email message
Text of the confirmation email; the booked items are appended below. State what happens next (invoice follows, course start, contact person) and insert {Widerruf_Link} and {Widerrufsbelehrung_Link} so that the withdrawal notice goes along.
This email is sent automatically for orders in the portal and from the order via “Send confirmation”.
Reminder template
The default text for reminders (PDF and email). Is pre-filled when creating a reminder and can be adjusted there case by case. Placeholders such as {Mahnungs_Stufe}, {Offener_Betrag} and {Zahlungsfrist} are filled per reminder.
Friendly but clear: invoice number, open amount, new deadline, consequences of non-payment.
Email / newsletter
The mandatory text under every newsletter with unsubscribe link and the page to which people who unsubscribe are then directed.
Affects all bulk emails with the tick “Email is newsletter”.
Newsletter clause
Text appended to the end of every newsletter email. Must contain the placeholder [link] – it becomes the unsubscribe link. E.g. “Do not want any more newsletters? Unsubscribe here: [link]”.
Without an unsubscribe option, sending a newsletter is not allowed.
Newsletter unsubscribe redirect
Address (with https://) to which customers are directed after clicking the unsubscribe link – e.g. a page of your website. Empty = Kursimple confirmation “You have unsubscribed from the newsletter”.
The unsubscription is effective in any case.
If your domain runs via Kursimple, use https://your-domain/newsletter-abgemeldet – that is the Kursimple confirmation with your name. A page that does not exist under your domain otherwise leads to an error page.
Withdrawal email text templates
The four emails around withdrawals: acknowledgement of receipt to the customer, notification to you, approval and rejection. Placeholders of the withdrawal context are in the box above.
{Widerruf_Ablehnungsgrund} and {Widerruf_Mitarbeiter_Notiz} are filled from the dialog on rejection.
Acknowledgement of receipt – subject
Subject of the email the customer receives immediately after submitting the withdrawal form.
E.g. “Your withdrawal has been received”.
Acknowledgement of receipt – message
Text of the acknowledgement of receipt. State date and time of receipt ({Widerruf_Datum_Uhrzeit}) – this proves to the customer that the declaration was made in time – and what happens next.
Do not announce a decision yet; that comes with approval or rejection.
Provider notification – subject
Subject of the internal email to your contact address when a new withdrawal arrives. Empty = “New withdrawal received”.
E.g. “New withdrawal for order {Bestell_Nummer}”.
Provider notification – message
Text of the internal notification – with order number and the customer's reasons so that you can decide directly in Orders → Withdrawal. Empty = default text with course, order number and time of receipt.
Goes to the email address from the tenant data. First name, last name and email of the sender are always included: if your text does not mention both itself ({Kunden_Name} and {Kunden_Email}), Kursimple appends a block “Sender of the withdrawal”. With “Reply” you write directly to the sender.
Approval – subject
Subject of the email to the customer when you grant a withdrawal.
E.g. “Your withdrawal has been accepted”.
Approval – message
Text of the approval email. Explain that the booking is cancelled, that the cancellation invoice comes separately and how and when a refund takes place.
Is sent when you click “Grant”.
Rejection – subject
Subject of the email to the customer when you reject a withdrawal.
E.g. “Regarding your withdrawal”.
Rejection – message
Text of the rejection email. Insert {Widerruf_Ablehnungsgrund} – it is replaced by the fully worded legal reasoning from the dialog – and {Widerruf_Mitarbeiter_Notiz} for your personal remark.
Is sent when you click “Reject”.
Auto-delete settings
After what time new persons get a deletion date: when creating customers, participants and speakers, the date “today plus period” is entered as the deletion date. A regular run cleans up persons whose date has been reached – data minimisation under GDPR.
Extend the deletion date in the record as long as someone actively books with you. For speakers the period can stay empty, then no date is set.
Auto-delete period for customers
Period (half a year to three years) that is pre-filled as the deletion date for new customers.
Applies to customers created from now on.
Auto-delete period for participants
Period that is pre-filled as the deletion date for new participants (e.g. children).
Applies to persons created from now on.
Auto-delete period for speakers
Period for new speakers; leave empty if speaker data should not automatically be due for deletion.
Applies to speakers created from now on.
Maintenance mode
Set the tick and save: visitors to your booking portal see a notice page and cannot book; the administration remains reachable. To end it, remove the tick and save.
Useful for larger price or programme changes so that nobody books at old terms in between.
save
Applies all settings of this page at once (“Application data saved”). Number sequences take effect on the next assignment, texts on the next email or invoice.
After changes to the letterhead or invoice texts, check an invoice as a PDF.
cancel
Discards all unsaved changes.
Back without saving.
Countries
Countries
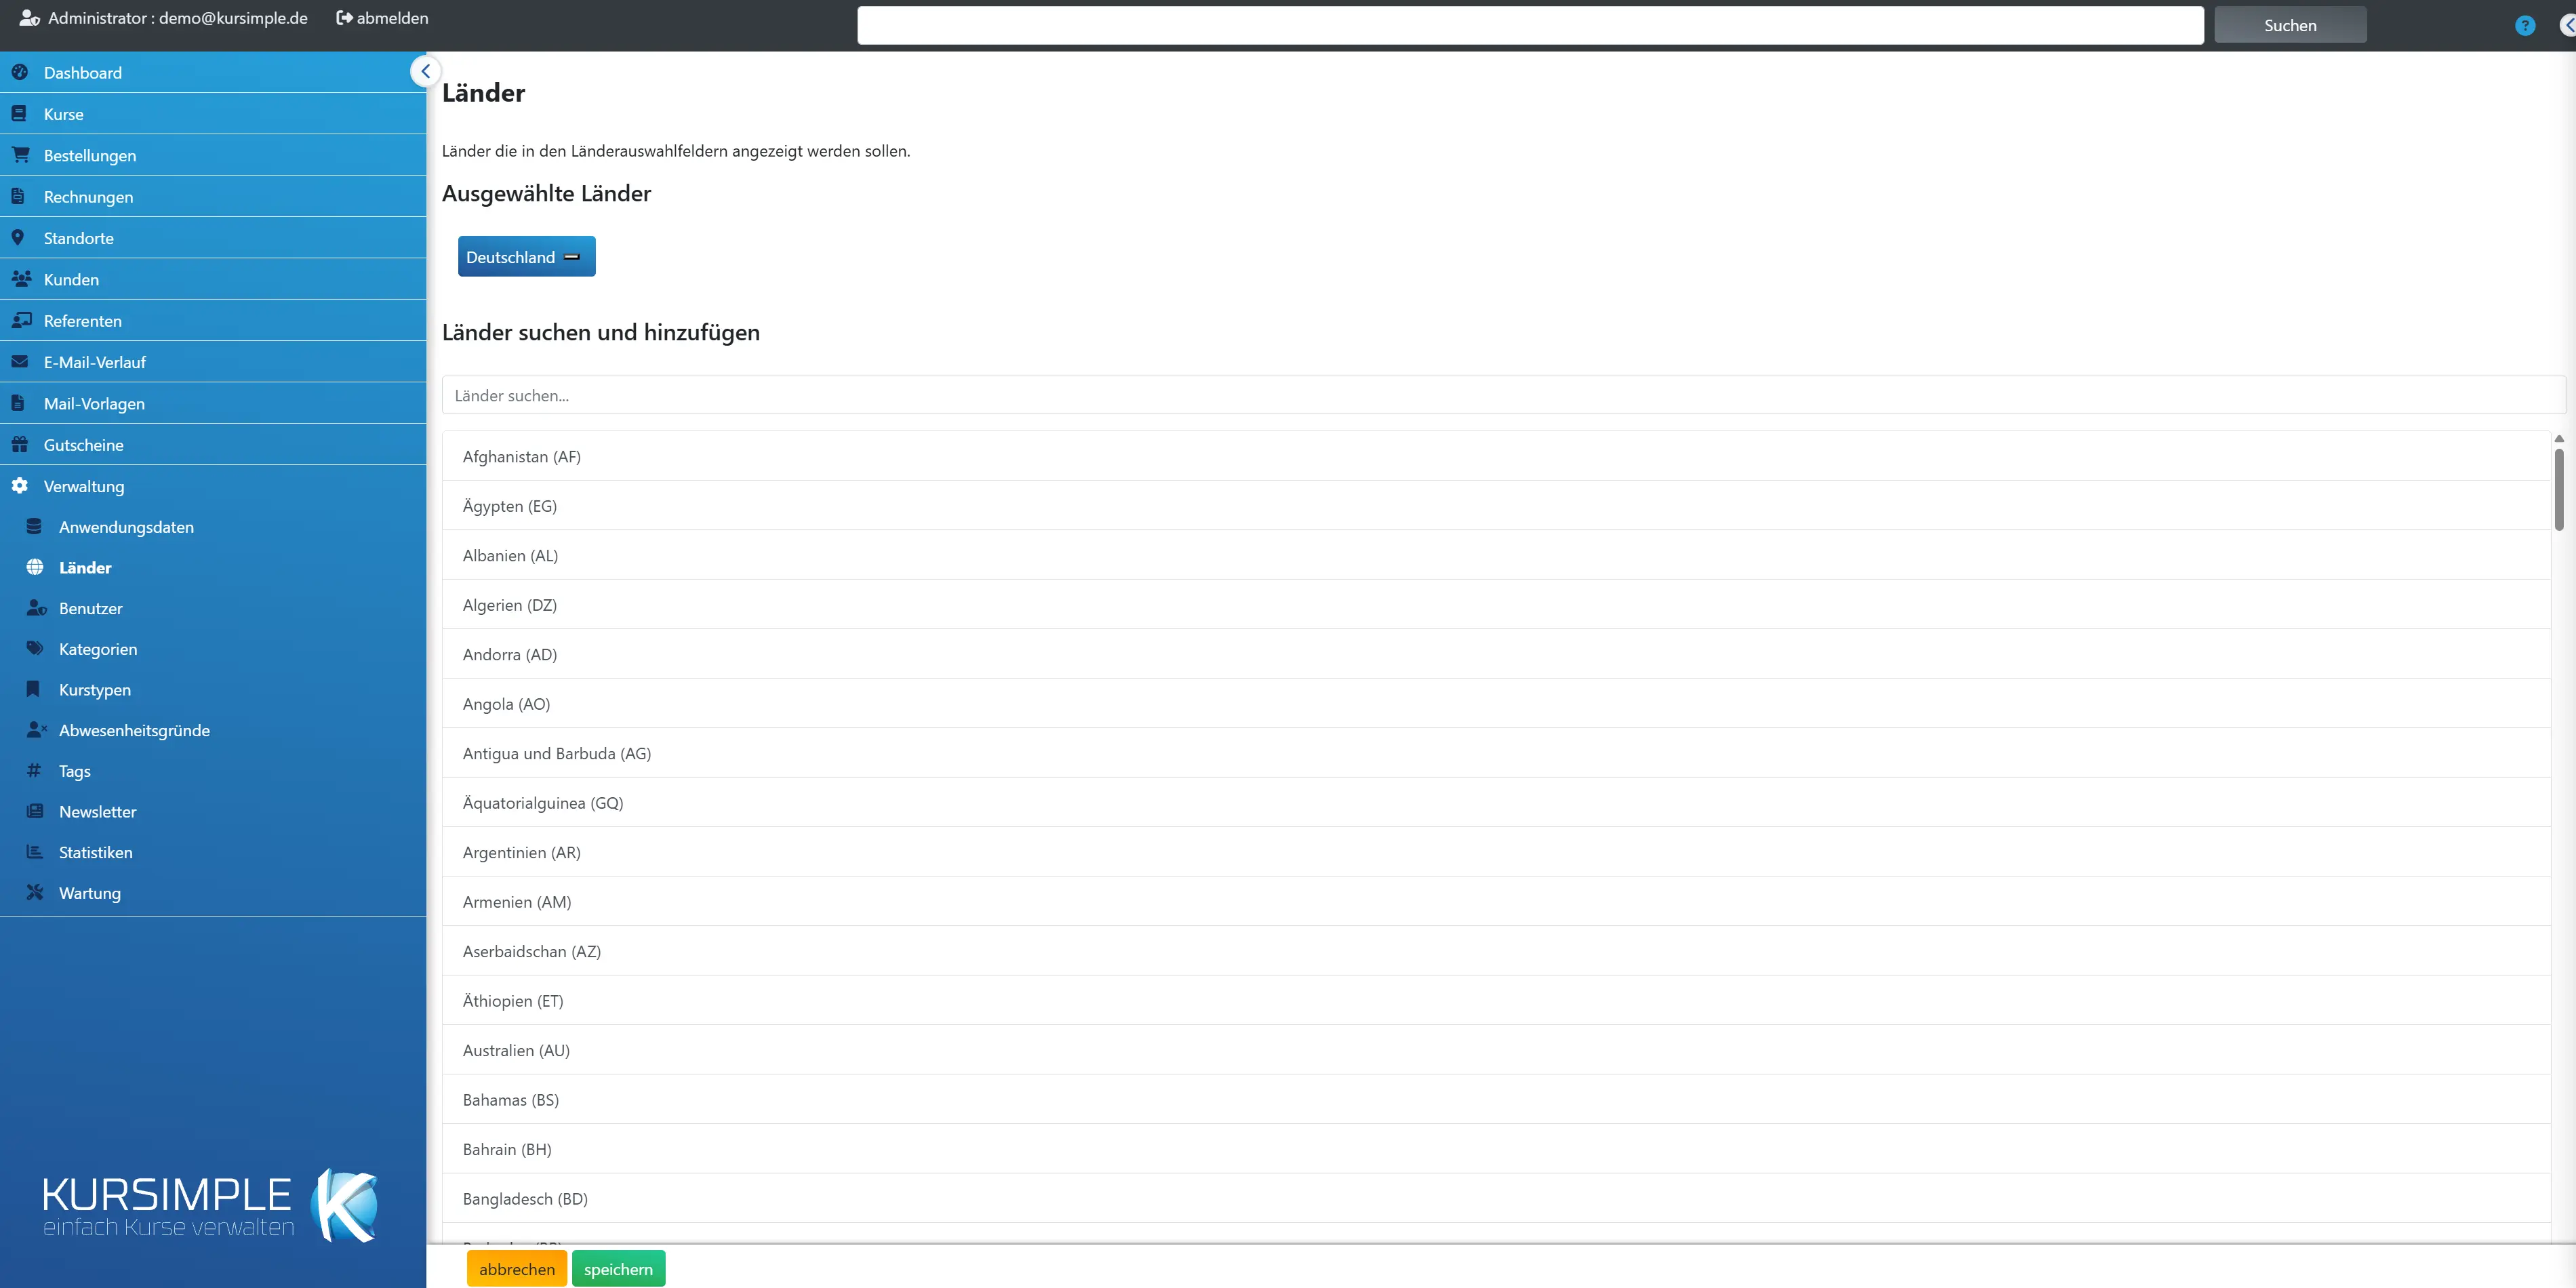
Which countries your customers can choose as the address country when registering and ordering. Choose the countries you issue invoices to – usually Germany and the neighbouring countries.
At the top are the enabled countries (X removes one), below you search for more. With “save” the selection takes effect immediately in the portal. At least one country must remain selected.
Selected countries
The currently enabled countries. A click on the X removes a country from the selection (only “save” makes it effective).
Do not remove a country in which existing customers live – they could then no longer edit their address.
Search and add countries
Type the country name and click the country in the list – it appears at the top among the selected countries.
Countries already chosen are marked.
save
Applies the country selection (“Countries saved”) – takes effect immediately in registration and checkout.
Afterwards back to the dashboard.
cancel
Discards the changes and leads back to the dashboard.
The saved selection remains.
Participation and cancellation terms
Participation and cancellation terms
Your terms for participation and cancellation. At checkout customers must agree to them; every order then carries the time and version of the agreement.
As long as nothing is entered here, checkout shows no tick and /agb shows the previous page. The order confirmation names the version that was agreed to.
Text
The full text of the terms, as customers read it under /agb.
Saving with changed text creates a new version; unchanged text remains the previous version.
Versions
All previous versions with date, checksum and the number of orders that agreed to them.
Versions are never changed or deleted – so for every order it can be proven which text was agreed to.
Terms
Terms
Define what important words are called in your administration, for example “Trainer” instead of “Instructor”.
Every term has a singular, a plural and a grammatical gender. From these the system builds menus, headings and labels in the correct form, in languages that need it also with an article (German: “der Trainer”, “die Trainerin”).
The change applies only to your tenant. “Restore default” brings back the original word.
Singular
The word for exactly one, for example “Trainer”.
The singular appears, for example, in form headings such as “Edit Trainer”.
Plural
The word for several, for example “Trainers”.
The plural appears in the menu and in lists. Write it exactly as it should appear there.
Singular after “with the/the (accusative)”
The singular as it reads after “mit dem” or “den” in German – often different, for example “Referent” and “mit dem Referenten”.
Some German words change their ending in headings and buttons. Example: “Neuen Referenten erstellen” – the singular is “Referent”, here it reads “Referenten”. Enter this form. For words like “Trainerin” or “Kurs” nothing changes; then leave the field empty or write the same word. In English there is no such form – leave the field empty or enter the same word as the singular.
Grammatical gender
The article of the word: der, die or das.
Articles such as “der”, “die”, “das” and “ein”, “eine” in German sentences depend on it. Choose the article of your singular. English does not use it.
Languages
Define in which languages your administration and your booking portal are displayed.
Tick all languages you want to offer and choose the default language. As soon as you offer more than one language, a switcher appears at the top. Each person chooses their language there; the system remembers it.
Where there is no text in a language yet, the system shows the German one. You maintain the texts of the other languages via the language selector at the top of “Terms” and “All Texts”. Languages written from right to left, such as Arabic, are not supported.
All Texts
All Texts
All labels that you can change for your tenant, with search and filter.
On the left you see the default text, on the right your own. If a word in curly braces appears there, such as {kurs_plural}, it is a placeholder: the system inserts the matching word from your terms there, here the plural of “Course”. You can leave them as they are or write the word yourself. Placeholders that appear in the default text must be kept.
You save each row individually; the feedback appears directly below the row. “Restore default” asks for confirmation and discards your text; afterwards the original applies again. With many texts, you page through at the bottom.
Translate texts
Have missing texts translated automatically and approve them afterwards.
“Translate missing texts” sends the system texts and your terms to an AI service that translates them into the chosen language. Customer data is never sent. Beforehand the system asks how many texts are involved.
The translations apply immediately but are marked “AI – unchecked”. Read them through and approve them individually or all together. If you change a text, it counts as checked. The translation uses your terms throughout, for example “Trainer” instead of “Instructor”. Texts where something is wrong, for example a changed placeholder word, are discarded and listed under “Last run”.
Rather see it than read about it?
In 30 minutes we will show you Kursimple with your own course programme. Or set up your own test system in 30 seconds – both free and without obligation.
Questions? +49 5931 990 99 10 · Mon–Thu 8:30–17:30, Fri 8:00–14:00 (CET)